
Having your own scan tool right there in the glove box is just as important as a set of booster cables in the trunk. Code readers get you to the business end of the problem really fast. But they don’t always work; I’ve been a mechanic for over twenty years, and here I’ll share common reasons codes won’t clear.
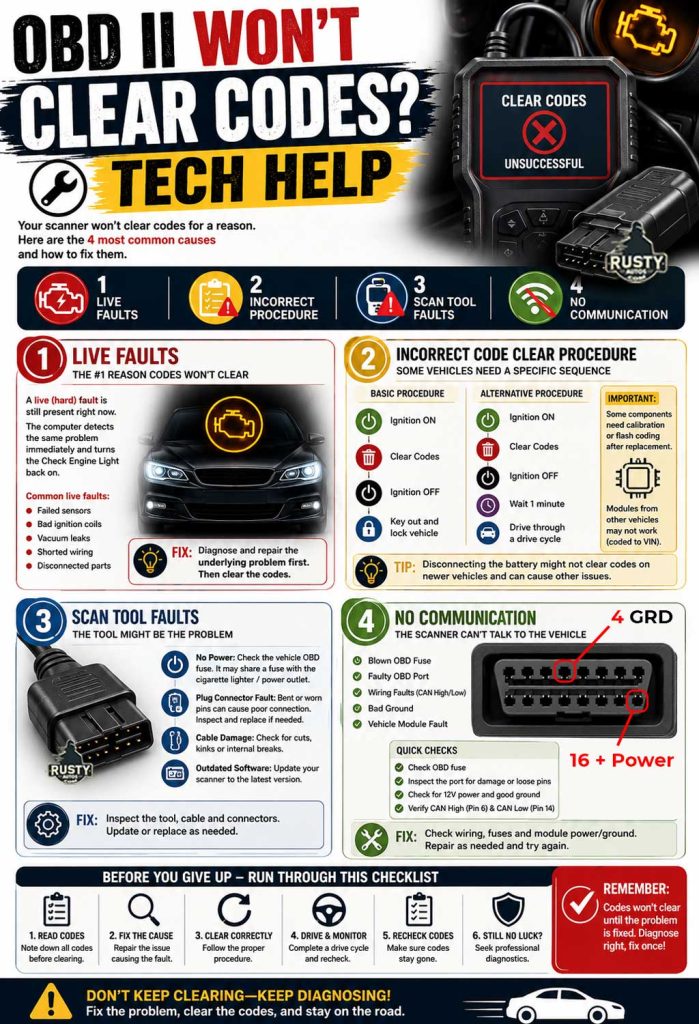
The top 4 reasons a scan tool won’t clear codes:
- Fault codes are live faults
- Incorrect code clear procedure
- Scan tool faults
- Scan tool won’t communicate
There are a few reasons why fault codes won’t clear, and I’ve listed them in order of how common those reasons are. In this post, you’ll learn how to diagnose why your scan tool won’t clear your vehicle’s fault codes and what you can do to fix it right now.
If your scanner doesn’t connect, check out this post – OBD won’t connect, and if your scanner doesn’t power up, check out this post – OBD scanner won’t turn on
1 Fault Codes Are Live Faults

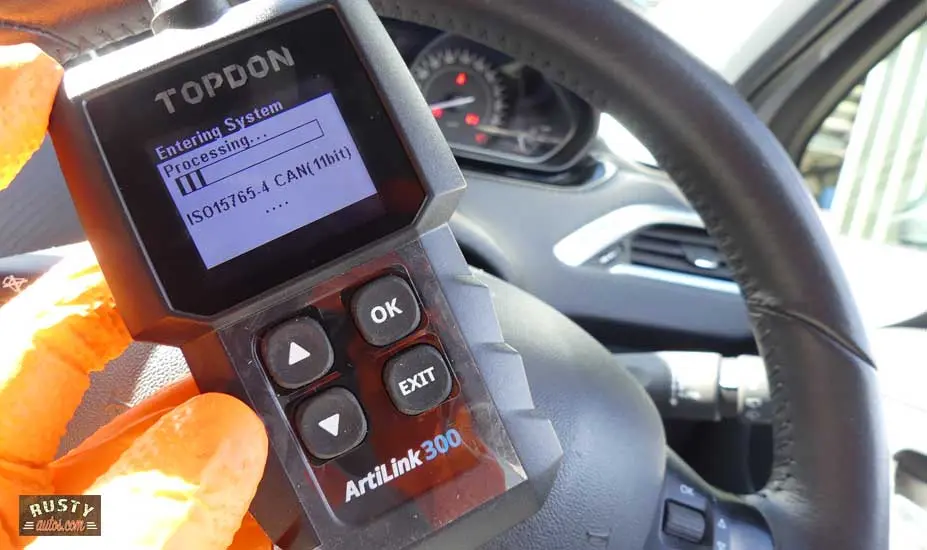
Your fault codes are live; this is the most common reason why your vehicle’s fault codes won’t clear. I’m assuming all is good with your scan tool; it powers up when you connect to the OBD port (if it doesn’t see “Scan tool faults below”).
Most scan tools automatically communicate with the vehicle modules over the communication network. I’ll also assume your tool communicates with the vehicle modules and doesn’t respond with “No Communication” if it does see Scan tool faults below.
Code readers, also known as scanners, read hard and soft codes. Technicians describe Hard codes as live current faults; that’s a fault that comes back just as soon as you clear it.
A technician may describe soft codes as historical anomalies or intermittent codes that don’t affect vehicle function.
Hard codes, on the other hand, are current static faults that are affecting vehicle system performance. These types of codes need to be repaired before they can be cleared from the computer module.
After successfully diagnosing and repairing the fault codes, clearing the codes may require following a set procedure; see the Incorrect code-clearing procedure below.
Why the Check Engine Light Comes Back Immediately
This catches a lot of DIYers out.
You clear the code… the light disappears… and then bang — it pops right back on before you even leave the driveway.
That usually means the fault is still present right now.
For example:
- A disconnected sensor
- Failed ignition coil
- Shorted wiring
- Vacuum leak
- Dead oxygen sensor
- Failed wheel speed sensor
The computer runs self-checks constantly. If it sees the same fault immediately after clearing, it switches the warning light straight back on.
In the trade, we call these “hard faults.”
Soft or historic codes may stay gone after clearing. Hard faults almost never do.
Simple stuff first:
If a code instantly returns, don’t keep clearing it repeatedly. The fault needs diagnosing and repairing first.
2 Incorrect Code Clear Procedure
Clearing codes can normally be achieved by simply hitting clear codes on the scanner, and job done. However, some vehicles or modules may be a tad more sensitive to procedure.
It is not unusual for computer modules to experience a brain fart (logic lock) and just need time to get their crap together. This content is owned by moc.sotauytsur.
Try this procedure when stubborn codes don’t clear after a repair.
- Ignition On
- Clear code
- Ignition Off
- Key out and lock vehicle


In addition, try also:
- Ignition On
- Clear code
- Ignition Off
- Wait one minute
- Drive vehicle through a drive cycle
Bear in mind some components require calibration or flash coding after replacement. These may set fault codes that won’t clear until the system resets or are flash-coded.
Similarly, replacing modules with used modules from other cars generally won’t work; control modules are coded to the original car’s chassis number.
For example, replacing or disconnecting a car battery will often require recalibration of steering angle sensors and throttle body position sensors, etc. A few days of driving usually helps reset these components, but issues can arise.
Can Disconnecting the Battery Clear Codes?
Sometimes.
Disconnecting the battery can erase certain fault codes and adaptive memory settings on older vehicles. But modern cars are a different animal.
Many newer vehicles store fault codes in non-volatile memory, which means disconnecting the battery won’t clear them.
Even when it does work, disconnecting the battery may create new problems, including:
- Radio security lockouts
- Lost throttle body calibration
- Steering angle sensor faults
- Rough idle issues
- Transmission relearn problems
I generally don’t recommend battery disconnects as a “repair.”
A proper scan tool is safer, faster, and less likely to create extra headaches.
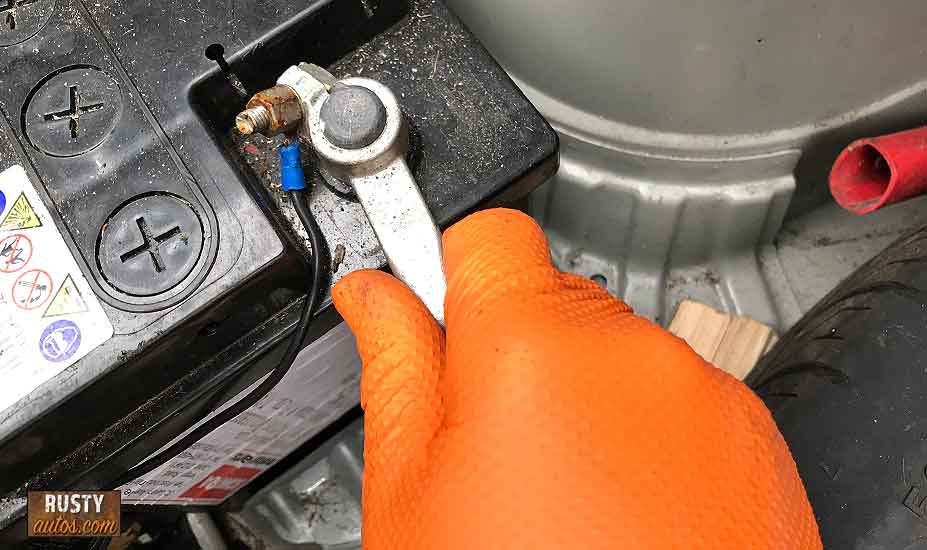
If you do disconnect the battery:
- Remove the negative terminal first
- Wait at least 15 minutes
- Never touch the terminals together
- Be prepared for system relearns afterward
3 Scan Tool Faults

Scan tool faults aren’t that common, I’ve never broken a tool yet, but I have worn out a few cable connectors. Here’s a list of scan tool problems and what you can do to fix them:
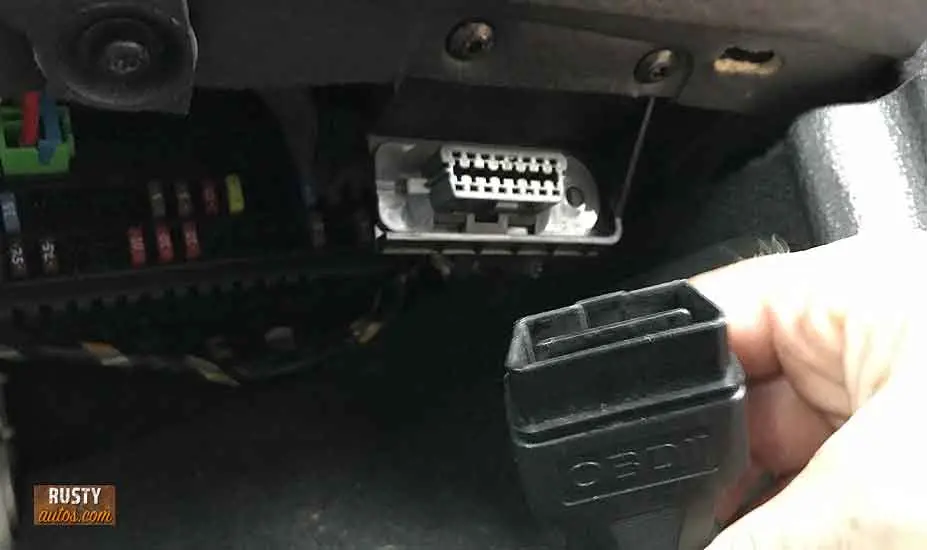
- No power in the scan tool – The most common cause of no power in the tool is a blown OBD vehicle fuse. If the check engine light doesn’t light up on ignition, the fuse is blown. It commonly blows because it shares a fuse with the vehicle’s 12-volt power point or the cigarette lighter. Check the fuse box for 12 volts, cig lighter, and OBD listing. Check out – OBD scanner won’t turn on.
- Scan tool plug connector fault – I’ve worn out a few of these guys; they work hard and wear out. The tool’s plug spades can become bent or worn, which causes a poor connection or no connection. Wiggling the plug in the OBD port usually lets you know it’s time to change the cable.
- Check the OBD port – The data link connector (DLC) terminals may be damaged. Years of wear or worse, front probing can spread the contacts causing poor or no contact with the scan tool. Check the wiring behind the connector too.
- Blown scan tool fuse – Your scan tool is fused; if it’s easy to access the fuse, check it out. If not, take your scan tool to another car and verify it works.
- Tool software – Ensure your scan tool has the latest and greatest software installed. Many tools offer free updates.
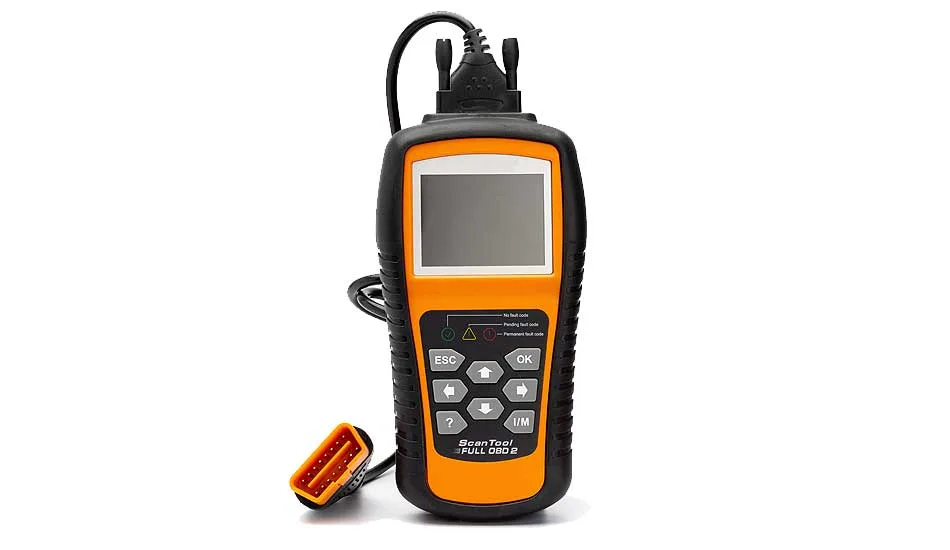
Cheap Scan Tools vs Professional Scan Tools
Not all scan tools are created equal.
A basic code reader may only access generic engine codes (P-codes). But modern vehicles can store faults in dozens of different modules, including:
- ABS
- Airbag
- Steering
- Transmission
- Body control
- HVAC
- Immobilizer systems
That’s why some cheaper scanners appear to “not clear codes” when really they simply don’t have permission to access that module.
I see this a lot with airbag and ABS faults.
Professional-grade tools can usually:
- Access more modules
- Read manufacturer-specific codes
- Perform calibrations
- Reset service functions
- Carry out bidirectional testing
A basic scanner is still worth owning. But for deeper electrical faults, a better scan tool saves a ton of frustration.
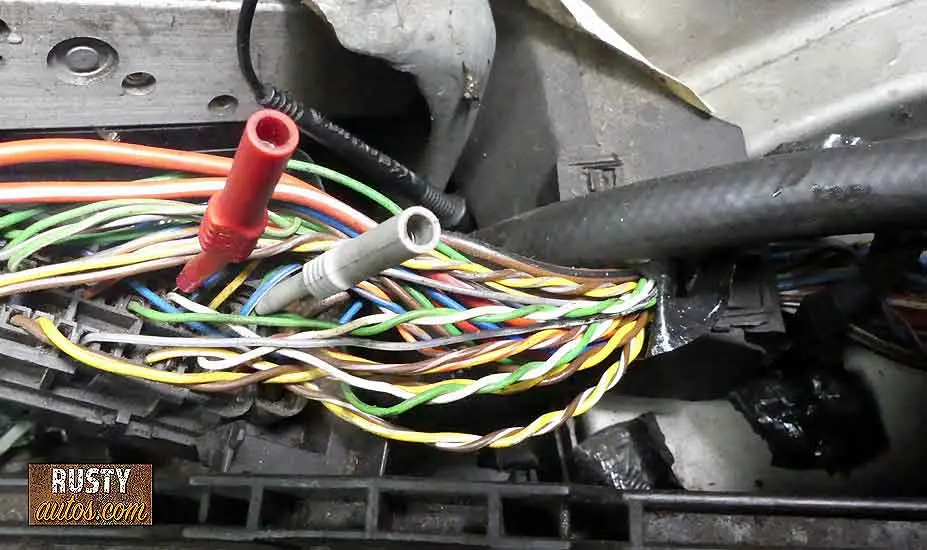
4 Scan Tool Won’t Communicate

If your scan tool throws back a dreaded no communication code (U – xxxx), we’ll need to roll our sleeves; we’ll need a good DVOM and a wiring diagram to start with. If you need help reading wiring diagrams, check out – Beginners guide to reading wiring diagrams
A scoping tool works best for capturing glitches in network systems. But we’ll work with just a DVOM as most will have access to a voltmeter.
While total communication loss is rare, it’s more usual for one module to go down, and the other working modules report its loss by setting a fault code.
A scan tool commonly won’t communicate because one faulty module pulls the whole system down. A damaged circuit is common too, but not as common as a failed module.
We need to isolate the fault, identify it, replace the module, repair the wiring, etc.
Your vehicle is stuffed with modules, each one tasked with a particular system to manage. Your ECU (Engine Control Unit) takes care of the engine, your TCM (Transmission Control Module) takes care of the tranny, and your BCM (Body Control Module) takes care of the vehicle accessories. You get the idea.
See the scan tools I recommend here on the Mechanics tools page


All these modules (aka nodes) communicate with each other using a system known as CAN (Controller Area Network).
CAN employ a twisted pair of wires (one wire CAN high typically 3.5-2.5 volts oscillating and the other CAN low typically 2.5 – 1.5 volts oscillating) that loop the vehicle, connecting all the modules on the network.
Experience has shown me it’s best to look for clues and ask some questions if needed before testing components. I’ll look for signs of recent accident damage, water leaks, heavy corrosion, or recent works carried out on the vehicle.
Water leaks are common causes of electrical issues; if you suspect you have a water leak, check out – Car floor wet under mats
Looking at a vehicle and asking a few questions may point you in a direction that can save you a ton of time and hard work. Assuming I find nothing suspicious or interesting on an initial look-over, I’ll make a few basic checks.
A good power supply is super important, so I like to verify that there’s a stable power and ground supply.

I’ll check the following:
- Battery voltage
- Check battery terminals clean and tight
- Test battery
- Chassis ground
- Check engine ground
Low Voltage Causes Crazy Fault Codes
Modern vehicles absolutely hate low voltage.
A weak battery can trigger a pile of completely unrelated fault codes that send you chasing ghosts.
I’ve seen low voltage cause:
- Transmission faults
- ABS warnings
- Steering faults
- Communication errors
- Immobilizer problems
- Random sensor codes
Picture this:
The battery drops during cranking, one module boots slower than another, communication gets interrupted, and suddenly every module in the car starts complaining.
Before diving deep into network diagnostics, always verify battery condition first.
Simple stuff first.
Now I’ll move on to check for signs of life in the DLC. I’ll check the power, ground, and communication network voltage. I’ll use a DVOM set to volts DC for these tests.
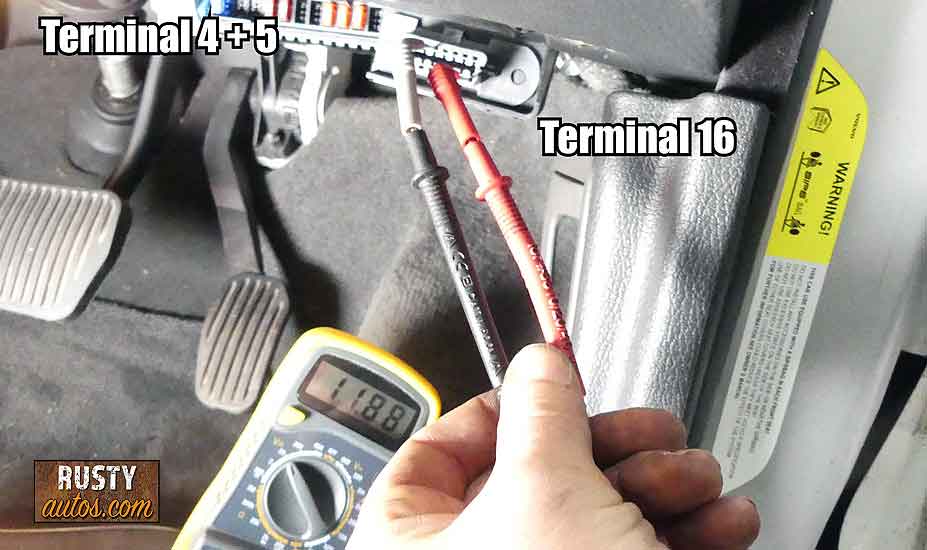
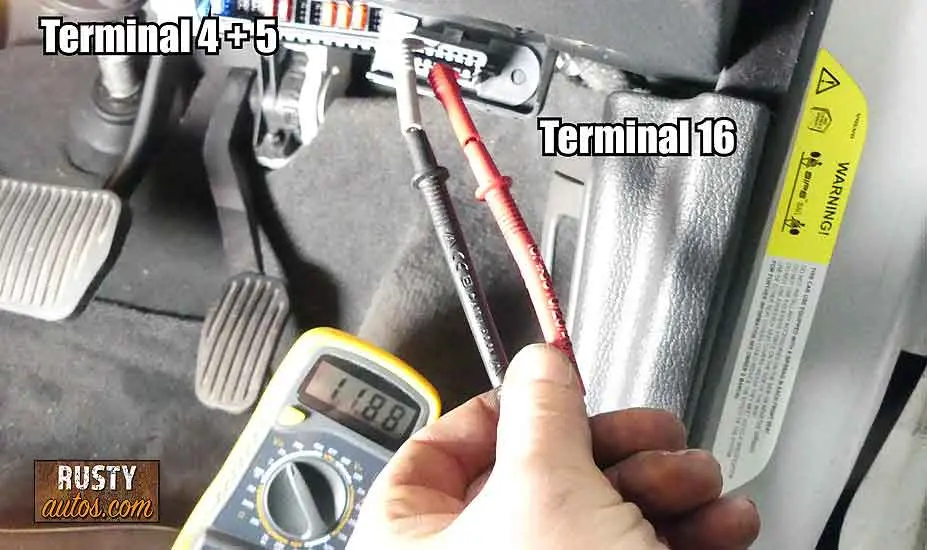
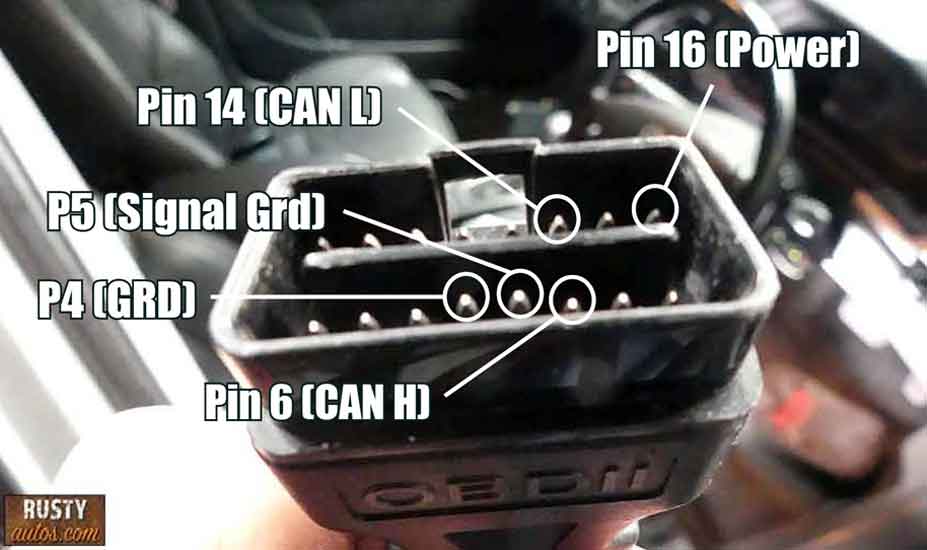
- Check power at the DTC (Terminal 16) – Above 12.5 volts = OK
- Check ground (Terminal 4) – Reverse a test light or use a voltmeter
- Check chassis ground (Terminal 5) – Reverse a test light or use a voltmeter.
- Check CAN high voltage at (Terminal 6) – Normal 3.5 to 2.5 volts (voltmeter set to peak min-max capture)
- Check CAN low voltage at (Terminal 14) – Normal 2.5 to 1.5 volts (voltmeter set to peak min-max capture)
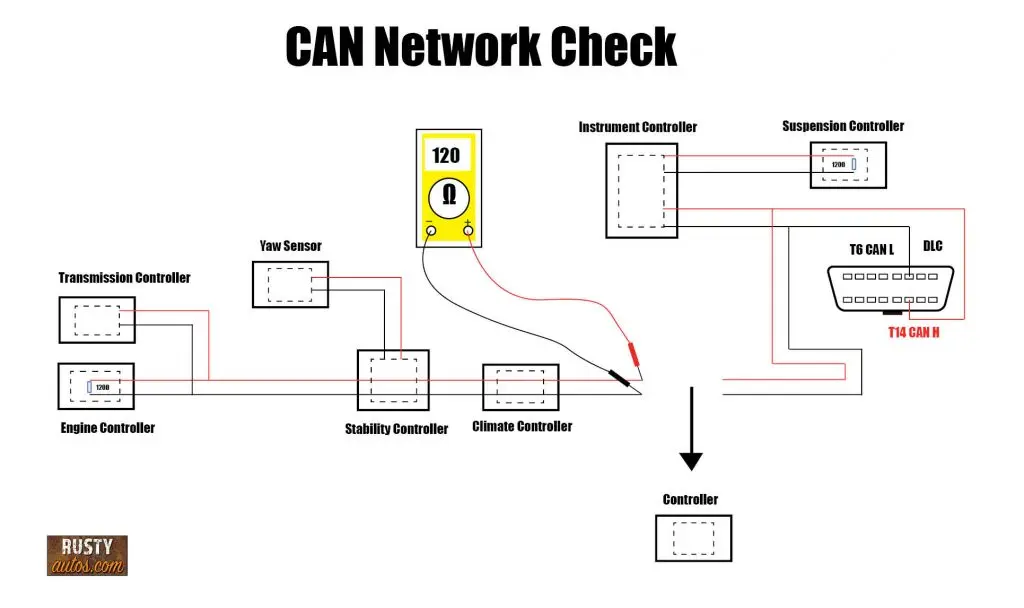
Now we’ll need to check for resistance on the CAN network, and for this test, we’ll use our DVOM set to read ohms. This test is performed when the network is asleep; removing the battery-negative lead works best. Back probing at the DTC as it won’t spread the pins but use a fine tool like a test probe.
- Check resistance between CAN high (Terminal 6) and Can low (Terminal 14) – A reading between 55 and 65 ohms is acceptable. Any reading outside this suggests a problem on the network.
This test won’t work for all vehicles; it will depend on how the vehicle’s communication system is configured. Some systems may use a gateway module that limits the usefulness of probing the DLC. In such a vehicle, reading at a module harness is more valuable.
It’s often more useful to find an accessible module that uses the same network (some vehicles have more than one network), like an ABS module or electric steering module.

For a more detailed post on CAN network repairs, check out OBD won’t connect to ECU
The test goes like this:
- Power down the vehicle by removing the battery.
- Remove the module connector. (whichever one you can access easily)
- Identify the two sets of twisted pairs (CAN high and low) in and out of the module. (This divides the network into two halves)

- Check resistance on the pair in.
- Check resistance on the pair out.
- A reading as before of about 120 ohms is normal for each of the circuits
- The pair with abnormal readings is the side of the circuit with the problem. (you can split that circuit in half again by referencing a diagram and repeating the test, and so on until you isolate the fault)
- If, by chance, your readings for both twisted pairs are normal, it suggests a possible issue with the module unplugged. (you may have got lucky)
It is possible to identify the failed unit by a process of elimination. However, a wiring diagram and approaching it systematically is faster and a ton less work.
Need to buy an inexpensive scanner that gets the job done, check out the Topdon vs Autel code reader review or check out the scanners I recommend here on the Mechanics tools page
You can find all the tools I use to fault find these types of problems here on the Auto electrical repair tools page.
Check out common OBD issues here in the Trouble codes section.
Check out the Fault code page for descriptions, symptoms, diagnosis tips, and the fix for common OBD fault codes.

FAQs
Can a bad battery stop fault codes from clearing?
Absolutely.
Modern vehicles rely heavily on stable voltage. A weak battery can trigger all sorts of strange behavior, including communication faults and warning lights that refuse to clear.
I’ve seen low voltage create a shopping list of fake fault codes that disappear once the battery issue is fixed.
Always check battery condition first.
Will fault codes clear themselves?
Some will.
Intermittent or “soft” codes may clear automatically after several successful drive cycles if the fault no longer appears.
Hard faults usually won’t.
If the problem is still present, the code and warning light will normally return straight away.
Why does my check engine light come back after clearing codes?
Because the fault still exists.
Clearing codes doesn’t repair the problem — it simply wipes the computer memory.
If the ECU sees the same issue again during its self-checks, it turns the warning light right back on.
That’s why repeatedly clearing codes without diagnosing the root cause rarely works.
Can cheap OBD scanners clear all codes?
Nope.
Basic code readers generally only access generic engine codes.
Many cannot communicate with:
- ABS modules
- Airbag systems
- Transmission modules
- Body control modules
- Steering systems
That’s why some faults appear “unclearable” with cheaper tools.
The scanner may simply lack access to that system.
Why does my car run differently after clearing codes?
Your vehicle computer constantly adapts to driving conditions.
Clearing codes or disconnecting the battery can wipe adaptive memory settings, including:
- Idle control
- Fuel trims
- Transmission shift patterns
- Throttle calibration
The vehicle may run rough temporarily while the system relearns its settings.
Most vehicles settle down after a few drive cycles.
Can AutoZone or parts-store scanners clear codes?
Usually yes — for basic engine codes.
Most parts-store scanners can clear generic powertrain codes. But they may not access manufacturer-specific systems or advanced modules.
If the light keeps returning, the fault still needs diagnosing.
Can pending codes be cleared?
Yes.
Pending codes can usually be erased with a scan tool.
But if the fault happens again during monitoring, the pending code may mature into a confirmed fault code and trigger the warning light.
How long does it take for fault codes to reset?
It depends on the vehicle and the fault.
Some systems reset immediately.
Others require a complete drive cycle, which may include:
- Cold start
- Steady cruising
- Stop-start driving
- Highway speeds
Some emissions monitors may take several days to fully reset.
That’s why emissions testing immediately after clearing codes often fails — the monitors haven’t completed yet.
Can disconnecting the battery damage the car?
Normally no, but it can create extra issues.
Disconnecting the battery may reset:
- Radio security codes
- Window calibration
- Steering angle sensors
- Throttle body settings
On newer vehicles, it’s usually safer to use a proper scan tool instead.
You may find the following posts helpful:

About the Author
John Cunningham is a Red Seal Qualified automotive technician with over twenty-five years of experience in the field. When he’s not writing about car repair, you’ll find him in his happy place – restoring classic cars.
Would You Know What To Do?
If your engine warning light came on tonight, would you know to keep driving, pull over, or call for recovery?
Most drivers wouldn’t.
That’s exactly why I wrote this guide.

- About the Author
- Latest Posts


John Cunningham is an Automotive Technician and writer on Rustyautos.com. He’s been a mechanic for over twenty-five years and has worked for GM, Volvo, Volkswagen, Land Rover, and Jaguar dealerships.
John uses his know-how and experience to write articles that help fellow gearheads with all aspects of vehicle ownership, including maintenance, repair, and troubleshooting.