
Plugging in your scanner and finding it doesn’t work is slightly alarming; some of these tools are expensive. But don’t panic; we’ll get this figured out. This has happened to me a ton of times, and it’s never the scanner’s fault.
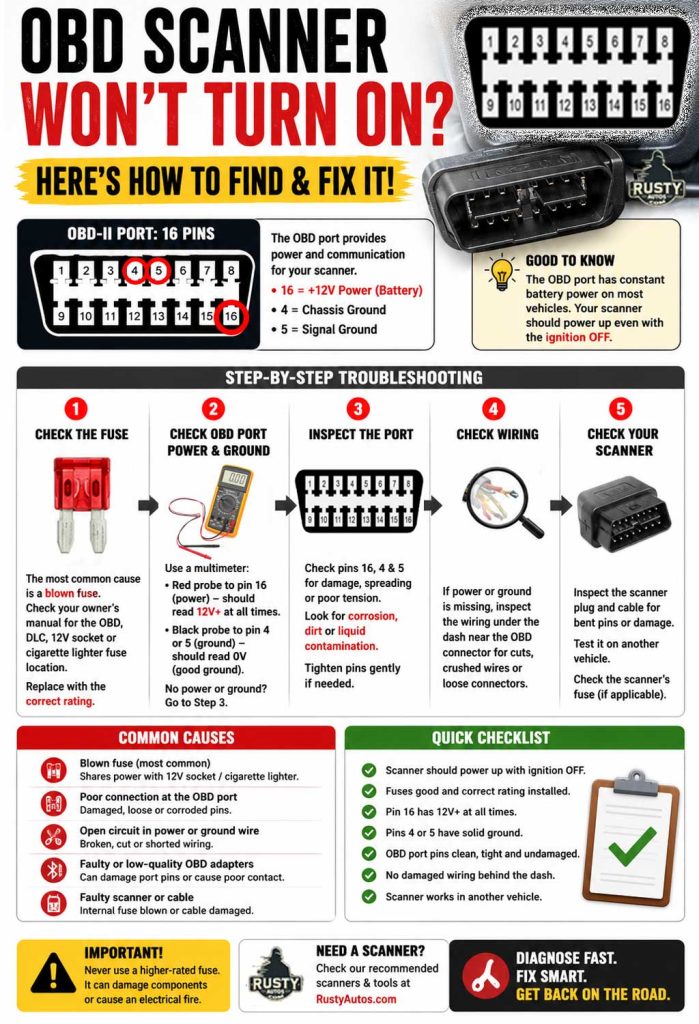
The most common cause of an OBD scanner that won’t turn on is a blown fuse on the vehicle’s OBD socket power supply circuit. If the check engine light fails to illuminate, you can be sure the fuse has blown. Checking the vehicle’s fuse box and replacing the blown fuse fixes the issue.
In this post, you’ll learn all the most likely causes of a scanner that won’t turn on, how to diagnose them, and how to fix them.
If you’re having trouble getting your scanner to connect, check out OBD won’t connect. For code-clearing issues, check out OBD won’t clear codes.
Blown OBD Socket Fuse
I’ve been a mechanic for over twenty-five years, and plugging in the scanner to find it won’t power up is a very common fault. The OBD port, socket, or DLC (Data Link Connector) provides power to your scan tool.
It’s worth noting that the OBD port receives constant battery power on most vehicles. Your scanner should normally power up even with the ignition switched off. If the scanner remains completely dead, it usually means the DLC has lost either its power supply or ground connection.
When your tool has no power, it usually means the vehicle’s OBD port is not receiving power. When the check engine light is missing, too, you can bet you found the reason your scan tool won’t power up.
The most common cause of the lack of power at the socket is, as you know, a blown fuse, and I’ll bet it will be the same for you. If that is the case, your tool will be juiced up five minutes from now, and you’ll be back in business.
Locating the OBD fuse


The OBD fuse usually blows for a good reason, overloading the circuit. That’s because the OBD fuse is commonly shared with the cigarette lighter, or 12 v socket, or other consumers. Plugging in a damaged accessory, such as a phone charger, or using a high-consuming device, such as a fan, may cause the fuse to blow.
So if your 12-v port/cigarette lighter also lacks power, you can bet you’ve found your problem.
Your vehicle will likely have multiple fuse boxes fitted; three are common. One under the hood, one in the trunk, and another behind the dashboard.
The OBD fuse may be listed on the fuse cover as OBD II, DLC, Accessory port, 12V power outlet, or cigarette lighter and will most likely be located inside the vehicle.
The most efficient way to locate it is to check the driver’s manual. Under fuses, many good driver manuals will list the fuse location, type, color, rating (size), and a description of what it powers.
Checking the OBD fuse

There are three common ways to check fuses:
- Using a test light
- Volt meter
- Remove the fuse and check the conductive strip
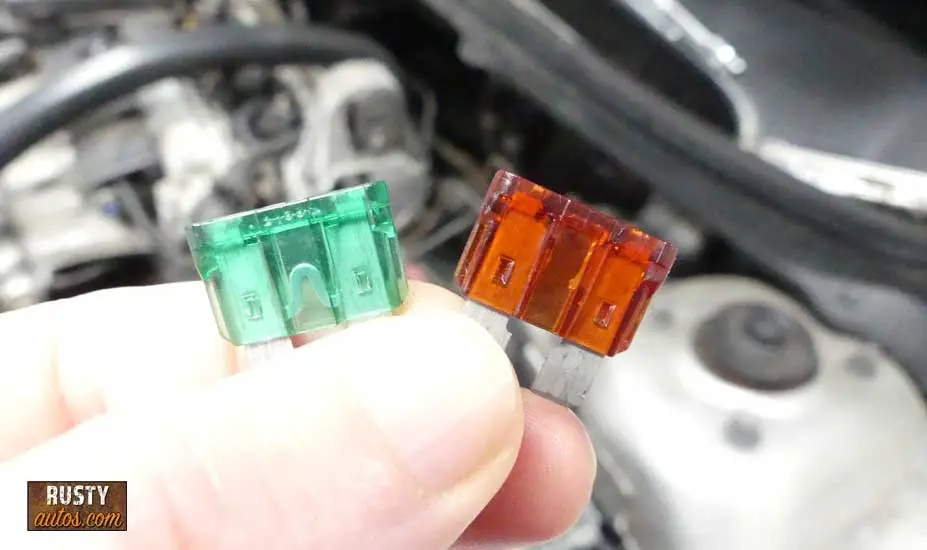
The fastest way is to pull the fuse. Most fuse boxes use blade-type fuses, which are easily removed. However, they’re small and awkward to grip. A handy tool is often clipped to the rear of the fuse box cover.
Hook the tool over the fuse body and pull. Holding the fuse to the light reveals the strip; if it’s broken, replace the fuse.
Check the rated fuse in the driver’s manual; never assume the removed fuse is the correct size. They are often not; fitting a fuse that’s rated below spec will cause the fuse to blow again.
Fitting a fuse that’s larger than spec could damage components or, at worst, start an electrical fire. The common fuse size is 15-20 amps, but use the size recommended by the manufacturer.
Open DLC Power Or Ground
When the fuse checks out, okay, the next most likely cause of no power is a damaged OBD socket. It’s common in older vehicles. And that makes sense: more OBD port use over time can cause the delicate terminals to wear or, more commonly, lose tension.
A DLC power terminal that doesn’t make solid contact with the tool won’t power it.
Checking OBD socket damage
We’ll perform two OBD port checks.
First, we’ll check the port and examine the port terminals closely using a light. Look at the terminals and see if terminals 4 and 16 appear larger than any of the others.
While inspecting the connector, look for signs of corrosion, dirt, or liquid contamination. Older vehicles sometimes suffer from moisture intrusion, while spilled drinks can find their way into the connector on vehicles where the DLC is mounted low in the dash. Green or white deposits on the terminals can prevent proper electrical contact with the scan tool.


Terminal 4 is chassis ground, and 16 is power. These two terminals power your scan tool and, for now, are the most important to examine.
In the workshop, I used a test probe to drag-test the terminals for tension, checking for spreading. If the tension is low, I’ll use a fine mental tool to tighten the terminal legs. I don’t advise poking anything into the front of the DLC unless you see an obvious terminal spread.
The second check will require a test light or voltmeter. You can find both here on the Auto electrical repair tools page.


Testing as per the diagram above will test both power and ground paths. If you don’t get a reading on the voltmeter or test light, go ahead and test each in isolation to see if power or ground is missing.
For reference, terminal 16 should have approximately 12 volts battery power at all times. Terminals 4 and 5 provide the ground circuits. If power is missing at terminal 16 or either ground circuit is open, the scan tool will fail to power up or communicate with the vehicle.
It is best to back probe the DLC terminals, but I know that can be a pain in the ass to access. Alternatively, use a paperclip or similar to gently probe.
If you find an issue with either path, check under the dash panel for damaged wiring. The most likely area of damage is just under the dash, where objects may impact the wiring.
Damaged OBD Scanner Plug


Scanner damage is last on the list because I’ve been using them for years, and they are surprisingly durable; I have yet to break one. That said, it is possible. What’s more likely is a damaged or worn-out scanner cable.
Checking the scanner plug
Check the scanner plug carefully; the pins should be straight and aligned correctly.
If you’re using a Bluetooth OBD adapter, inspect it carefully before plugging it back in. Some low-quality adapters have oversized terminals that can spread the vehicle’s DLC contacts over time, causing poor connections with other scan tools.
A bent pin won’t make contact with the vehicle’s port. The good news is that the cable is universal and easy to replace.
If the cable checks out okay, go ahead and plug it into a donor vehicle and test it. This helps confirm the problem is definitely the scanner.
Check the scanner fuse
All scanners are fused, and the bottle type is common. Access may not be as straightforward as checking a car fuse. The scanner may need to be opened to check and swap out the fuse. Check the process with the maker.
If your scanner is toast and you need an inexpensive one that gets the job done, check out the Topdon vs Autel code reader review and the scanners I recommend here on the “Mechanics tools page.”
FAQs
Why won’t my OBD scanner turn on?
The most common cause is a blown fuse supplying power to the OBD port. Many vehicles share the OBD circuit with the cigarette lighter or 12-volt accessory socket, so if that outlet isn’t working either, check the fuse first.
Should an OBD scanner power up with the ignition off?
Yes. On most vehicles, the OBD port receives constant battery power through terminal 16. A scanner should normally power up as soon as it’s plugged in, even with the key removed.
Which OBD pin powers the scanner?
Terminal 16 supplies battery voltage to the scan tool. Terminals 4 and 5 provide the ground circuits. If any of these connections are missing, the scanner may not power up.
Can a bad battery stop an OBD scanner from working?
Yes. If the vehicle battery is completely discharged, the OBD port may not have enough voltage to power the scanner. Check battery voltage before investigating the port itself.
Why does my scanner power up but won’t connect?
If the scanner turns on but won’t communicate with the vehicle, the issue is usually a communication fault rather than a power supply problem. Common causes include blown ECU fuses, damaged CAN bus wiring, module faults, or compatibility issues between the vehicle and scan tool.
Can a damaged OBD port be repaired?
Yes. Damaged terminals can often be tightened or replaced. If the connector housing is broken or the wiring is damaged behind the port, replacement DLC repair kits are available for most vehicles.
Can a cheap Bluetooth OBD adapter damage the port?
It can. Some low-quality adapters use oversized terminals that spread the connector pins over time. This can cause poor contact with other scan tools and intermittent communication problems.
Is it safe to replace an OBD fuse with a larger one?
No. Always replace the fuse with the exact rating specified by the manufacturer. Installing a larger fuse may damage wiring or electronic components and can create a fire risk.
About the Author
John Cunningham is a Red Seal Qualified automotive motive technician with over twenty-five years of experience in the field. When he’s not writing about car repair, you’ll find him in his happy place – restoring classic cars.
You may find the following links helpful:
Would You Know What To Do?
If your engine warning light came on tonight, would you know to keep driving, pull over, or call for recovery?
Most drivers wouldn’t.
That’s exactly why I wrote this guide.

- About the Author
- Latest Posts


John Cunningham is an Automotive Technician and writer on Rustyautos.com. He’s been a mechanic for over twenty-five years and has worked for GM, Volvo, Volkswagen, Land Rover, and Jaguar dealerships.
John uses his know-how and experience to write articles that help fellow gearheads with all aspects of vehicle ownership, including maintenance, repair, and troubleshooting.