
A car fuse that keeps blowing is a royal pain in the ass, but we can’t blame the fuse. It’s doing its job, breaking the circuit protects expensive circuit components from heat and fire. I’m a mechanic, don’t panic we’ll get this figured out right now.
The top 4 common causes of a car fuse that keeps blowing:
- Fuse amp rating too small
- Short in the wiring
- Failed component
- Overload in the circuit
In this post, you’ll understand the top 4 reasons a fuse blows continuously, how to diagnose why your fuse is blowing and how to fix it, like a pro.
If your 12-volt accessory port fuse keeps blowing, check for a faulty accessory power plug. Faulty phone chargers cause a ton of issues.

1 Fuse Amp Rating Too Small

A fuse’s purpose in this world is to protect your car’s wiring, so in a way, we should be happy it blows, but I never am. Fuses are rated by how much current they can handle before they blow, it’s mission-critical the fuse size is correct.
Fuses are rated by amps, it’s a measurement of how much energy can flow through the fuse element before it burns out.
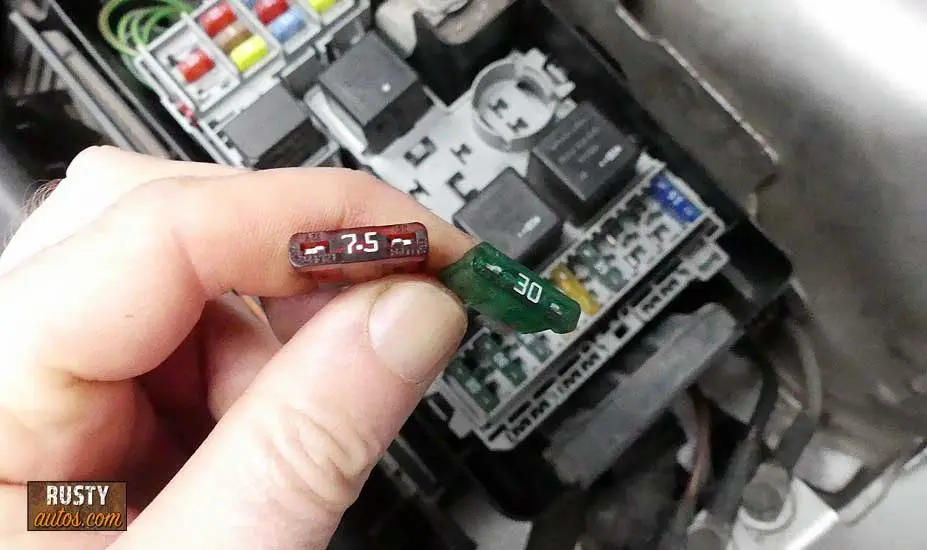
You can tell the amp rating of a fuse in two ways:
- By color – Fuses are color coded (see chart)
- By amp number – Amp rating stamped into fuse body


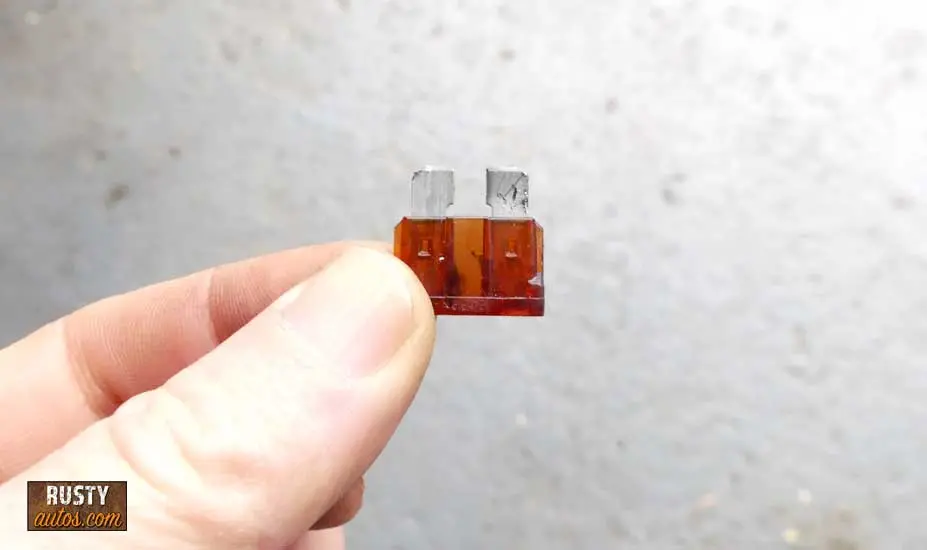
What is a blown fuse?
Turning on a light or motor causes energy (known as current or amp draw) to flow in a circuit which also causes heat to occur naturally. Your circuit needs to be protected from excessive heat. And that’s the fuses job.
Fuses contain a fine metal strip that’s designed to melt above its rated amp draw. When a circuit is designed, factors such as the size of the load (motor, light, etc.), wire size, wire length, voltage, etc. dictate how much heat a circuit will produce.
Based on such factors a circuit designer can calculate the correct size fuse. Fitting a fuse that’s too big, would cause excessive heat in the circuitry (when shorted) as the higher rating fuse is designed to handle higher amp draw. This content is owned by moc.sotuaytsur. The result is excessive heat, burnt wiring, or components.
Conversely, if the fuse fitted to the circuit is too small, it will cause the fuse to blow, below the circuit’s capacity. That results in the fuse blowing every time the load is turned on.

Fitting a fuse that’s too small is an inconvenience but fitting a fuse that’s too large can have devastating effects. It’s really important to get this right.
Fitting a fuse that’s too small is a super common cause of a fuse constantly blowing. And it’s worth eliminating before presuming you have a more serious problem.
You’ll need to check the correct fuse rating of the circuit. It’s never a good plane to assume the fuse that blew was correct. Better to check the driver’s manual or the fuse cover for the correct fuse amp rating.
2 Short In The Wiring
If your fuse is the correct size and it continues to blow, it means you do indeed have a short in the circuit somewhere.
What is a short?
It might be helpful to explain a little about what a short is exactly. I know most of you know what it is. Stay with me here, this won’t take long. Let’s take a simple light circuit. It’s called a circuit because, in order for a light to work, the energy (electrons) must make a circuit (or circle if you like) from the positive side of a battery to the negative side (negative side also known as a ground side).
A circuit is an obstacle course, where we force the electrons to take a longer path than they would like. This way we force them to do our work (light a light). It’s helpful to know that a vehicle’s negative battery cable is connected to its chassis. In effect, it turns the vehicle’s metal components into a negative side circuit (ground).

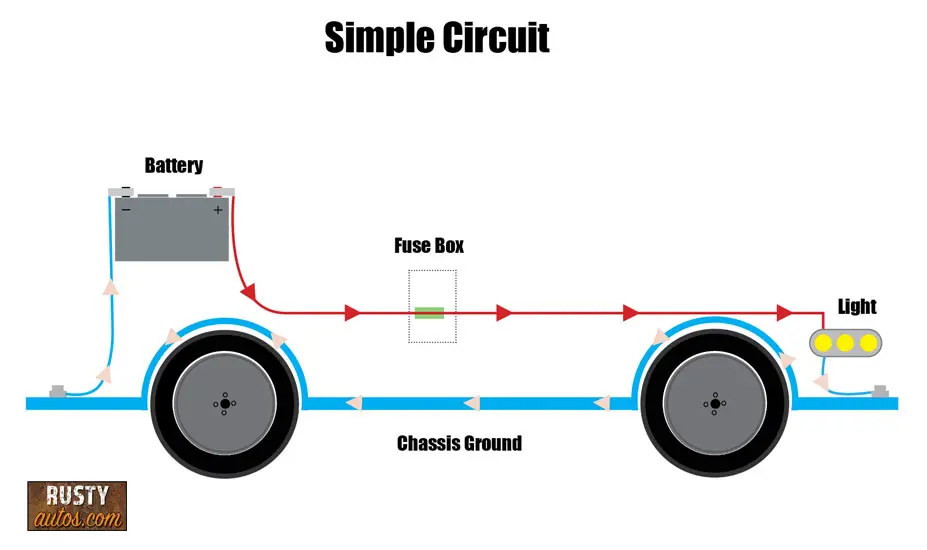
Check out this simple light circuit without a switch, its flow goes something like this:
- Power flows from the positive side of the battery through the wiring
- Through the fuse
- Slows as it enters the light bulb (finer circuitry of bulb causes a restriction in flow)
- Slowing the flow of energy causes the bulb circuit to heat (light)
- Remainder of the energy passes through bulb and goes to ground and the circuit is complete
If a shortcut to the ground (short) was introduced into the circuit, and since electrons love a shortcut, the energy is quickly diverted away from the bulb and the light bulb won’t light.

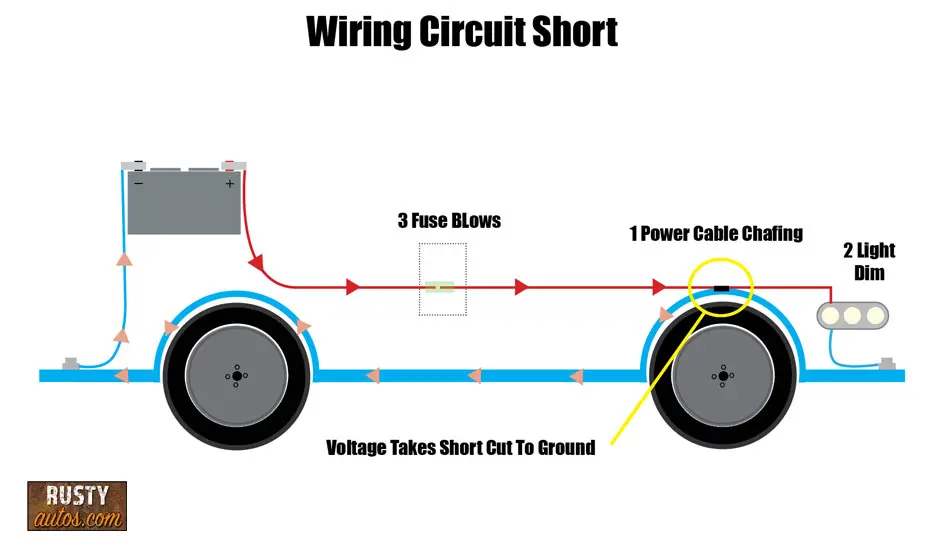
In addition, as the shortcut doesn’t include the resistance offered by the fine circuit inside the light bulb, the energy is encouraged to flow unrestricted to the ground (negative side of the circuit).
This unrestricted flow causes excessive heat and bang goes the fuse.
What causes a short in wiring:
Common causes of a short in a vehicle’s wiring system are chafing and moisture contamination.
What’s chafing?

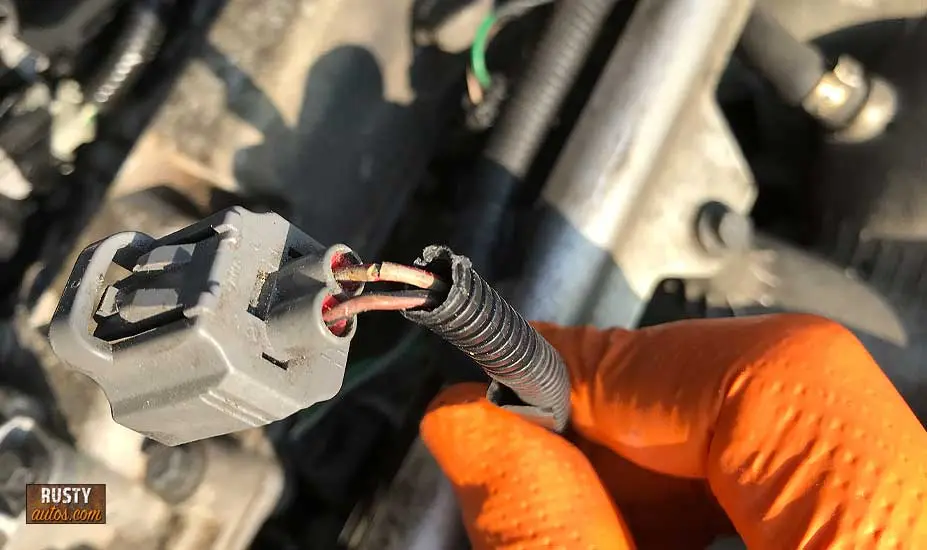
It’s not as exciting as it sounds. It’s when the power supply wire of the circuit rubs on some metal bodywork causing the plastic insulation to rub through and expose the copper wire to the metal chassis. Chafing can also occur between a power supply and a ground wire, again when they rub through, they short and a fuse blows.
Remember, every part of your car’s metal chassis and powertrain is part of the ground circuit. Touching a power supply wire off the body is the same as touching it off the negative side of the battery post – creates a shortcut to battery negative.
Chafing can happen simply as the vehicle ages, vibration causes wiring looms to sag and lay up against chassis and engine components. Problems can be introduced by not securing looms after repairs, not uncommon for looms to lay against hot exhaust components burning through the insulator and causing you to know what.


I’ve seen a ton of wiring short issues, chafing isn’t to blame for them all. Here’s just a few examples where chafing isn’t the root cause:
- Mice damage – Mice love to eat wire insulation, which often causes a short
- Accessories damage – Fitting accessories blindly, caused fastener to trap a power wire against the body
- Trapped power wire – Trapped behind header after cylinder head repair job
- Vandalized truck – Vandals started small fire under truck which caused short
- Aftermarket alarms – Poor wiring connections that become apparent as the vehicle ages
- Melted power cable – Power cables resting on hot exhaust will eventually burn through and cause a short
What’s moisture contamination?

Moisture is a car killer, most people think rust and they’re half right. Electrical damage is likely to kill a car long before rust gets it.
If a car leaks water unnoticed or is not repaired, strange things begin to happen. Electrical components start to do their own thing. That’s the early signs of moisture in switches or modules.
Water in the electrics allows voltage to take a shortcut and flow from the positive circuit through the water to the ground and of course, that causes a short and the fuse blows.
3 Failed Component

A wiring circuit isn’t complete of course without the load, the load is whatever component the energy is powering. Could be a light, motor, heater element, etc. The load has a wiring circuit too, which is also prone to failure.
Many electrical components include a motor and motor failure is common, they generally suffer from one of three failures:
- An open – break in the internal wiring
- A short circuit – short causes the component to draw more power than intended which causes a fuse to blow.
- Mechanical failure – motors employ bearings to help them move freely, a seized bearing may cause excessive amp draw
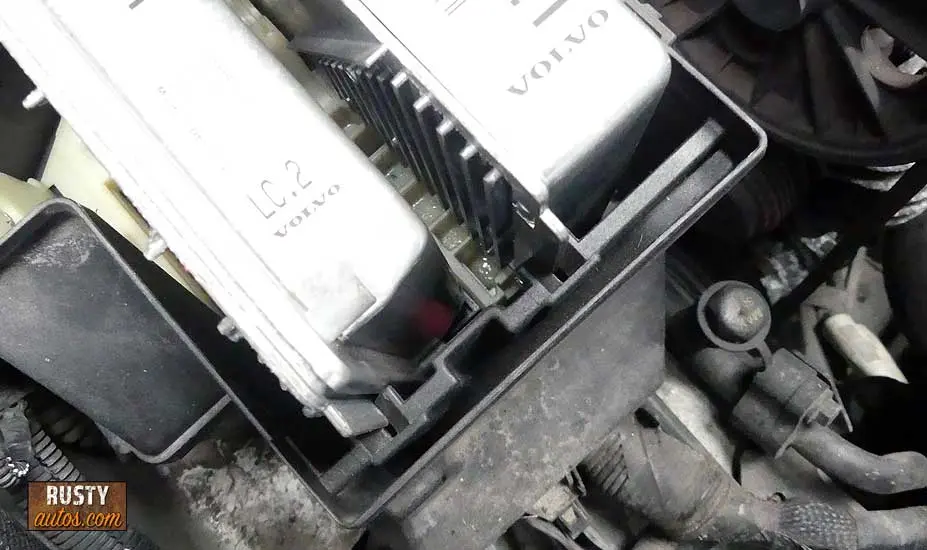
A component’s wiring generally isn’t visible, meaning many components are solid-state units that can’t be opened for inspection or repair. It’s not always apparent that a component is to blame, especially if it operates for a time before the fuse blows.

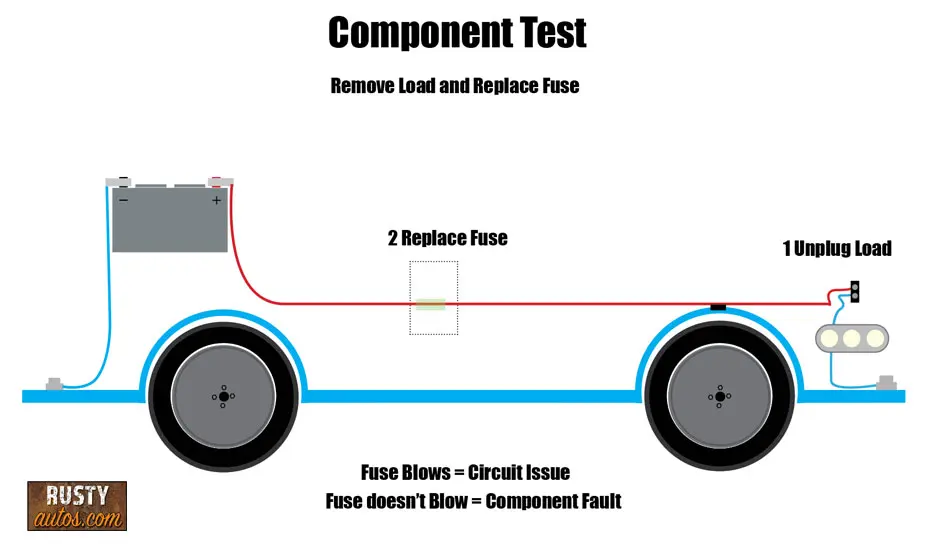
To help eliminate component failure as a possible cause of the short. Try unplugging it and replace the circuit fuse. If the fuse blows immediately or activating the components switch causes it to blow, you know the component is good and you are instead chasing a wiring short problem.
If on the other hand, the fuse doesn’t blow, it suggests an issue with the component. See testing component resistance below.
How To Find A Short
We know we have a short, and we know we don’t want to strip the vehicle completely to check every inch of the circuit, that’s not fun. A wiring diagram is really useful, it allows you to see what’s connected and where, a diagram will save you a ton of time and frustration.
You can check out all the tools I use here on the Auto electrical repair tools page.
I’ll show you a mechanics hack for chasing these types of problems with just a test light and voltmeter.
Here’s how I go about finding a short:
- I check the fuse is the correct rating.
- I note all the consumers attached to the fuse. The fuse box or handbook will list all consumers on the same fuse. Not uncommon for many consumers to be fused by the same fuse.
- I do a visual of the wiring to those listed components. I’m looking for damaged wiring, at contact points, I’ll do a wiggle test. Sometimes we get lucky and we’ll see the problem.
- Assuming I find nothing, I’ll unplug consumer wiring connectors.
- I attach a test light crocodile clip to battery positive and probe the load side of the fuse. The short causes the test light to light. The strength of the light tells me how big the short is. Note: The load must be unplugged, if the load isn’t unplugged, the test light will light up dimly.

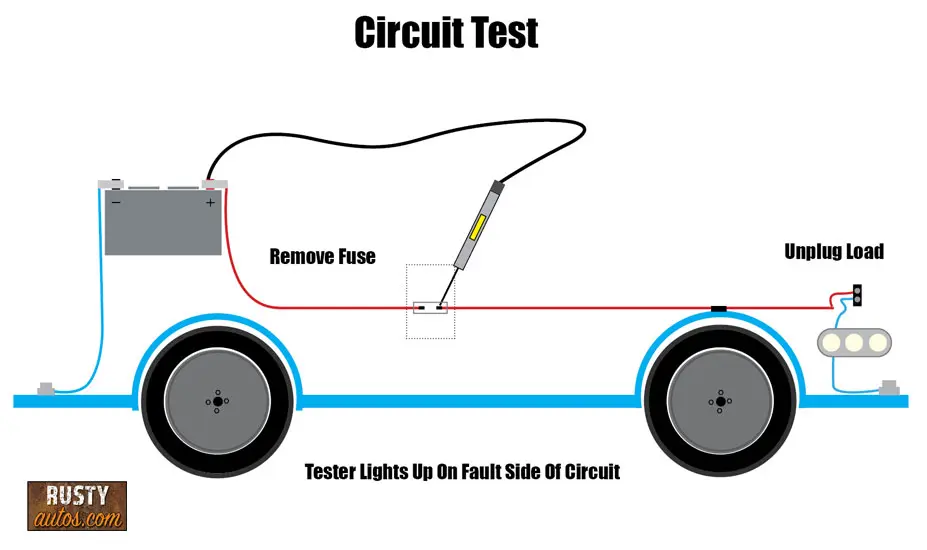
At this point, your test light either lights up, or it doesn’t.
- If the test light doesn’t light up – Your wiring is in great shape and your problem is likely a short in the component. Run a resistance test on the component. (See below)
- If the test light does light up – See chasing the wiring short below.
Testing Component Resistance
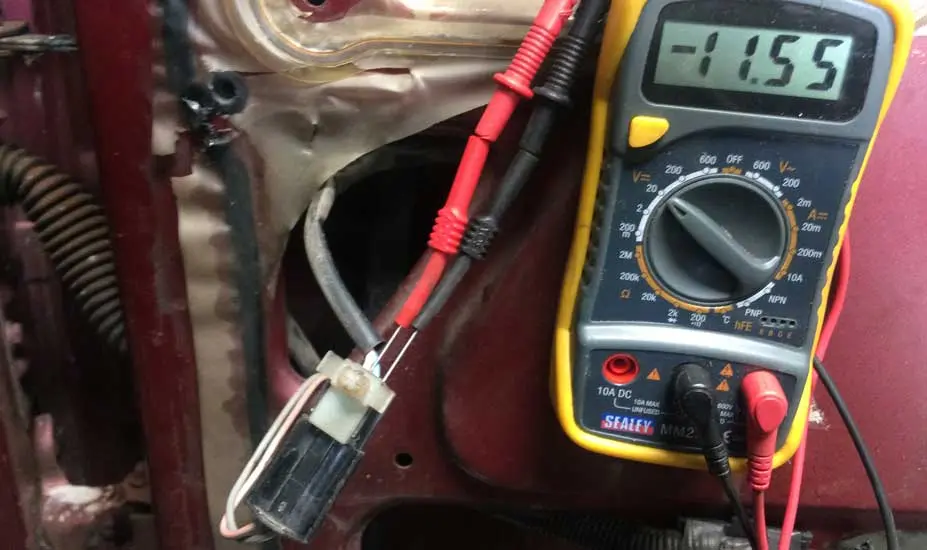
To test a component you’ll need a DVOM set to read Ohms and you’ll need to check what a good component should read. Resistance values vary depending on the type. A fuel pump for example may measure 20-30Ω, solenoids might measure just a few ohms.
If your consumer is blowing the fuse the resistance is lower than it should be, it’s likely grounding internally on the body. Check continuity between the body of the consumer and the supply terminal.
Chasing the wiring short
Finding that your test light lights up when testing the fuse terminal lets you know you have a short to ground and it lets you know which section you need to check. Find a mid-way point in the circuit, at a connector, works great, open the connector, and using your test light, repeat the test as above. Repeat this process again and again until you narrowed the field.
Needless to say, consulting a wiring diagram is the smartest route. The circuit you’re testing may have branching points, that could give you a bad reading. A good diagram will show you exactly where the loom runs, colors and connector blocks, and consumers. Often this knowledge alone can point you close to the root cause.
Check out the wiring diagrams and tools I use here on the Auto electrical repair tools page.
How To Fix A Short


Fixing the problem is a ton easier than finding it, so well done you. To fix a failed component is simply a matter of swapping it out. I say simply, some components are very challenging to work on, you might even wish you were still fault finding. But at least your mission is clear.
A wiring short is likely the best outcome, it’s the easiest fix and cheapest too. To nail this repair you’ll need the following tools.
- Wire strippers
- Heat shrink
- Soldering iron
- Solder
- Tape
- Zip Ties
How we repair this depends on how damaged the wire is.
If the wire is:
- Chafing – If the wire is largely intact (wires not broken) then go ahead and tape it up. Use additional hard outer insulation and zip ties to make weather tight and secure.
- Broken – We’ll need to strip the broken wires back, slip a heat shrink sleeve over one end and twist them in series, before soldering them and heating the heat shrink. Apply insulation tape and secure with extra insulation and zip ties if needed.
4 Overload In The Circuit


Overloading of a circuit commonly happens when a healthy motor’s progress is impeded by a physical restriction.
For example, imagine a motor tasked with moving a component like a sunroof motor, window motor, or wiper motor. Imagine a restriction in the moving component such as heavy snowfall on the windshield. The motor reacts to this restriction by drawing even more power to move the snow, and the result is a larger amp draw on the circuit which causes the fuse to blow.
In the case of sunroofs and window motors, this isn’t totally accurate as sunroofs are fitted with a self-resetting circuit breaker to prevent injury, but I think you get the point. If your circuit contains a motor and its function is to move a lever etc. (electro-mechanical assembly), check for a physical restriction causing a circuit overload.
You may find “How to read wiring diagrams” useful also.
Good job, you’re a pro!
- About the Author
- Latest Posts


John Cunningham is an Automotive Technician and writer on Rustyautos.com. He’s been a mechanic for over twenty-five years and has worked for GM, Volvo, Volkswagen, Land Rover, and Jaguar dealerships.
John uses his know-how and experience to write articles that help fellow gearheads with all aspects of vehicle ownership, including maintenance, repair, and troubleshooting.