
A battery drain is a right pain, it’s one of those problems we tend to live with for a little while before we finally have enough. Yep, the early morning jumpstart pilgrimage is over; today, we’ll find and fix that battery drain. I’m a mechanic, and you’ll soon learn how to nail this drain like a total pro!
The most common cause of a battery drain is a battery fault itself, followed by an alternator fault and wiring short to the ground. There are other possible causes of battery drain; they are:
- Failed component
- Accidental battery drain
In this post, you’ll learn about the common causes of a battery drain and how to diagnose your battery issue, including how to locate the circuit that’s draining your battery, how to pinpoint the failure within the circuit, and of course, how to fix it. Let’s get stuck in!

Index
- Reasons car batteries drain
- Battery issue
- Alternator issue
- Finding battery drain
- Repairing wiring short
- Sum up
Reasons Car Batteries Drain
Here we’ll broadly outline the likely reasons your battery won’t stay charged. This section eliminates some of the more obvious reasons that are often overlooked. Some of these may seem trivial or irrelevant, but a few minutes spent observing clues and running a few quick checks could save us a bunch of wasted diagnosis time.
We’ll deal with all the easy-to-check stuff here first before moving on to the more hard-core wiring short fault finding later. Okay, let’s begin.
You will need a DVOM (also known as a Voltmeter) for some of these tests, but don’t worry; the tests are easy. You can find the tools I recommend here on the “Auto electrical tools page.”
Accidental Battery Drain
By accidental battery drain, I mean it could be a self-inflicted issue; hey, it happens to us all. I’ve listed a few questions below which serve to eliminate some of easy to fix common self-inflicted accidental battery drains, and here they are:
Are all consumers Off? – Too obvious? Perhaps, but consider something discrete as a rear seat reading light that’s left on, it’s not detected during daylight hours for obvious reasons, and unless you drive at night, you may not notice it. Worth checking all those interior lights, including the glove box and trunk.
Are all 12-volt consumers unplugged? – Check glove box, center console, and trunk for consumer 12v sockets. Unplug all consumers and their cables. A damaged consumer, cigarette lighter, cable, or USB plug could short and cause a drain.
Have accessories fitted? – If you’ve had lights, a radio, Sat-nav, Rear infotainment screens, etc. installed, they are a likely cause of a drain. Aftermarket accessory wiring is often not up to the vibration of a moving vehicle and results in rubbed-through wire insulation and a battery drain.
Is your trailer unplugged? – A problem with your trailer wiring is a very common (dragging trailer cable on the highway) cause of vehicle battery issues. If applicable, inspect your trailer plug and cable and try unplugging the trailer to see if that helps any.
DLC plug – There are a ton of vehicle accessory apps on the market to help drivers monitor their driving skills, fuel efficiency, vehicle health, or track their vehicle. To aid installation, many of these apps employ a module that is designed to plug directly into your vehicle’s standardized OBD (On Board Diagnostic) socket.

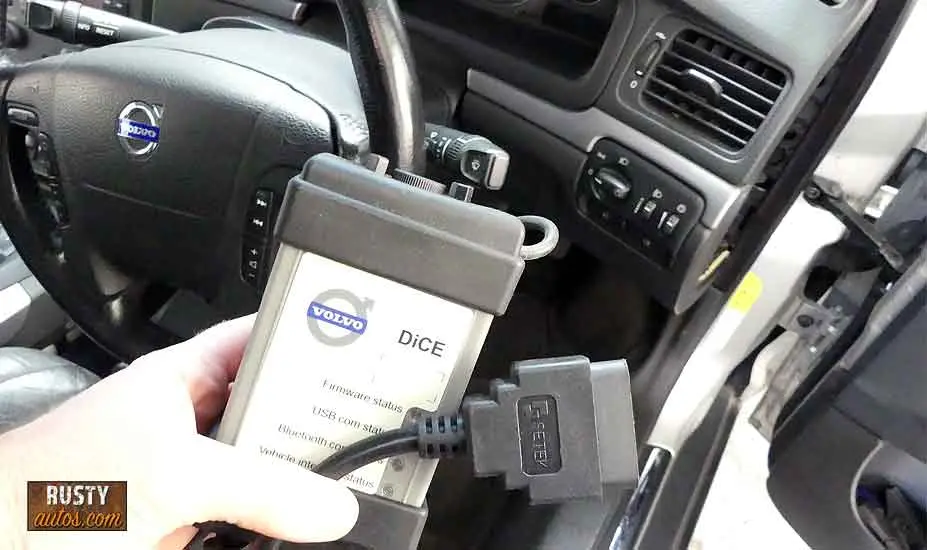
The purpose of the OBD is to allow technicians easily access your vehicle’s computers. They need to do so to retrieve fault codes, update software, gather live data, and run component tests.
The OBD is not designed to have an accessory installed, and some vehicles don’t like it. It causes the computers to remain awake and active when they should be asleep (vehicle shutdown), and when computers are awake, they consume power.
If you have an OBD app plugged in, try removing it.
Battery Issue
A battery is used to start your car, and when running, it’s the alternator that supplies all voltage needed. When the ambient temperatures are mild, a failing battery doesn’t often make its presence known until the temperatures turn lower, and that’s because batteries hate the colder temps.
They are less efficient and so need to work harder; you won’t be surprised to learn a battery is more likely to fail as winter creeps in.
We’ll be testing your battery a little later, but first, let’s take a look at some common battery-related issues.
Battery terminals loose
Loose terminals are self-explanatory; loose terminals will generally prevent or at least offer resistance to the flow of voltage from your alternator to the battery. While loose terminals are an explanation for a battery losing charge, it, in practice, comes with the additional symptom of a no-start or at least a slow crank.
Nevertheless, it remains a possible explanation.

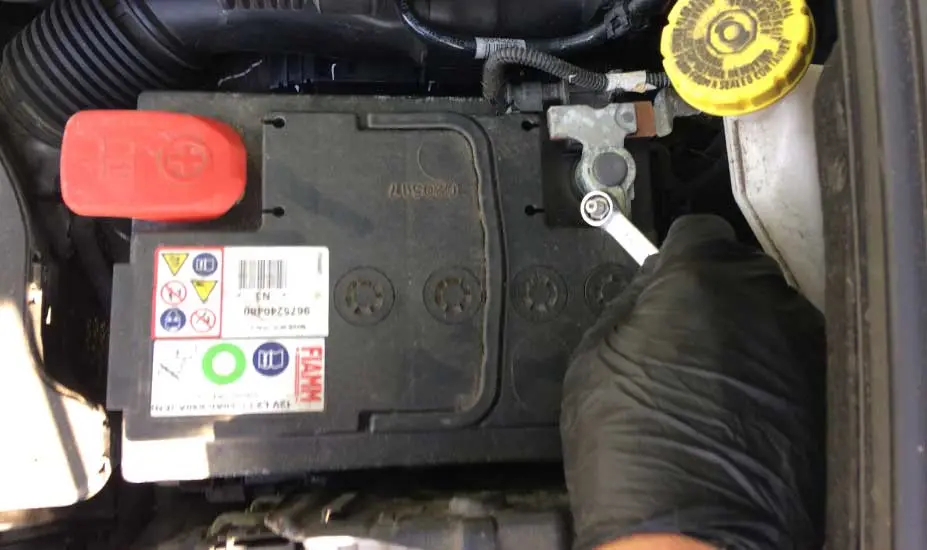
Diagnosis – Easy check the terminals are tight, a 10 mm open wrench usually does the job.
Loose terminals are especially common where the battery hold-down bracket is missing, if that’s the case, you’ll need to fix it, or you’ll be visiting this issue again.
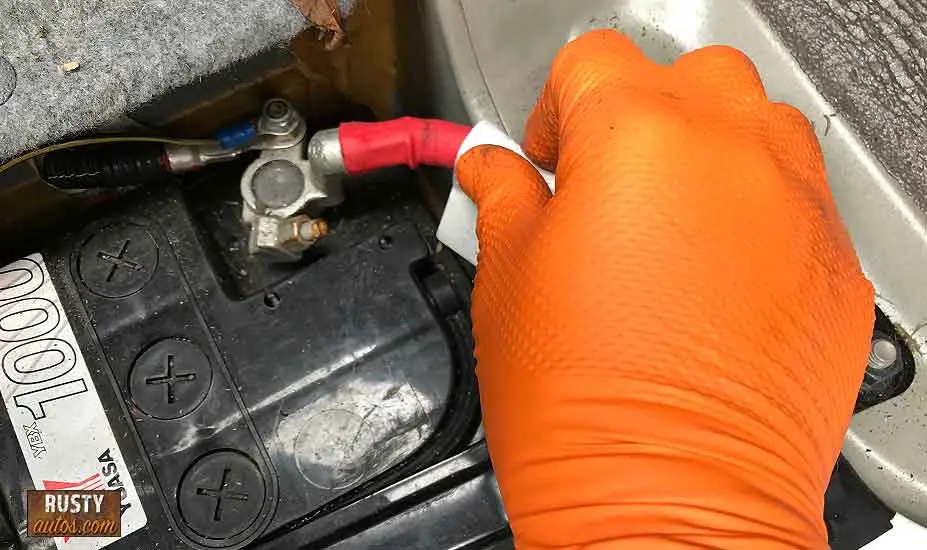
Battery terminals dirty
Corrosion on the terminals, just like loose terminals, will prevent voltage flow both ways. The diagnosis is easy; corrosion shows up as a white crusty build-up around the terminals. This is known as sulfation, and it is dangerous.


A sulfated battery throws off combustible hydrogen gas; a spark from a battery charger or jumpstarting is enough to cause an explosion. When a battery exhibits symptoms of sulfation, it’s best to have it replaced.
But the corrosion still needs to be cleaned from the terminals. The corrosion is leaking acid from your battery. To clean it, you’ll need gloves and eye protection; acid is nasty stuff.
Pour boiling water on the terminals to remove the corrosion, or mix up some cold water and some baking soda. The concoction neutralizes the acid.
We’re not done yet; we’ll need to remove the terminals and clean them with a wire brush and some grit paper before refitting but use protective kit like safety glasses and gloves.
To call the job good, coat the terminals with petroleum jelly to help keep them clean.
Battery wires damaged
Just like the previous pair, damaged battery cables will cause resistance. Battery cables, as you know, are made up of several lengths of copper wire; losing one or two won’t hurt the flow of voltage, but if several lengths break, it causes a traffic jam inside the cable.

One such symptom is a cable that gets hot when attempting to start your car. Broken battery cables generally aren’t a problem in fresher cars, but if your old girl has fifteen-plus years on her, it’s at least worth a visual.
Diagnosis – As both your battery cables are covered in insulation, we usually can’t see the broken wires. Still, it is sometimes possible to see or feel damaged wires through the insulation. I’ll show you a more scientific way to check for resistance in the battery cables a little later in alternator volt drop testing.
Faulty battery
To successfully test a battery, it must be sufficiently charged, and so battery testing is a two-part test. First, we’ll need to check the battery’s state of charge before load testing the battery.
To run these tests, you’ll need a Voltmeter, and if your battery is soft, you’ll need a battery charger; you’ll find the tools I recommend here on the “Auto electrical tools page.”.
Remember, if your battery exhibits symptoms of sulfation (white crusty deposit), it’s dangerous and needs to be replaced.
Part one of the battery test – Checking voltage
The process is as follows:


- Engine off and ignition off
- Set voltmeter (DVOM) to 20 v DC
- Place the red probe on the red positive battery pole and the black probe on the negative battery pole.
- Read the meter and check against the table below.
| Voltage | % Charged | Recommend |
| 12.7 – 13.2 | 100% | Ok |
| 12.4 | 75% | Ok |
| 12.2 | 50% | Charge |
| 12.0 | 25% | Charge |
| 0 – 11.9 | 0% | Charge |
If your battery tested in 12.4 volts or above, you can go ahead and move to step two; otherwise, you’ll need to charge your battery.
Part two of the battery test – The crank test
Having a battery read above 12.4 volts is fine, but it doesn’t mean your battery is a goodin. The next test stresses the battery, which allows us to see how it performs. As before, we’ll need our voltmeter, and a helper would be great; otherwise, we’ll need a meter that captures peak voltage, and we’ll need some crocodile clamps for the meter probes.
The process is as follows:
- Set meter to 20 v DC and set to capture peak volts (Auto)
- Red probe to the positive pole and black probe on the negative pole
- Have a helper crank over the motor (ideally, the fuel pump relay should be removed to allow for a good long crank)

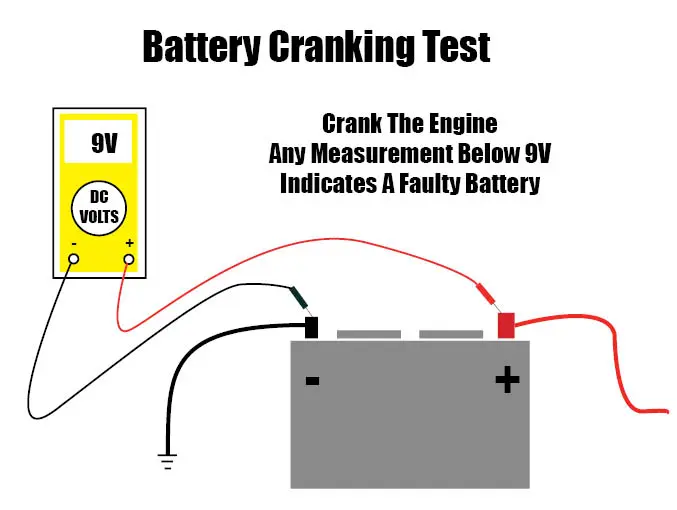
The results are simple to decipher; battery voltage should not drop below 9 volts. If it does, replace the battery, it’s failing.
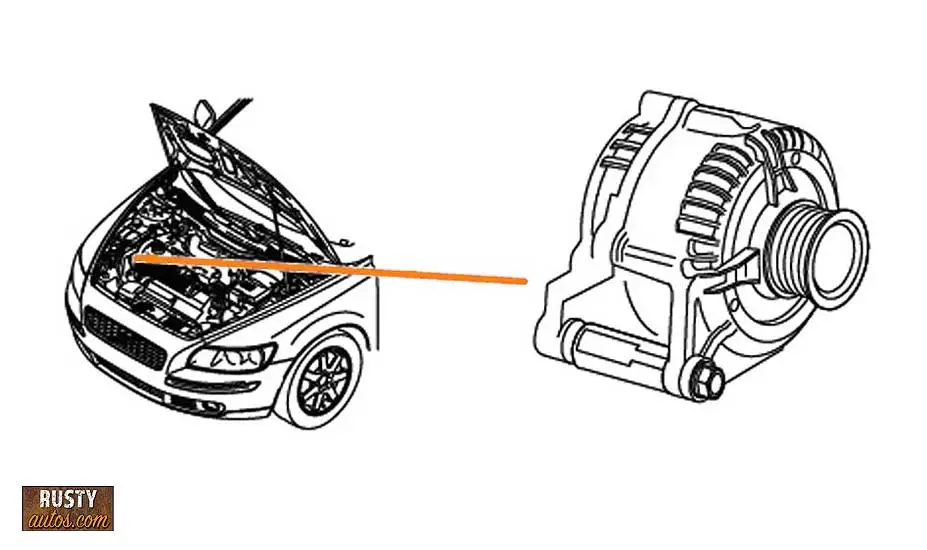
Alternator Issue
Your alternator is a super important bit of kit. While your battery is used to start your car, your alternator takes over and supplies all the power demands you put on it, and it recharges the battery.
As your car turns on more electrical consumers, your alternator must respond immediately by increasing the output. Yes, it’s a busy bit of kit, and modern cars are power hungry, and many now employ a dedicated battery control module (computer) to manage the just-in-time supply model.

If your alternator fails, your battery will take over and supply power, but it will run down pretty quickly, especially at night.
Diagnosis
Your alternator is driven by a belt that is connected to the crankshaft. It is worth checking all is well with the belt and pulleys. The ribbed belts commonly last about 50,000 miles, but as they age, they crack and may slip, especially when driving in wet conditions and when the load comes on (lights, etc.).

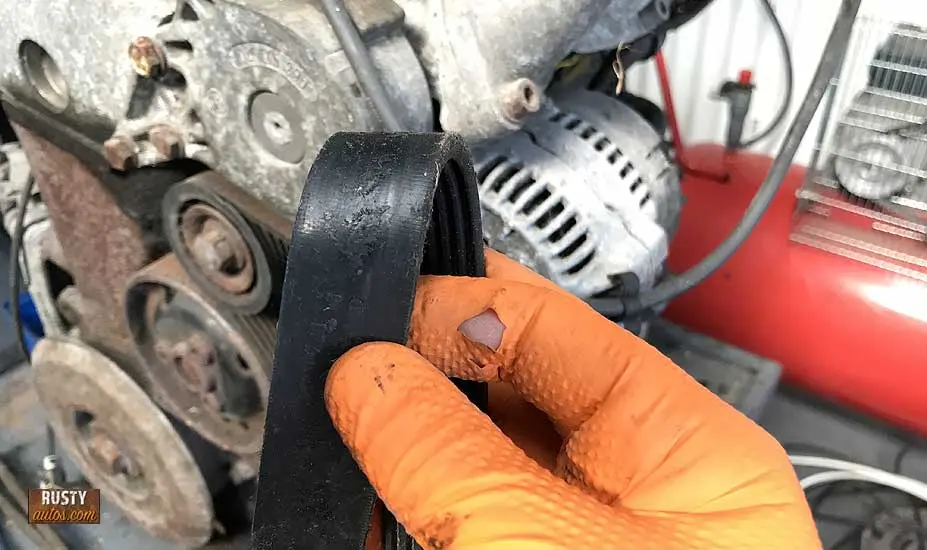
If the belt slips, the power supply dips, and your battery must take up the slack, which will deplete battery power.
As alternators work so hard, you won’t be surprised to know that they also fail; diode failure is common. And the number one symptom of a suspected diode failure is a battery drain.
The diodes are what make charging your battery possible. Your battery is DC (Direct Current), but an alternator generates power using AC (Alternating Current), and AC current is a lot like the tide, brings energy in but then takes it back out again.
But we don’t want the energy to go back out. We want it to go to our battery and stay there until needed. The diode is the answer to the problem; it acts like a valve allowing the voltage to flow in but not back out.
And you’ve guessed it when the diode fails; it allows all that stored energy to drain back out, also known as a battery drain.
There are several alternator health checks we can run:
- Voltage test
- Volt drop test
- Diode test
Alternator voltage test
In this test, we’ll check your alternator is outputting voltage sufficient to run all the systems and charge your battery. The test is as follows:

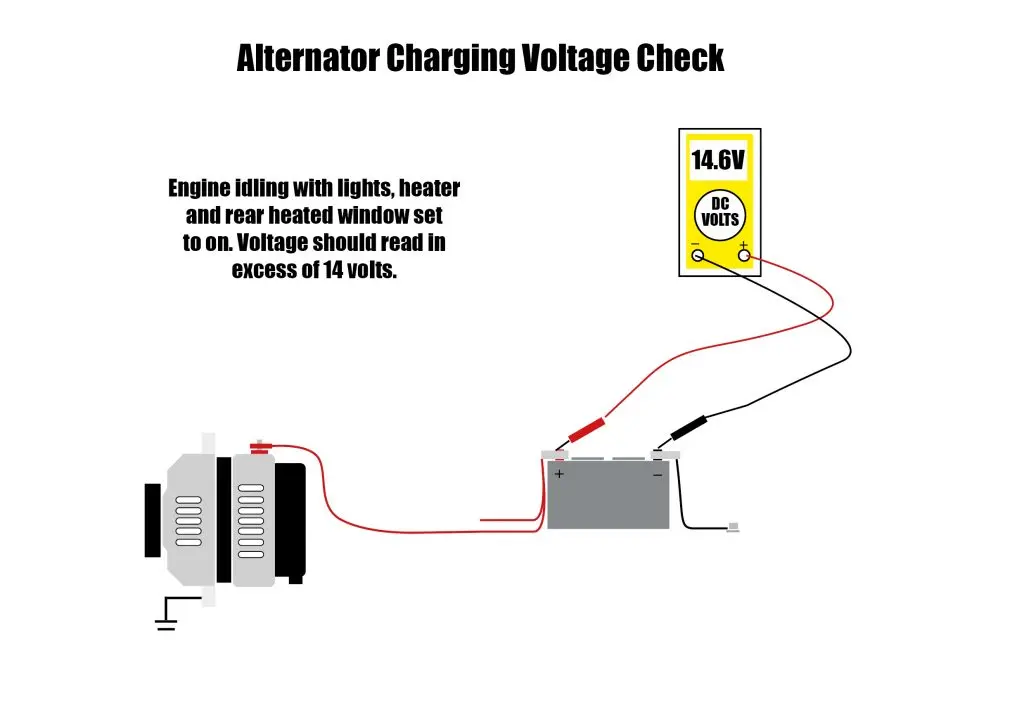
- Engine idling
- Turn lights, rear heated screen, and heater fan on
- Set the voltmeter to 20 v DC
- Red probe on positive and black on negative
- A reading between 13.5 and 15 volts means all is working well here.
If you have a reading above or below this window, suspect an alternator fault.
Alternator volt drop test
The volt drop test is a simple concept; it measures the difference in voltage between the test probes.
The idea is if the voltage is above a certain threshold, it means there’s a blockage (we say resistance) in the circuit (wire or component).
By testing sections of a circuit, we can quickly determine where the general fault lies. We can then repeat the test in smaller and smaller sections until we pinpoint the blockage.
The volt drop test is by far the most useful test in automotive circuit testing.
Since a circuit has two sides, the power side and the ground side, we test them separately, and in addition, they have different pass test voltage values.
When volt drop testing, it is important the circuit is live; since we are testing an alternator, we’ll need the engine running. As the engine will be running, be mindful of where you place your hands, etc.
The alternator power side volt drop test is as follows:

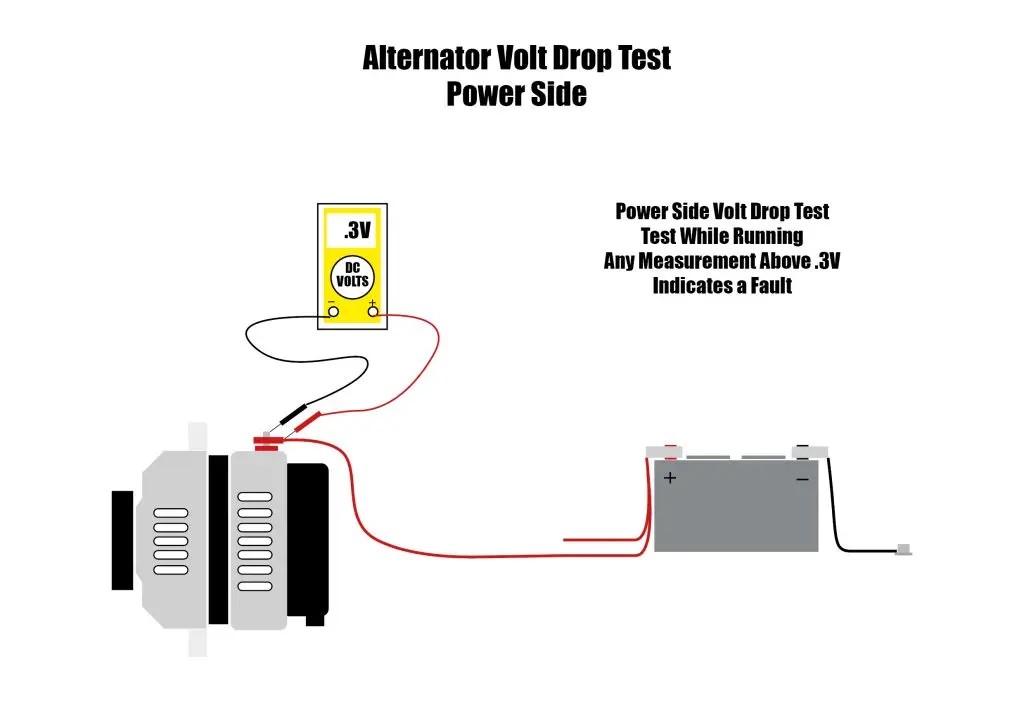
- Engine idling
- Set meter to 20v DC
- Place negative (black) probe on alternator power terminal (may need to remove protective cap)
- Place positive (red) probe on the battery positive post and note reading
- Move the positive probe forward to the power cable at the alternator and note reading
A reading above .3 volts indicates high resistance (blockage) between the two probes, and further investigation is needed. Resistance is usually caused by corrosion, loose or broken wiring or connectors etc.
The alternator ground side volt drop test is as follows:

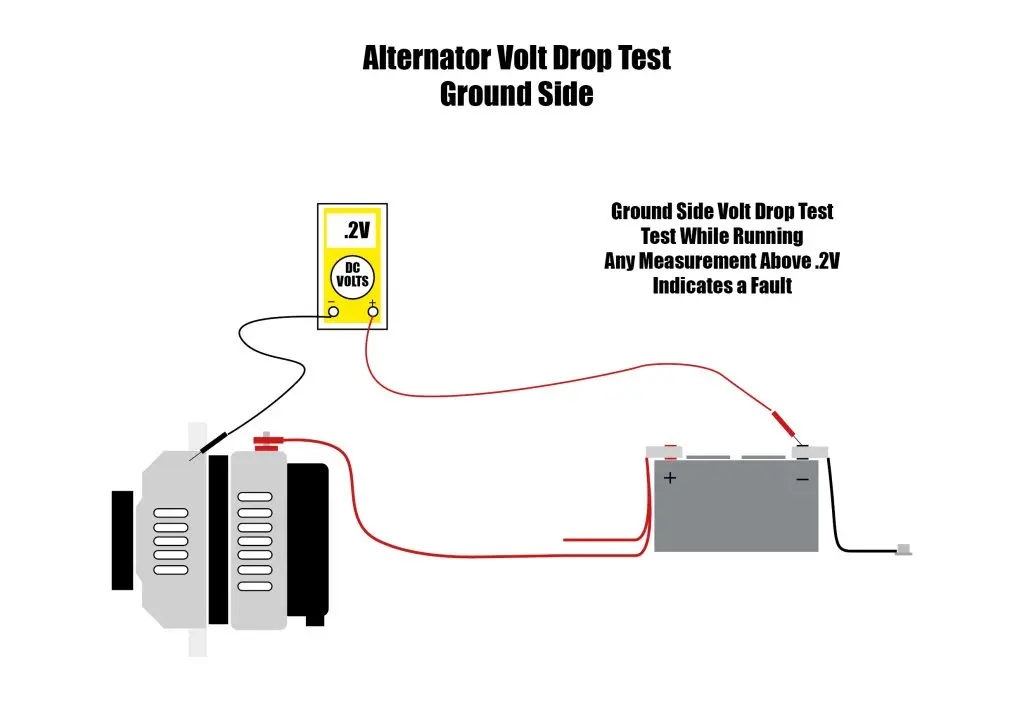
- Engine idling
- Set meter to 20v DC
- Place negative (black) probe on alternator body
- Place positive (red) on the negative battery post
- Move the positive probe to the end of the ground wire at the chassis to test the battery cable.
- Move the positive test probe to the chassis to test the cable-to-chassis connection.
A reading above .2 volts indicates high resistance (blockage) between the two probes, and further investigation is needed. Resistance is usually caused by corrosion, loose or broken wiring or connectors, etc.
Alternator diode test
As mentioned earlier, alternators produce AC (alternating current) which means the voltage flows both forward and back. So to prevent the alternator from stealing the voltage back out of our battery, it’s fitted with diodes. They act like a one-way valve allowing voltage to flow in one direction only – to the battery.
But as said, when a diode fails, the alternator is happy to pull battery voltage out, leaving us with a flat battery.
In the following test, we’ll check these diodes. For this test, we’ll use our volt meter set to Diode function.
The test is as follows:
- Disconnect the battery negative cable
- Set meter to diode function
- Place positive meter probe on alternator battery feed
- Place negative probe on alternator metal casing
- Note the reading
- Now reverse the probes and note the reading

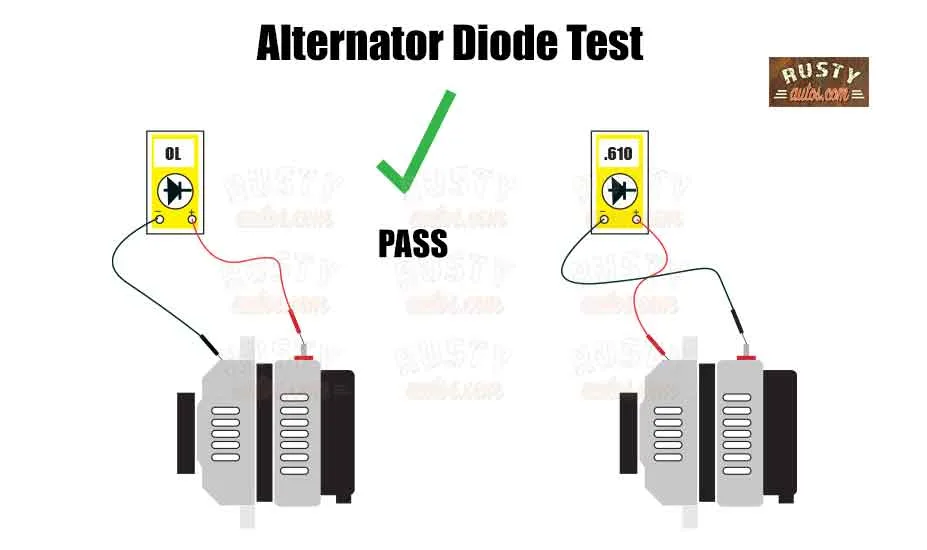
A Good Diode Test – A good diode test will show millivolts in one direction only.
Swapping the leads over will offer an open loop (OL).
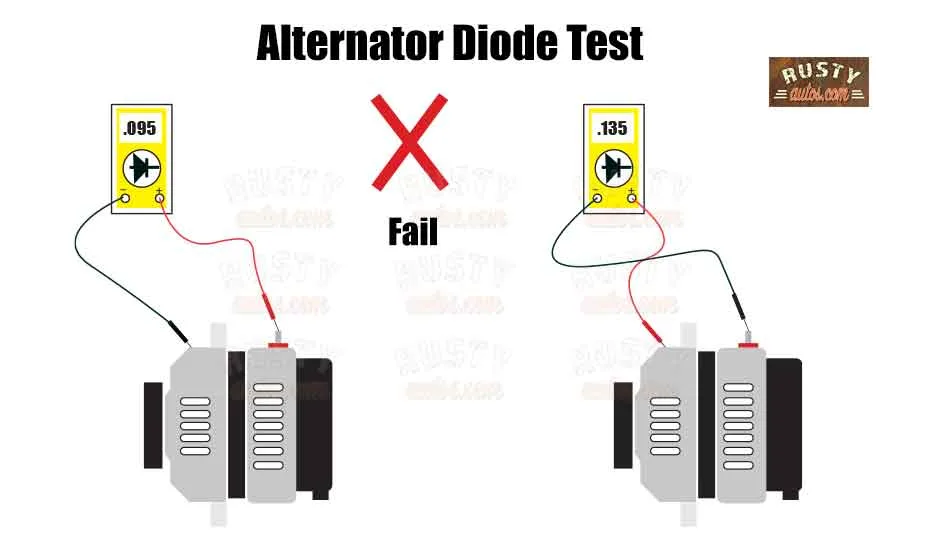
A Bad Diode Test – A bad diode test will show millivolts in both directions.

Failed Component
A battery drain, by definition, means something is getting power all the time, and it’s draining the battery. That’s obvious enough; what’s not obvious is what that something is
A failed component, by its nature, offers us a clue as to where and which circuits we should begin our tests. This type of observation will help shorten our diagnosis time later when we are volt drop testing.
So here in this section, we’ll set about gathering some clues by answering some of the following questions.
Any dash warning lights? – A door ajar light on the dash, for example, could indicate a faulty door latch that is draining the battery.
Any non-operating systems, like power windows, electric seats, radio, etc.? – This type of clue is a non-operating component, such as a seat that could point to a may be a clue as to which circuits we should check first.
Maybe a component won’t turn off – That’s the best clue of all as to what’s killing the battery. A sticking relay is most closely associated with a component that refuses to shut off. Locate that relay in the fuse box and remove it. Many relays within a fuse box are interchangeable and so try swapping them around to test.
Recent accessory added? – We’ve touched on this earlier; accessories, in my experience, are the most likely cause of a wiring short and battery drain. When I’m fault finding a battery drain, I’ll pay very close attention to accessories and the quality of installation.
Is the trailer socket fitted? – Got to love those trailer sockets; they gather moisture and debris and are another common source of battery drain both when connected and unconnected. Check the socket, cap, and wiring is in great shape. The water inside is a big clue.
Wiring Short

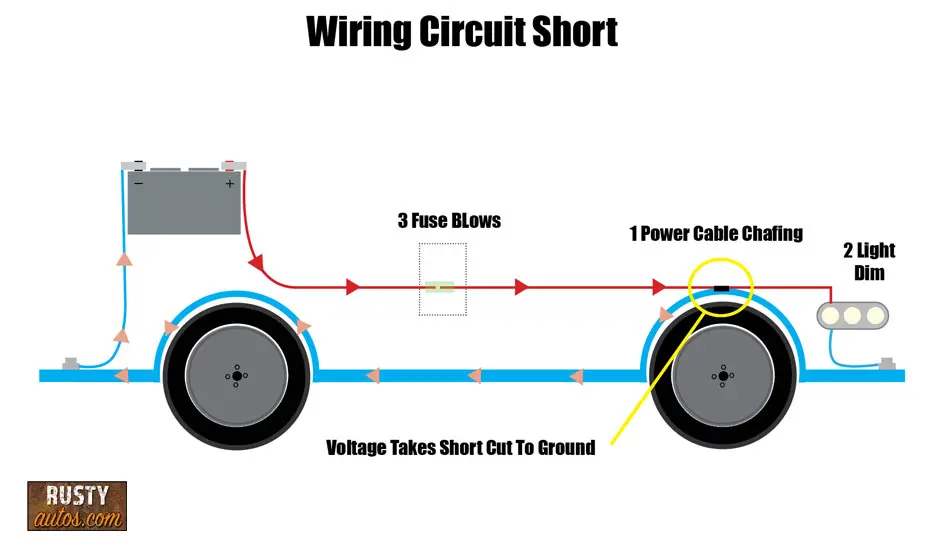
A common cause of a battery drain is a short to ground. This usually occurs when the insulation of a power wire rub’s through and makes contact with a ground source, such as a metal chassis.
We’ll cover locating and fixing a short in greater detail next.
Finding a Battery Drain
In this section, we’ll set about fixing the power drain. This is a three-step process; as you know, your vehicle has hundreds of individual circuits, and it’s one of these circuits that’s at fault.
- Step one is to identify which circuit within the car’s electrical system is at fault.
- The second step is pinpointing the exact location of the short within the circuit.
- The third and final step is repairing the short.
Step 1 Identify the Circuit
When a short is large enough, it blows a fuse which is great for a couple of reasons, the drain on your battery stops, and of course, you know the circuit with the short. But what if the short isn’t drawing more than the circuit’s fuse rating, the fuse doesn’t blow, and our battery drains down slowly but consistently?
This type of drain doesn’t usually make its presence known until you park your vehicle up for a few days, the season turns colder, or your battery degrades naturally.
This section is all about identifying that circuit. You may already know which circuit is to blame; maybe a power seat is playing up or a HVAC system that doesn’t work as it did.
For the following test, we’ll use a Voltmeter and run a volt drop test right from your vehicle’s fuse boxes. The test is simple to understand; we’ll check for a voltage difference in our circuit across the fuse. Finding a fuse with a voltage difference means it’s using power; that’s our drain.
But we need to be careful we are only testing when the vehicle’s computers have gone to sleep, and we’ll cover that below.
Preparing for the voltage drop test
Modern vehicles have a ton of computers managing all sorts of systems; these computers, which we call controllers, keep working for a while even after we shut off our cars. Usually, within 1 hour, they go into what we call sleep mode.
However, many vehicles only enter sleep mode if certain conditions are met, Ignition switch off, keys removed, vehicle lights, radio, etc. turned off. Doors, hood trunk closed.
The controllers rely on door sensors or door latch sensors to detect that the doors are open; we’ll need to fool the computers as we’ll need the door trunk and hood open while the computers are asleep. and that’s what I’ll cover next:
To prep the vehicle, take the following steps:
- Open all doors, hood, and trunk
- Locate all fuse boxes and remove the covers
- Trip the door latches on all doors and check the dash for warning lights to confirm you were successful (trip the latch with a screwdriver)
- Lights radio etc. off
- Remove keys and lock the vehicle
- Wait about one hour
- Do not pull door handles or touch brake pedals or switches, etc. doing so may wake the controllers up, and we’ll need to wait another hour.

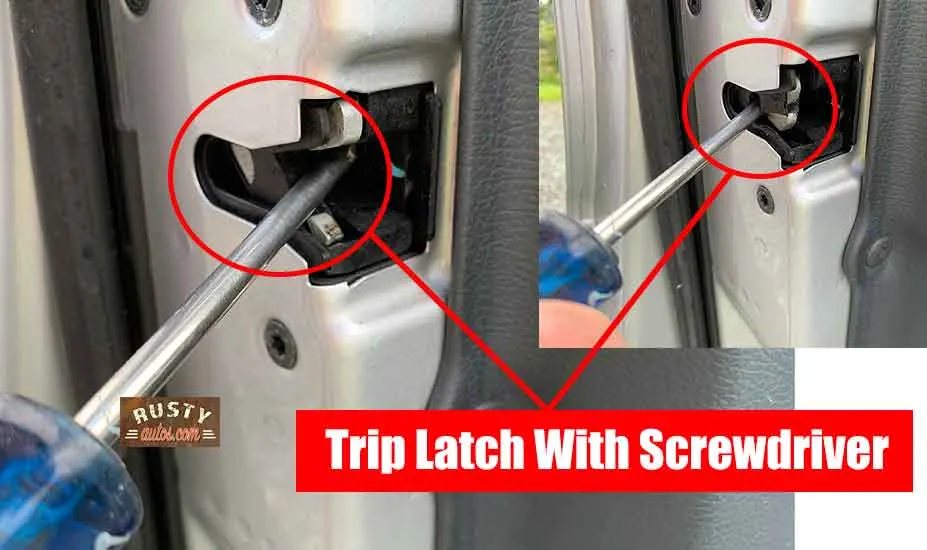
Trip the door latches, as per the picture, the hood, and the trunk trip similarly.
Remember to unlatch them by pulling the handle before slamming them closed.
Your vehicle has multiple fuse boxes; we’ll need access to them all. Places you can expect to find fuseboxes include:
- Under the hood
- Under the dash
- Drivers and passenger kick panel
- Behind trunk side panels
- Centre console
- Behind glove box
- Side of dashboard inside the door jam
Your vehicle is now ready for the volt drop test.
You’ll need your voltmeter, good light, and a mat to kneel on. Let’s get stuck in!

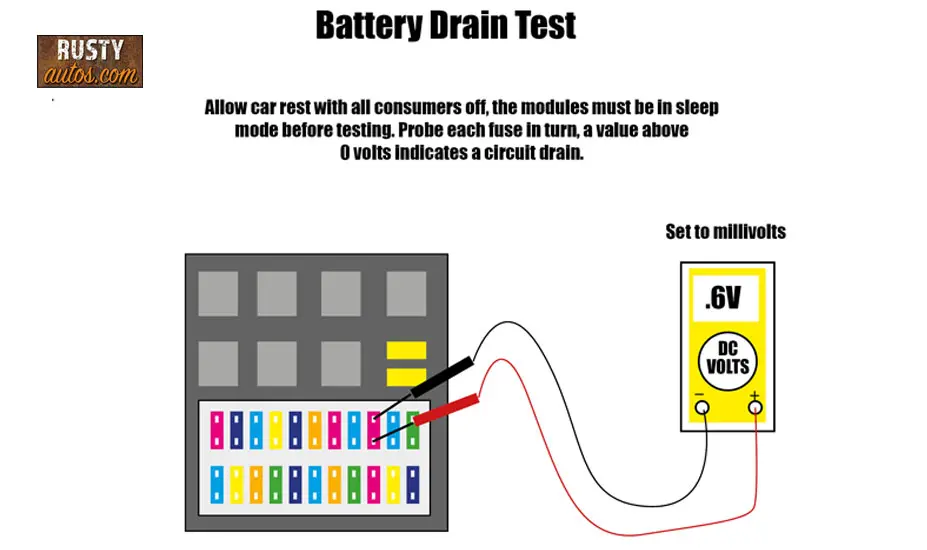
- Set your meter to Mv (millivolts) volts DC
- Systematically test voltage across each fuse
- Finding a fuse with voltage identifies our circuit with the short
You can easily locate the circuit from the fuse location inside the fuse box. The fuse box lid typically lists what circuit each fuse takes care of.
I like to run one more test before moving on to step 2. I like to unplug the load (light, motor, or whatever gets the power) from the circuit and see if the voltage across our problem fuse goes away. If it does, you have identified an issue with the load itself, a relay (covered earlier), or the switch.
Test resistance of the load (motor etc.) is within the manufacturer’s spec? If not, you found your short, go ahead and replace the load.
Step 2 Pinpoint the Short
A short to the ground means our power wire is in contact with a ground source, and so in these tests, we’ll be testing continuity between the ground and our circuit’s power wire.
We always run a continuity test on a dead circuit because the voltmeter acts as our battery, putting a small voltage into the circuit.
Testing systematically requires us to break the circuit into smaller sections and test resistance to ground to determine which section is at fault. We repeat this process over and over until we are dealing with a very small section of the circuit where hopefully, the short will be visually obvious.
The easiest way to break a circuit into two sections is by pulling the fuse and disconnecting the load. After testing each section, we will at least know which section is at fault.
At that point, we’ll need some help in the form of a wiring diagram. As breaking the circuit into smaller sections requires knowledge of where the block connectors are etc. That’s the type of info a wiring diagram will reveal. Fault finding without a wiring diagram will burn a ton of time striping unnecessary components.
An outfit like Mitchells 1 offers wiring diagrams and repair manuals at a fair price.
With a wiring diagram to hand, steps to pinpoint a short are as follows:

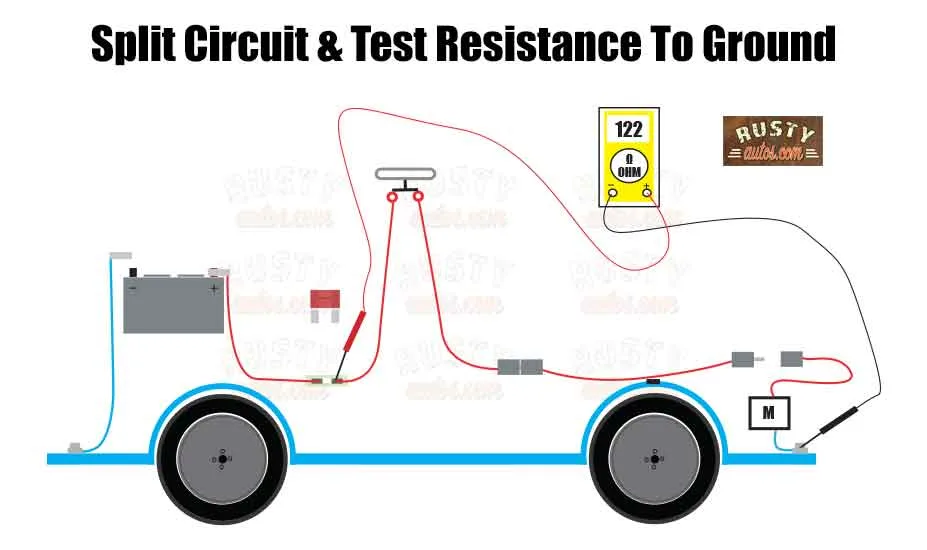
- Isolate the circuit by removing battery negative cable
- Pull fuse and remove the load block connector
- Set voltmeter to resistance Ω
- Check resistance to ground on each side of the circuit
- A good circuit will read open (OL)

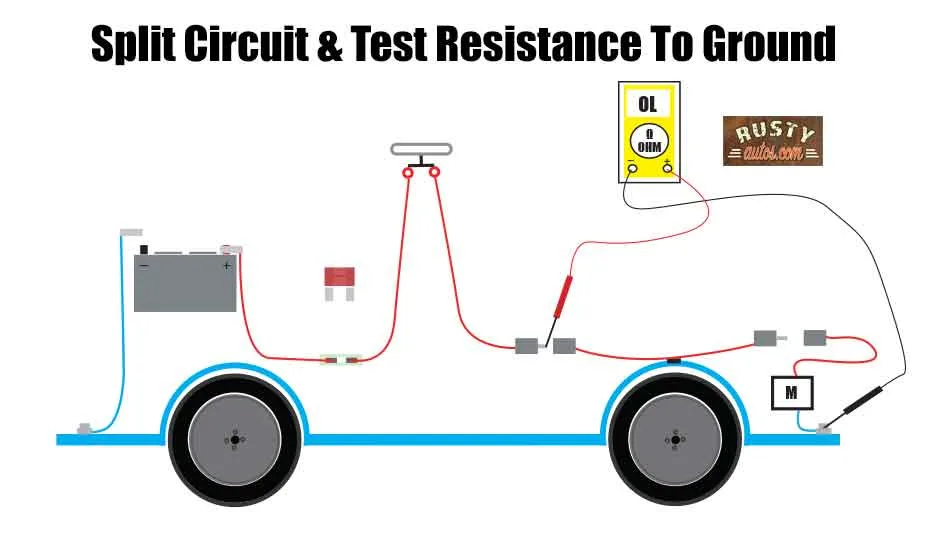
- A short will offer a value
- Chase the side with low resistance
- Read the wiring diagram and split the circuit in two again
- Check resistance to ground

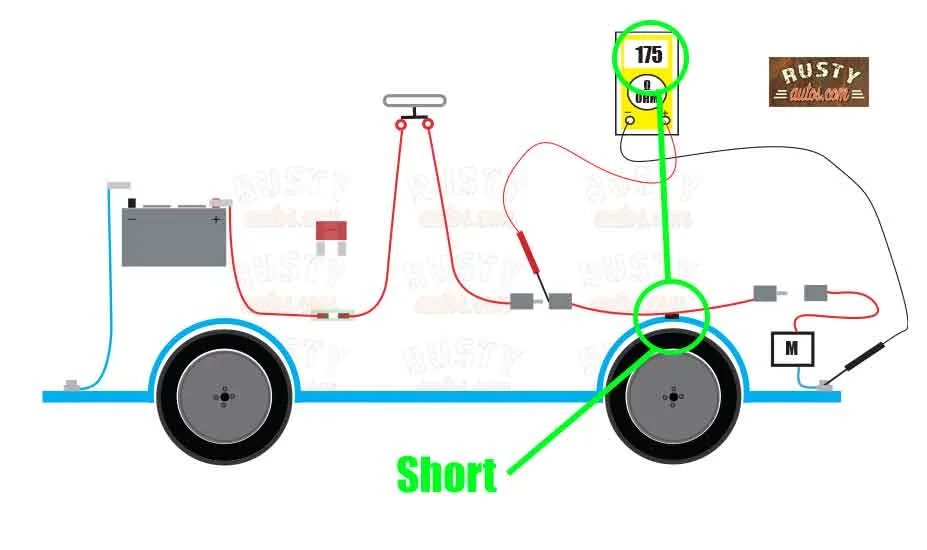
- Chase the side with low resistance
- Repeat until you can visually identify the short
With the short pinpointed, it’s time to run a repair.
Step 3 Repairing the Short
Here we’ll cover the repair sequence of soldering, look at other solutions such as speed clips and point out their shortcomings.
By far, soldering is the very best wiring repair. A rubbed-through wire usually causes a short, and very often, the fix only requires a small repair, such as adding new insulation. On other occasions, the wire strands are broken, and the repair calls for a new section of wire.
Let’s look at the soldering steps first; soldering is required when adding a new section of wire. Steps as follows:
- Use the same gauge wire as the circuit
- If the wires are twisted pair, maintain the twist
- Remove the insulation from each section of wire
- Slip heat shrink over the one wire
- Add solder to the gun
- Twist exposed copper wire around each other


- Place solder tip under the joint
- Rub solder across the top of the copper until it melts
- Push the sleeve over the joint and use a heat gun to shrink
- Add a protective cover or use zip ties to secure the wire within a loom.
Sum Up
After ruling out a self-inflicted battery drain, such as leaving an interior light on, a failing battery is the most likely cause. If your battery passes the test, then the alternator should be tested and eliminated also.
If all checks out, we’ll need to systematically volt drop the fuses to establish which circuit is draining the battery. Once located, splitting the circuit into manageable sections and checking resistance to the ground will pinpoint the fault.
Soldering or replacing sections of shorted wire is a typical repair; if the root cause is a shorted component (load), it should be replaced.
You may also find the following posts helpful:
How to read wiring diagrams
Is it hard to change an alternator?
- About the Author
- Latest Posts


John Cunningham is an Automotive Technician and writer on Rustyautos.com. He’s been a mechanic for over twenty-five years and has worked for GM, Volvo, Volkswagen, Land Rover, and Jaguar dealerships.
John uses his know-how and experience to write articles that help fellow gearheads with all aspects of vehicle ownership, including maintenance, repair, and troubleshooting.