
A spongy brake pedal after a brake bleed is frustrating, but you’re in the right place, and we’ll get to the bottom of it in this post.
The most common cause of spongy brakes after bleeding is contaminated brake fluid. Usual contaminants include air or moisture in the system. The most common causes include:
You are correct to bleed the brakes; the most likely cause of the soft pedal is trapped air inside the hydraulic brake fluid system. If you’ve previously done some work, like replaced brake pads or rotors, it’s common to lose confidence in the brakes. Typically, after fitting new pads, the brakes won’t feel great until they bed in. (More on this below.)
Check out the beginner brake repair page for step-by-step illustrated guides on common brake repairs like:
As said, the pedal will feel soft and ineffective until the pads and rotors bed in (surfaces mate). This is normal; test-driving and braking lightly will solve the poor pedal feel. I wrote a post about replacing pads and bedding in brakes, which you may find useful – Bedding in brakes
However, having no brakes after a brake repair is not normal, and I wrote a post about exactly that; you can check that out here – No brakes after changing pads
Opening the bleed nipple to push home the caliper piston is a preferred method for some DIYers when fitting pads; in so doing, it is possible to allow air into the system.
If you used this technique to fit pads or replace brake lines or hoses, you likely have air in the system, and air won’t go away by itself. Bleeding the brakes using the vacuum method below will fix the problem.
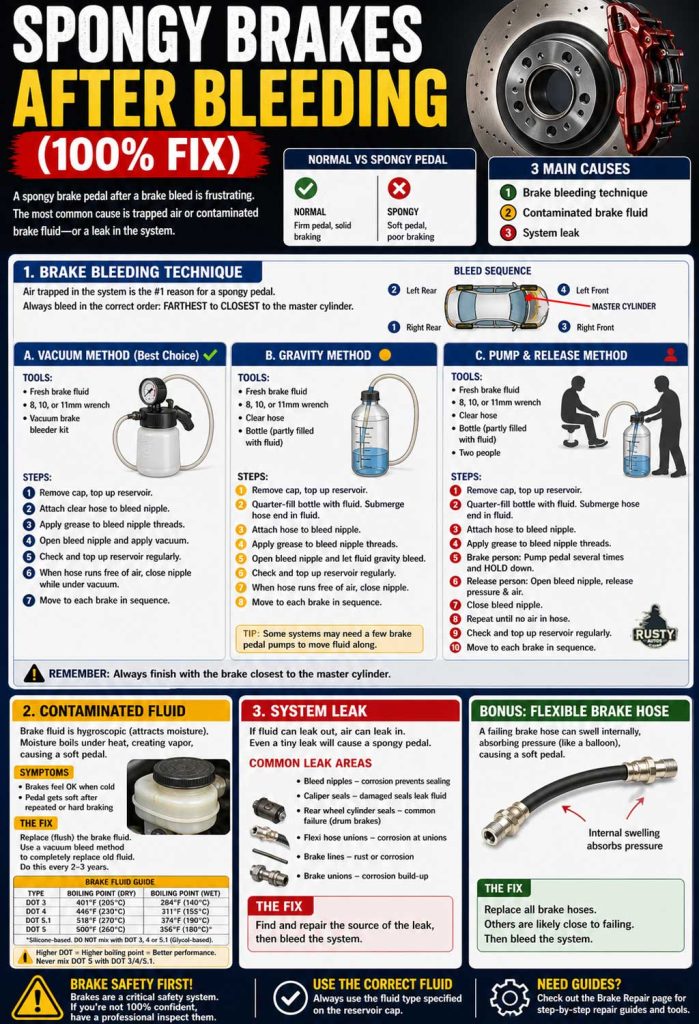
In this post, you’ll learn about the three most common causes of spongy brakes and what you can do to fix them. I understand you have bled the brakes, which are still soft, and so at this stage, it makes sense to eliminate a brake bleeding procedure error first.
1 Brake Bleeding Techniques
Bleeding the brakes isn’t a job you do every day, or maybe you’ve never done it before, so it’s worth checking your technique. Bleeding the brakes successfully isn’t a complex procedure, but, like many jobs, it requires nailing a few crucial steps.
I’ve covered the top 5 reasons brakes won’t bleed, which you may also find helpful – Brakes won’t bleed

If you need a refresher on brake bleeding, you’ll find this post helpful – How to bleed car brakes.
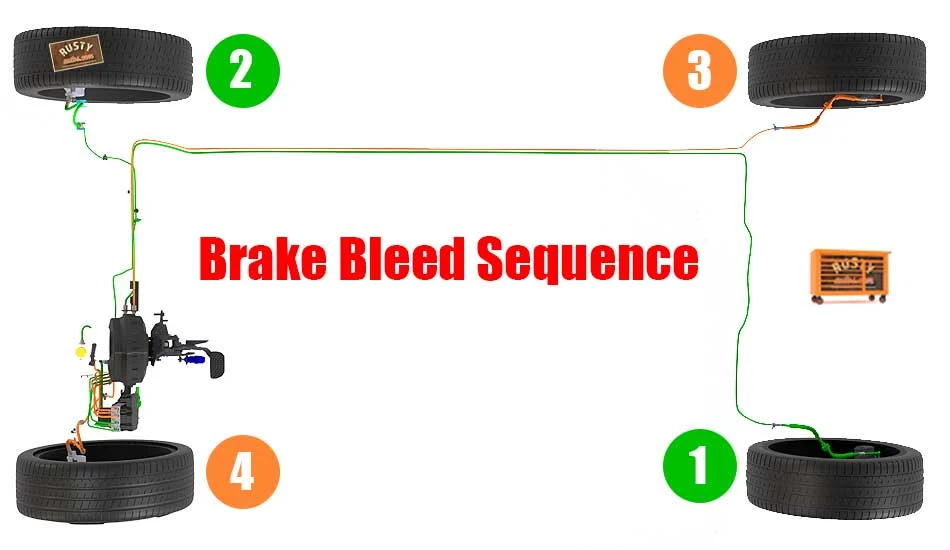
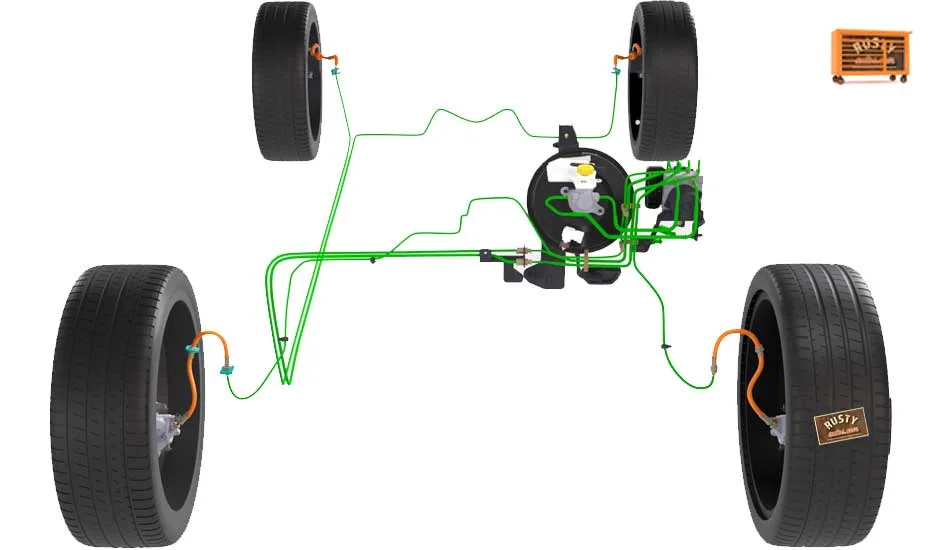
Bleeding is, as you know, a process whereby we purge the hydraulic system of trapped air pockets. Trapped air is compressible, which causes the horrible spongy pedal feel. The process requires different steps depending on the brake bleed method employed.
Broadly, there are four common methods for brake bleeding, they are:
- Vacuum method (Brake bleed tool required)
- Gravity method (No special tools needed)
- Pump and release method (No special tools needed)
- One-man bleed kit (DIY homemade tool needed)
I prefer the first method – the vacuum brake bleed kit, but we’ll cover the three most common DIY techniques used below. I’ve previously covered the fourth method (DIY homemade kit), which works great if you don’t have a brake bleeder. It covers making a killer homemade brake bleeder in minutes – How to bleed brakes without bleeder.
If you’ve replaced the brake calipers recently and the brakes won’t bleed, you may find this post useful –Brakes won’t bleed, and you may find this video helpful Brakes won’t bleed.
To begin any brake work, it’s important to use the correct brake fluid, so before topping up your brake fluid, make sure to use the correct type. I wrote a post about the likely causes of low brake fluid and fluid types; you can check it out here – Can I just add brake fluid?
Vacuum Method
As its name suggests, the vacuum method uses a vacuum to pull brake fluid through the lines, releasing trapped air. The process is simple, convenient, and a one-person job.


Check out the Brake repair tools page; I’ve listed a simple hand vacuum bleeder that works great.
I wrote a step-by-step guide to successful brake bleeding using a vacuum brake bleed kit – Bleed car brakes.
Tools you’ll need:
- Fresh fluid
- Wrenches 8, 10, or 11mm usually
- Brake bleeding kit
The process looks like this:
- Remove, set cap aside, and top up the fluid reservoir.
- Starting at the brake line farthest from the brake reservoir, attach the clear vacuum bleeding hose to the brake caliper or wheel cylinder bleed nipple.
- Apply grease to the bleed nipple threads – helps prevent air from entering the system through the threads.
- Open the bleed nipple and apply a vacuum to the system.
- Check and top up fluid reservoir regularly.
- When the hose runs free from air, close the bleed nipple while under vacuum.
- Move to each brake line and repeat, finishing with the brake line closest to the fluid reservoir.


A vacuum bleeder is the best option; here’s the model I recommend, sold on Amazon.com.
Gravity Method
This is my least preferred method; it’s usually successful, but some systems may require a few brake pedal pumps to move things along. This method is a little different from the vacuum method.
Tools you’ll need:
- Fresh fluid
- Wrenches 8, 10, or 11mm usually
- Brake bleeding bottle and clear hose
The process looks like this:
- Remove, set cap aside, and top up the fluid reservoir.
- Quarter-fill the bottle with fresh fluid, and submerge the bottom of the hose below the fluid (important)
- Starting at the brake line farthest from the brake reservoir, attach the clear bleeding hose to the brake caliper or wheel cylinder bleed nipple.
- Apply grease to the bleed nipple threads – helps prevent air from entering the system through the threads.
- Open the bleed nipple and allow the fluid to gravity bleed.
- Check and top up fluid reservoir regularly.
- When the hose runs free from air, close the bleed nipple.
- A variation on this method includes pumping the brake pedal to move the fluid through the brake lines.
- Move to each brake line and repeat, finishing with the brake line closest to the fluid reservoir.
This is my least preferred method because the gravity bleed technique takes longer, and pumping the brakes risks damaging the seals of the master cylinder (higher risk on older cars).
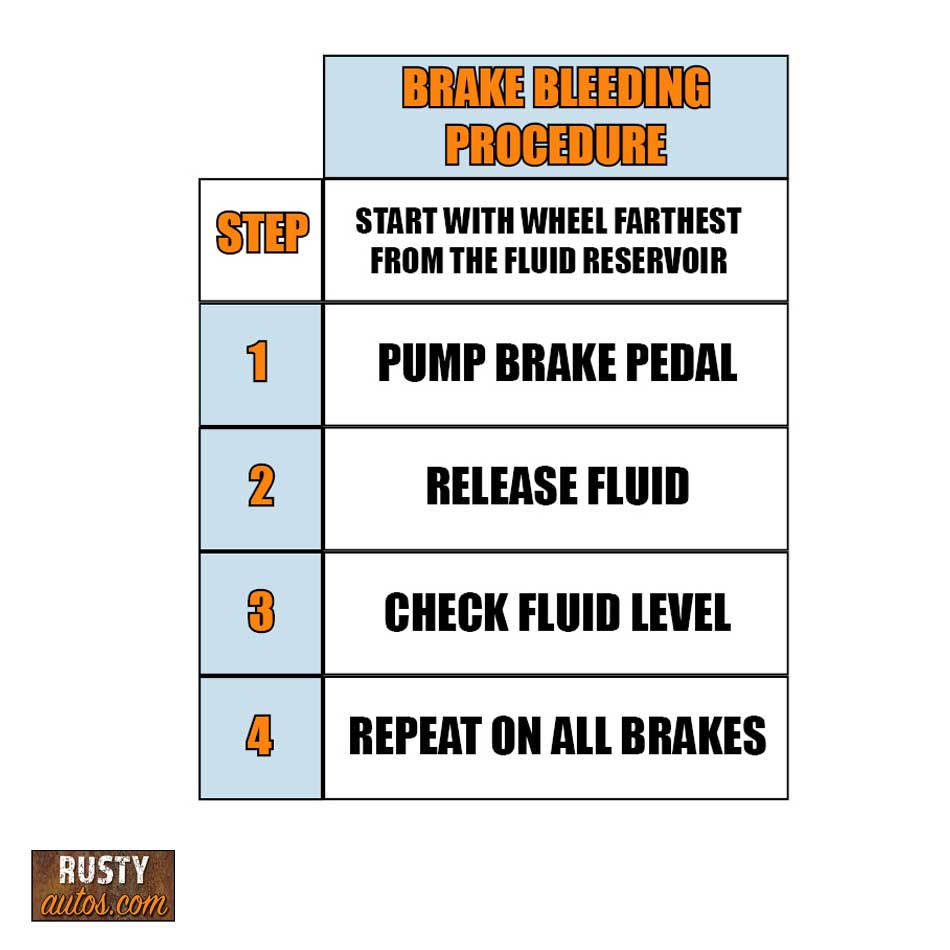
Pump & Release Method
This is how my father taught me to bleed brakes; as a kid, I was the brakeman, and my job was to pump and hold the brake pedal when instructed. This is a two-person procedure, one person builds brake system pressure (brake person), and the second person releases the fluid (release person).
To execute this procedure, you’ll need the following:

- Two people
- Fresh fluid
- Wrench’s 8, 10, or 11mm usually
- Fluid bottle and clear hose
The process looks like this:
- Remove, set the cap aside, and top up the fluid reservoir.
- Quarter-fill the bottle with fresh fluid, and submerge the bottom of the hose below the fluid (important)
- Starting at the brake line farthest from the brake reservoir, attach the clear bleeding hose to the brake caliper or wheel cylinder bleed nipple.
- Apply grease to the bleed nipple threads – helps prevent air from entering the system through the threads.
- Brake man is instructed to pump the brakes several times and to then hold the brake pedal down. (important)
- The release man then opens the bleed nipple and releases the fluid pressure together with the trapped air.
- Release the man, then close the bleed nipple and repeat the process until the fluid runs without air in the hose.
- Check and top up the fluid reservoir regularly during the process.
- Move to each brake line and repeat, finishing with the brake line closest to the fluid reservoir.
This technique isn’t advised for older vehicles, especially those without regular fluid maintenance. This type of process requires the brake pedal to go to the floor several times. This runs a real risk of damaging the master cylinder seals.
Older brake systems may develop corrosion on the piston plunger, and running a corroded plunger past its normal travel distance can damage master cylinder seals.
I also wrote a post about successful brake system flushing using a DIY brake bleeder, which you may find helpful – Flush brake fluid system.
2 Contaminated Fluid

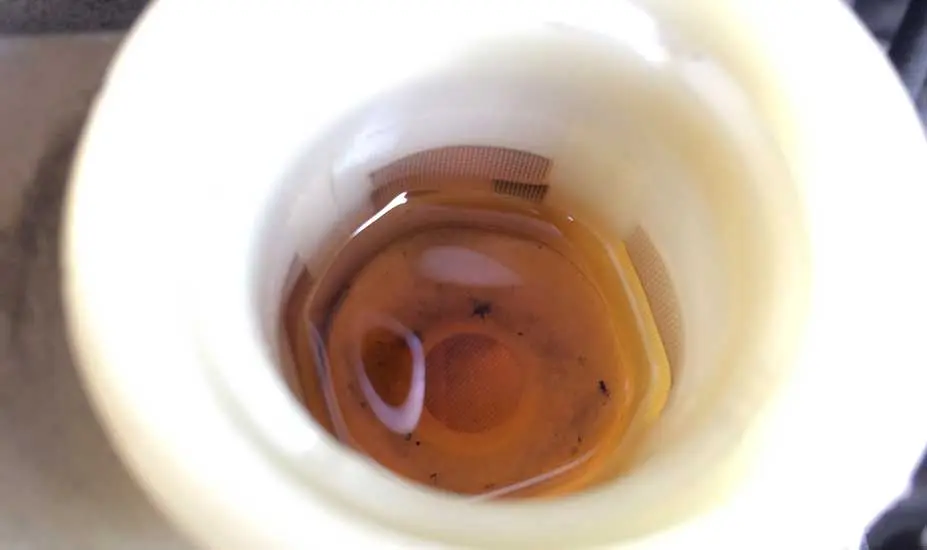
Brake fluid quantity is important, but so too is the quality. Hydraulic brake fluid is hygroscopic (attracts moisture), and that’s a problem. When a car brakes, it turns that kinetic energy into heat energy at the brake rotors.
The brake caliper positioned over the rotor naturally causes the brake fluid inside the brake caliper to heat. This isn’t a problem when the fluid is fresh. However, when the fluid is old, the moisture content boils and becomes steam. Steam isn’t compressible, so the pedal sinks to the floor.
Symptoms:
This is generally only a problem when the brakes have been warmed up for a while, and usually isn’t an issue when cold.
The fix:
Replace the brake fluid. Brake fluid isn’t drained like you drain motor oil. Instead, the old fluid is replaced by repeating the brake bleed technique. Approximately one quart (litre) of brake fluid is enough to flush the system completely.
I recommend buying a vacuum brake bleed kit; it makes the job simple and mess-free. Your brake fluid should be changed every two to three years, and the fluid marked on the reservoir cap is the recommended type.
Check out how to bleed brakes using a Vacuum brake bleeder – Brake fluid flush
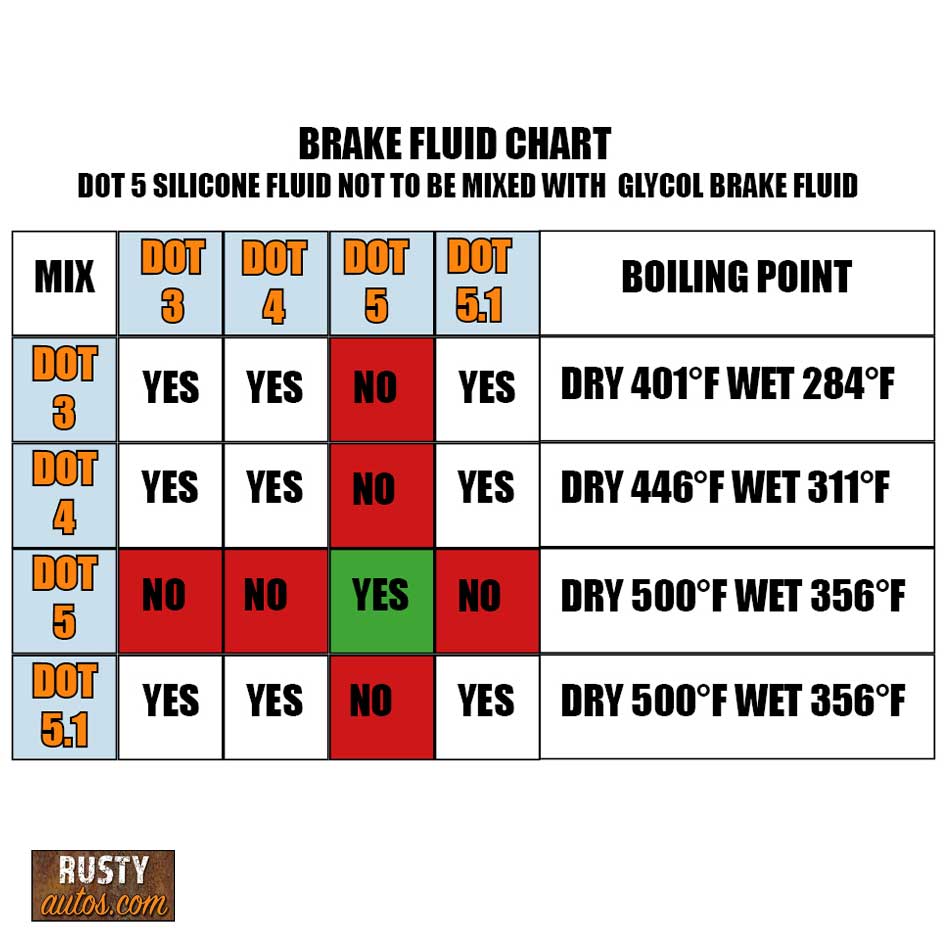
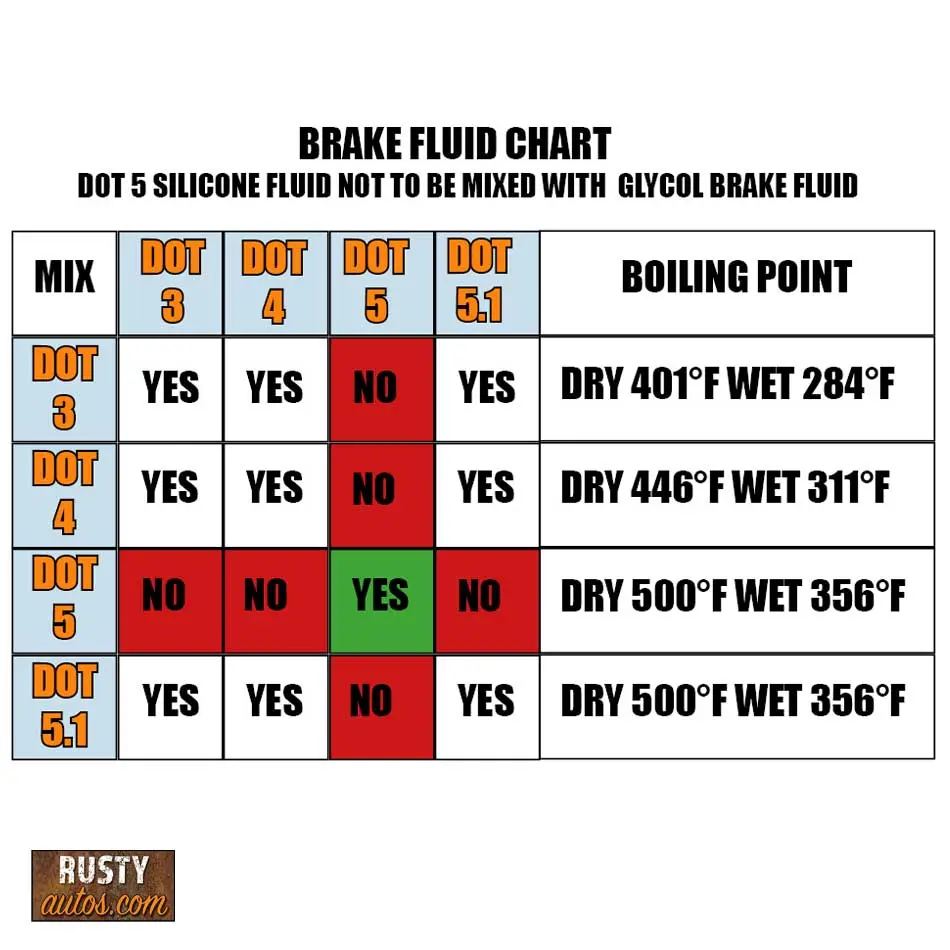
Mixing DOT 5 (Silicone-based) with DOT 3, 4, or 5.1 (Glycol-based) is a NO-NO; it will damage your brake system.
Mixing the different spec Glycol fluids is possible, but keeping them separate is better.
Main difference – boiling point.
I wrote a post about topping up brake fluid and the importance of using the correct type; you can check it out here – Can I just add brake fluid?
The higher the DOT, the higher the boiling point, and a higher boiling point is better.
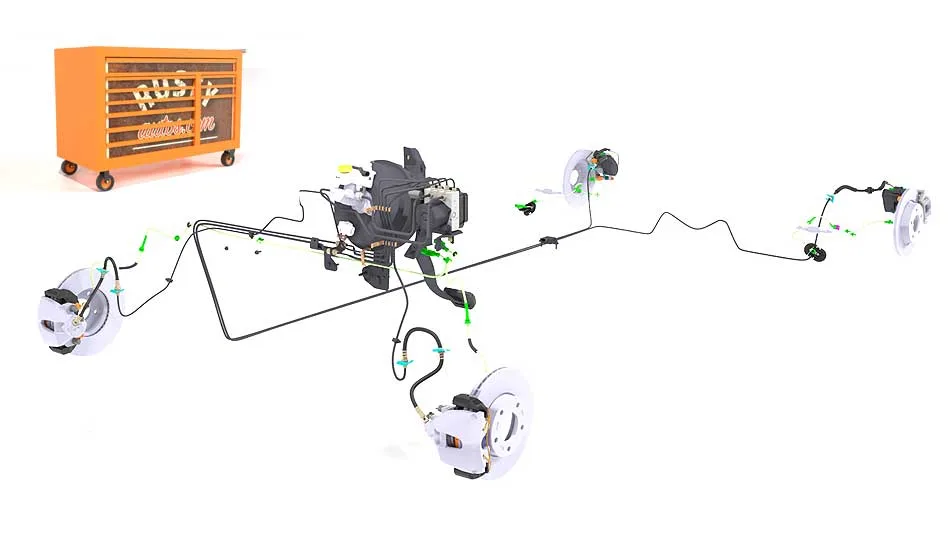
3 System Leak

Your hydraulic system works under pressure; a leak is possible. If fluid can leak out, then conversely, air can leak in. A fluid leak is usually self-evident.
A wet, oily patch around the brake components or lines must be investigated. Even the tiniest leak will allow air to enter the lines.
Common leak-prone areas include:
- Bleed nipples – Corrosion on the bleed nipple beveled seat prevents sealing
- Caliper seals – Brake caliper seals are damage, causing fluid leak
- Rear wheel cylinder seals – Rear wheel cylinder seals are a common failure (only fitted to vehicles with rear drums)
- Flexi hose unions – Corrosion on flexi to hard-line unions
- Brake lines – Corrosion
- Brake unions – Build-up of corrosion at unions is common
The fix: Find and repair the source of the leak and bleed the system.
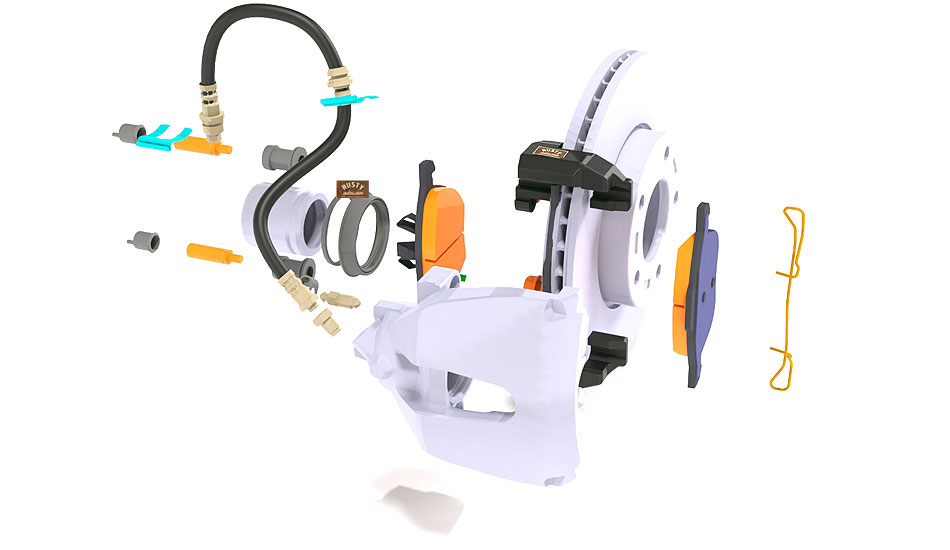
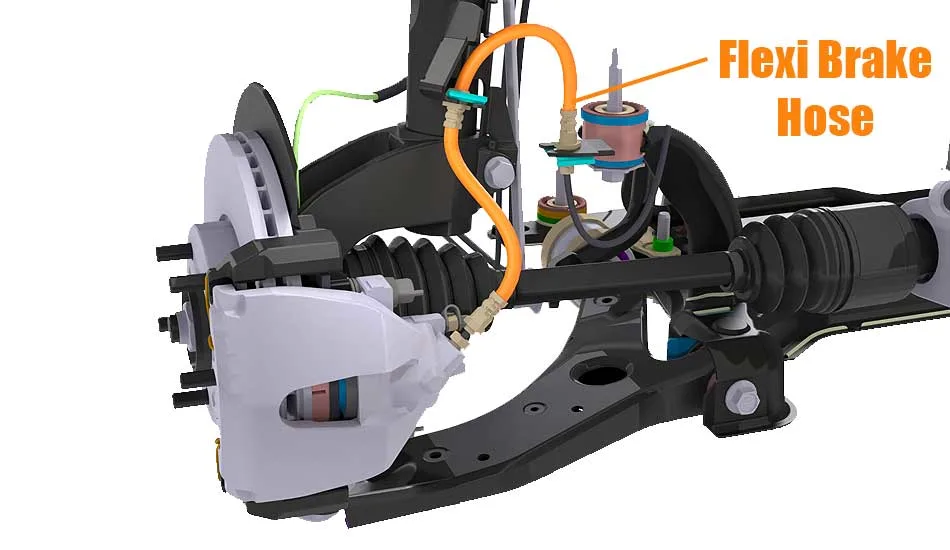
Faulty Flexi Brake Hose
A faulty brake hose can also cause a spongy feel, it’s a lot less likely, but I have replaced plenty, especially on older cars. I cover flexi hose issue here in this post – Brake caliper won’t go in


The flexible rubber brake hose between the chassis and the suspension allows for relative movement. The constant movement does take its toll and often without any visual cues.
The rubber hose may show signs of wear and tear and age or may not. The hose is constructed with an inner and outer wall; a rupture of either prevents fluid loss.
However, the weakened wall allows the hose to swell and expand instead of sending fluid pressure to the brake caliper, much like squeezing a balloon in the middle. The swelling of the hose causes a horrible spongy soft pedal.

I wrote a post about some of the issues a faulty flexi hose could cause; you can check that out here – Brake hose causing caliper to stick
The Fix:
Replace all brake hoses, as the others will also be close to failing, then go ahead and bleed the system.
You can check out the brake repair tools I use here on the Brake repair tools page
I wrote a ton of posts about all the most common brake troubleshooting and repairs; you can check them out right here in the brake blog section.
Brake Safety
Brakes are a genuine safety concern; if you aren’t confident they are correct, have your local mechanic check them immediately.


Check out the brake repair page for illustrated brake repair guides.
You may find these posts helpful:
- How to bleed brakes without bleeder
- Rotors keep warping
- What causes a wheel to get hot?
- What causes a wheel to lock up?
- Brake troubleshooting and repair blog page


I wrote a ton of car troubleshooting posts. Hopefully, you’ll never need them, but if you do, we’ve got you covered!
About the Author
John Cunningham is a Red Seal Qualified automotive motive technician with over twenty-five years of experience in the field. When he’s not writing about car repair, you’ll find him in his happy place – restoring classic cars.
Check out the DIY Brake Repair page for easy-to-follow brake repairs and troubleshooting tips.

Related Question

What does spongy brakes feel like? Spongy brakes feel soft and ineffective. Brake pedal travel is excessive, and the pedal will only take effect toward the end of its travel.
Would You Know What To Do?
If your engine warning light came on tonight, would you know to keep driving, pull over, or call for recovery?
Most drivers wouldn’t.
That’s exactly why I wrote this guide.

- About the Author
- Latest Posts


John Cunningham is an Automotive Technician and writer on Rustyautos.com. He’s been a mechanic for over twenty-five years and has worked for GM, Volvo, Volkswagen, Land Rover, and Jaguar dealerships.
John uses his know-how and experience to write articles that help fellow gearheads with all aspects of vehicle ownership, including maintenance, repair, and troubleshooting.