
I know what it’s like when the job doesn’t go to plan; these little challenges are sent to test your will and resourcefulness. So far, you’re doing great; you haven’t quit.
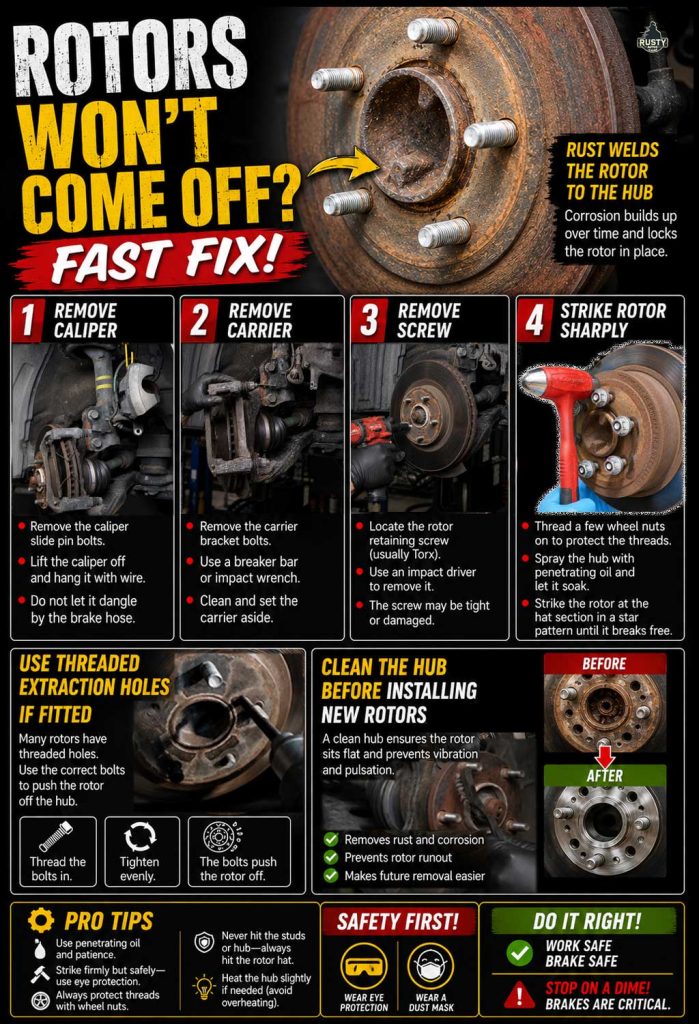
Remove stuck car rotors in four steps:
- Remove caliper
- Remove brake carrier
- Remove rotor holding screw
- Strike the rotor sharply
In this post, you’ll learn how to remove stuck rotors safely; I’ll also share how I perform a brake inspection and a few tips for nailing your Brake job like a pro.
Brakes Overview


Brakes last some drivers for years, and others may only last six months, depending on the vehicle, mileage, and driving style. Brakes that haven’t been changed in years can be challenging. Corrosion builds on the components, making life interesting.
1 Remove Caliper

Most calipers today are free-floating and slide on pins that need to be removed. Torx fasteners are the favored type, be sure to clean out the Torx head, especially if the dust caps are missing. The Torx should fit snugly; if not, use a pick to clean and remove grit from the Torx heads.
The bolts aren’t easily accessible, and if the head strips out, cutting tools will be needed. When refitting, apply thread lock and check torque specs for your vehicle; a normal spec is in the region of 30 Nm (22lb-ft).
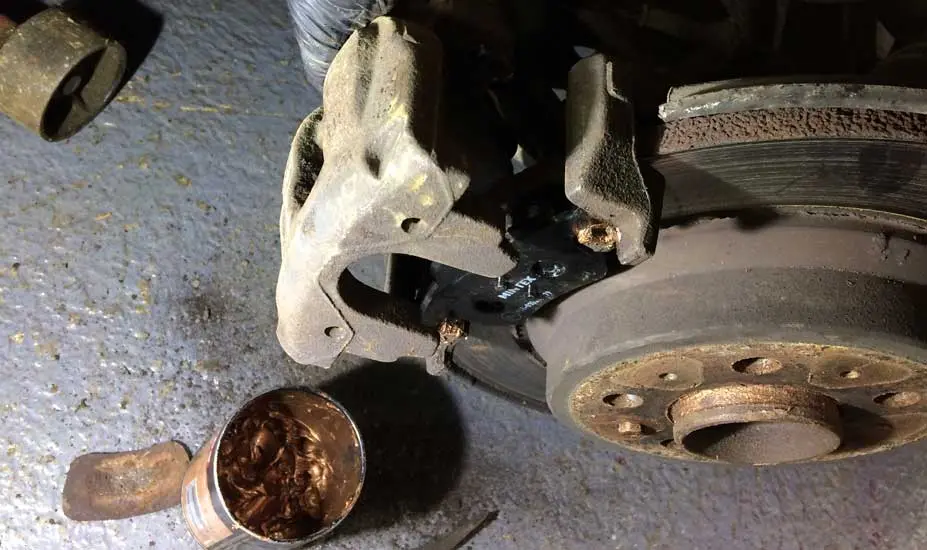
2 Remove Brake Carrier

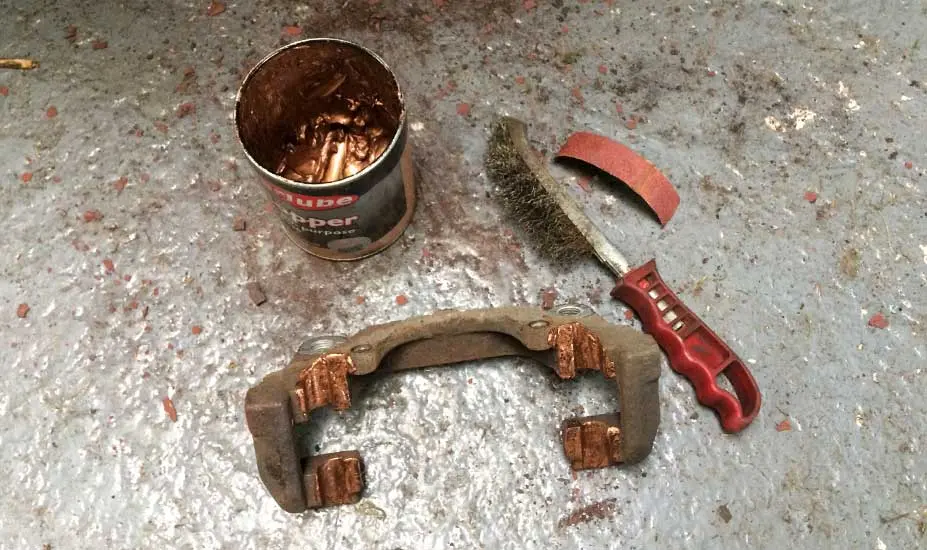
In most cases, the brake carrier (Calliper bolts to it) will need to be removed. A breaker bar or impact wrench makes life easy here. While removed, use a wire brush and copper grease to prep the carriers for reassembly.
When refitting, apply thread lock and check torque specs for your vehicle; a typical spec is around 133 Nm (98 lb-ft).
3 Remove Holding Screw


The Rotor holding fastener is countersunk and may go unnoticed. Most rotors use a Torx-head screw to secure the rotor in place when the wheel is removed. The fastener holds the rotor to the wheel knuckle. The screw often becomes damaged, so you may need to use an impact driver to loosen it.
What About Rotor Retaining Clips?
Some vehicles use thin metal retaining clips on one or two wheel studs to hold the rotor in place during factory assembly.
These clips are not required once the wheel is installed and can simply be cut off with side cutters if they prevent rotor removal.
Don’t mistake them for a safety device. Their only purpose is to keep the rotor aligned during vehicle assembly.
4 Strike Rotor Sharply
Before we strike anything, we’ll need a dusk mask and eye protectors. Brake dust is some nasty crap, and you don’t want it in your lungs. Spray down the components again with water. If your car has lug nuts instead of bolts, thread them all in one turn; this protects the threads from an accidental hammer strike.
Spray some WD40 around the hub and allow it to soak for 10 minutes.
Using the preening side (ball end) of the hammer, strike the rotor at the hub in a star configuration. Keep striking until she breaks loose, and she will break loose.
Check for Rotor Removal Holes
Many brake rotors include threaded extraction holes.
If your rotor has them:
- Thread the correct bolt into each hole.
- Tighten evenly.
- The bolts push against the hub, forcing the rotor off.
This method is often safer than excessive hammering and is commonly used on Japanese vehicles.
When the Rotor Still Won’t Budge
If the rotor refuses to move:
- Apply penetrating oil around the hub centre.
- Strike the rotor from different angles.
- Rotate the rotor between strikes.
- Use heat on the rotor hat section if necessary.
- Reinstall a couple of wheel nuts loosely to prevent the rotor from flying off unexpectedly.
Years of corrosion can effectively weld the rotor to the hub, so persistence is often the key.
Clean the Hub Before Refitting
Once the rotor is removed:
- Clean rust from the wheel hub using a wire brush.
- Remove corrosion from the hub face.
- Apply a very light coating of anti-seize to the hub centre.
A rusty hub can prevent the new rotor from sitting perfectly flat, causing brake pedal pulsation and steering wheel vibration after the repair.
This is a genuine mechanic trick that prevents comebacks.
Brake Inspection Pro Tips

The brakes are the most important systems on your car, and doing a brake job is totally within the skill range of most DIY weekend warriors. But brakes are serious business, and we’ll need to get this right. I’ve been a mechanic for more than 20 years, and I’ll share all the brake hacks and tricks to nail the job like a pro.
Before any brake job, I like to drive the vehicle and check the brake function. Typically, I’ll drive the vehicle far enough to warm the brakes, but before that, I’ll do some static checks.
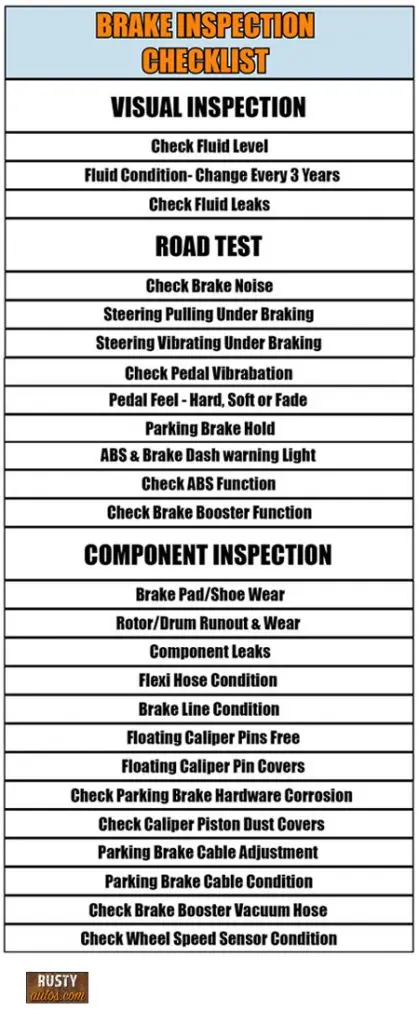
Static vehicle checks:
- Check the brake fluid level – A low fluid level is usually caused by brake pad wear, but it could be a brake line or seal leak.
- Fluid condition – Dark particles in the fluid suggest it’s old; brake fluid should be golden in colour. Change fluid every 3 years.
Checks on Start-up:
- Check brake booster – Place foot on the brake and start the vehicle, the pedal should sink a little.
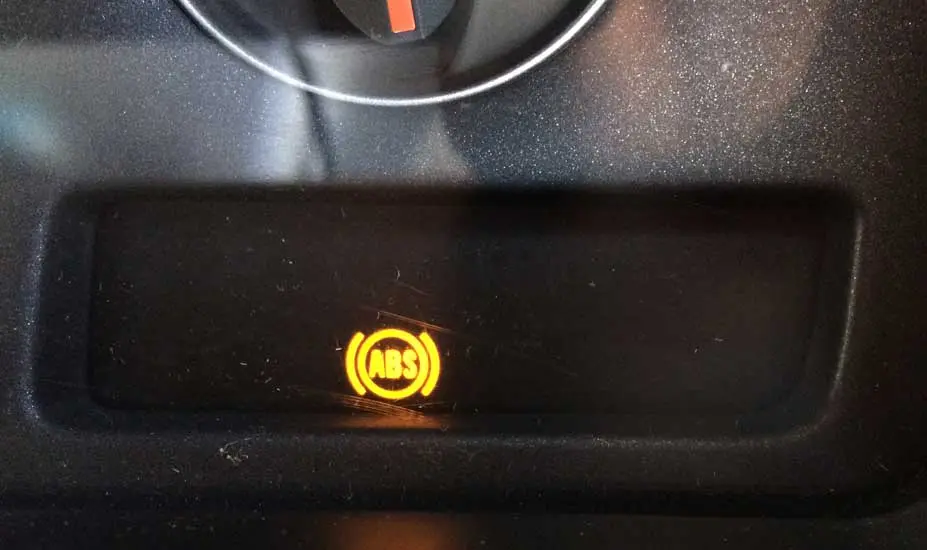
- At startup, does the ABS light go out? The ABS system is self-diagnosing, and the light stays on if the control module detects a problem.

Checks on the road:
- Brake pedal travel and feel – How far the pedal goes to the floor, a low, spongy pedal suggests air in the system.
- Brake performance – Are the brakes efficient, do they pull the vehicle up quickly.
- Brake noise – Squeal or metallic cyclical noise from the brakes suggests brake pad issue.
- Steering Vibration under braking – Suggests warped rotors, bushings, ball joints, or wheel bearings.
- Brake pedal pulsing – Suggests warped rotors (excessive run-out)
- Vehicle pulling to one side under braking – Suggests a brake caliper imbalance and requires further investigation.
Wheels off inspection:
- Pads/shoes check – Inboard pads will show more wear than outboard (floating calipers). Minimum thickness 2mm.
- Check calipers – Floating calipers should be free to move laterally.
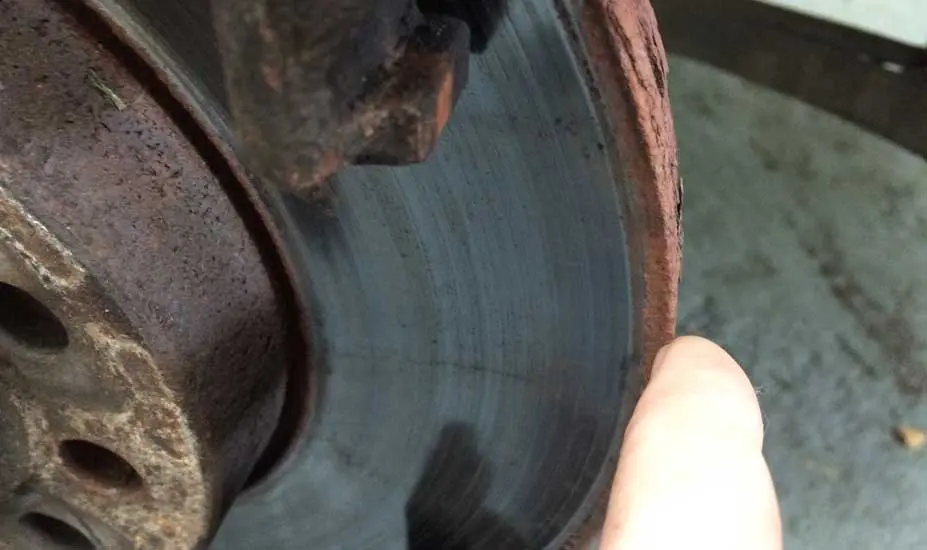
- Check rotor wear – In excess of 1mm requires resurfacing, more than 2mm requires replacement.
- Check flexi hoses and steel brake lines – Pershing, cracking, corrosion and leaks.
- Check park brake tension – Lube mechanical cables and check for EPB fault codes.
You may find the brake resources page useful, it’s a fluff-free guide to DIY brake repairs.

Brake Fitting Tips
The correct tools will make the job move like butter. Not all of these tools are necessary.
Tools you’ll need:
- Jack
- Axle stand
- Water spray bottle
- Dust mask
- LED inspection light
- Long flat screwdriver
- Wrenches
- Sockets
- Wind-back tool
- Copper grease
- Moly dry grease
- Silicone grease
- Wire brush
- Bungee cord
- Impact wrench
- Torque wrench would be nice, but not critical.
Check out all the tools I use for a brake job on the Brake Repair Tools page, and if you need brake system parts, check out the Amazon link below.
Amazon Brake PartsHere’s a list of useful tips when executing a brake job.
- Remove the brake fluid reservoir cap to prevent fluid from overflowing or splashing.
- Clean the wheel hub and apply copper grease to prevent the wheel from sticking.
- Clean and lube the floating caliper pins.
- Use only silicone grease on rubber components.
- Rear calipers pistons need to be turned and pushed simultaneously.
- Replace brake pad clips when replacing brake pads.
- Use anti-sequel or copper grease on pad shoulders and backs.
- Torque road wheels in star formation when fitting.
- Change brake fluid every 3 years.
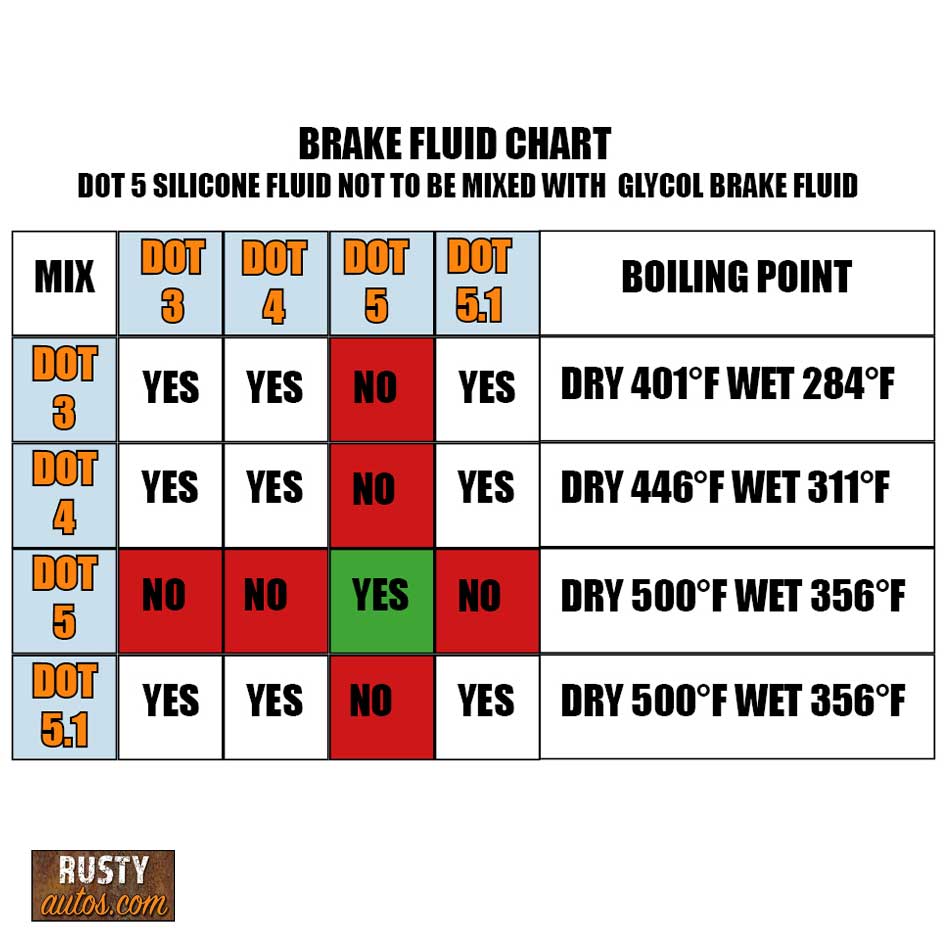
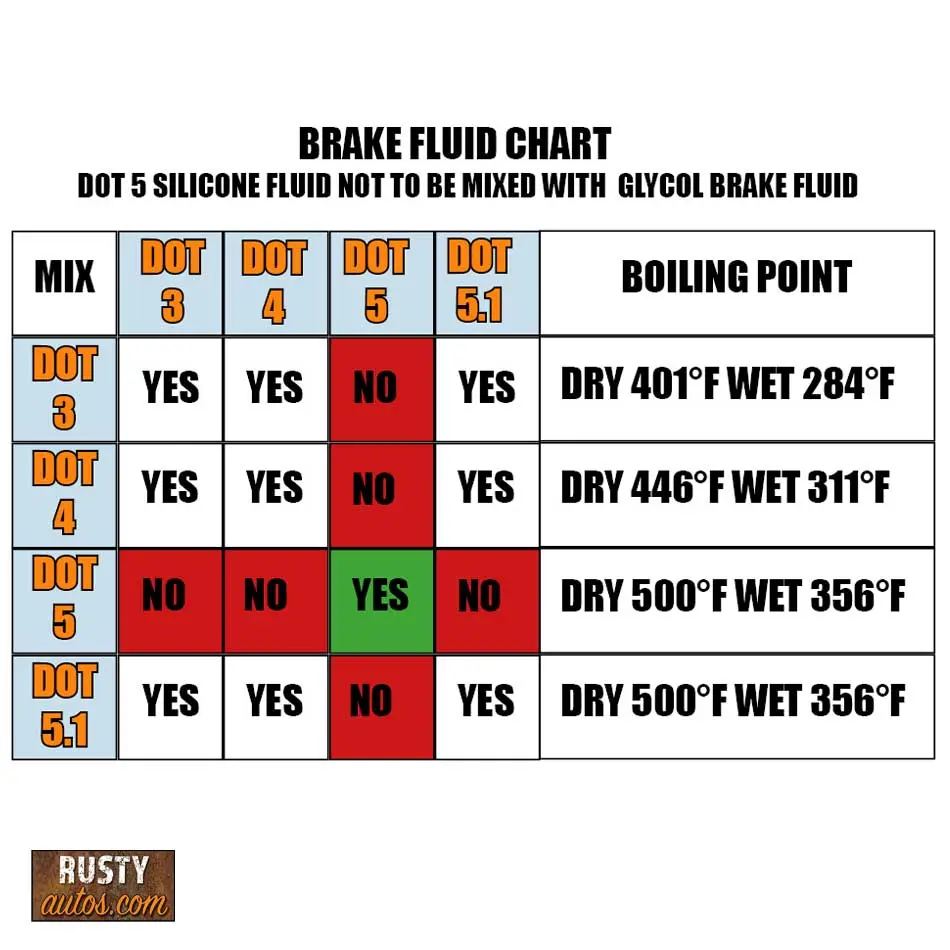
- Avoid mixing different brake fluid types and never mix silicone with glycol-based fluids.
- Check fluid level and top up after brake pad procedure if needed.
- Caution – Build brake pressure by pumping the pedal before test driving, the brakes won’t be effective when fitting new pads.
- Test drive and brake normally, brakes will feel ineffective at first.
Related Questions
Which brakes go out first?
Front car brakes wear out the fastest for two reasons: the front of the car is heavier, and during braking, most of the car’s weight is transferred to the front axle, increasing the workload on the front pads and rotors.
Why is my new rotor stuck to the hub already?
Brake rotors are cast iron and begin rusting almost immediately when exposed to moisture. Corrosion builds between the rotor hat and the wheel hub over time, eventually bonding the two together. Applying a light coat of anti-seize to the hub during installation helps prevent future seizure.
You may find the following posts helpful:
What causes a wheel to lock-up?
New brakes smoking on one side
Would You Know What To Do?
If your engine warning light came on tonight, would you know to keep driving, pull over, or call for recovery?
Most drivers wouldn’t.
That’s exactly why I wrote this guide.

- About the Author
- Latest Posts


John Cunningham is an Automotive Technician and writer on Rustyautos.com. He’s been a mechanic for over twenty-five years and has worked for GM, Volvo, Volkswagen, Land Rover, and Jaguar dealerships.
John uses his know-how and experience to write articles that help fellow gearheads with all aspects of vehicle ownership, including maintenance, repair, and troubleshooting.