
A winking headlight is a real pain, but the good news is it’s usually a really easy problem to solve. You’re in the right place; this post will cover all you need to know to nail the repair like a pro!
Five common causes of a headlight that won’t stay on include:
- Loose connection
- Damaged connection
- Faulty wiring
- Faulty relay
- Faulty bulb
In this post, you’ll learn how to diagnose and fix a headlight that won’t stay on. This post covers both HID and halogen lighting systems.
Lights Overview
I know you are here to fix a winking headlight but here are a few basic things you should know about vehicle lighting systems. Most head lighting systems use incandescent bulbs and a regular 12 volts to power them. These systems are safe to work on and in general, don’t require any special precautions.
Higher-end vehicles will, however, likely have HID (High-intensity Discharge), also known as Xenon lighting. This system uses specially designed xenon gas-filled bulbs and requires much higher voltages, around 25,000 volts, to ignite the bulb gases. When running, the bulbs are extremely hot and pressurized. Working on the HID system requires care and attention to safe working practices. The voltages are high enough to kill.
The gas-filled bulbs require special attention when handled. Take some time to check which system is fitted to your car before attempting repairs. Check the headlamps; HID lights display D1R, D1S, D2R, and D2S on the lens cover.
Working On HID Systems
Before working on your HID lighting, you must ensure it is safe to do so. Here’s an outline of the system, and it covers the steps you’ll need to take to safely work on it.
- Before handling any components, turn the power off and disconnect the battery negative cable. However, you’ll need to use a battery maintainer to keep the control module’s stored values alive. Disconnecting the battery without using a maintainer will require calibration of various systems such as the Throttle body, HVAC, Power windows, Electric Steering, and steering angle sensors.
- Don’t touch any of the lighting components in damp conditions.
- Don’t touch the bulbs with bare hands, the grease on the skin will damage the bulb when fired.
Components of the HID system include:
- Bulbs – Bulbs are filled with xenon gas and two electrodes. The high voltage sent through the electrodes causes the gas to emit white plasma light about three times as bright as a regular halogen bulb.
- Igniter – The Igniter steps up the car’s 12v system to 12k, which is required to fire the xenon bulbs. Once running, a much lower voltage (about 100v) is needed to maintain the arc.
- Ballast (inverter) – Automotive electrical systems run on direct current (DC), and HID system runs alternating current (AC); the Ballast or inverter converts DC to AC.
- Some of these components may either be stand-alone or integrated with the bulb.
1 Loose Connection
The most likely cause of a winking headlight is a loose connector on the rear of the lamp unit. The loose connector causes an interruption in the flow of voltage which causes the bulb to be dim or go out altogether. As you might imagine, a bump in the road may cause the connection to come loose; engines create a ton of vibration, often causing connectors to come loose.
Diagnose:
If your system is a regular 12-volt incandescent lighting system, turn the lights on and try the wiggle test. This involves wiggling the wiring at the rear of the lamp and seeing if the light comes on steady.
A loose connector simply needs to be firmly pushed home, but it is possible the internal pins are loose, also.
Do not attempt the wiggle test when diagnosing the HID system instead of shutting off the ignition and lights and removing the battery negative cable. Remove the bulb connector, the igniter connector, and the ballast connector. Check for loose or damaged pins inside the connectors.
Fix:
If the internal block connector pins are loose, tighten them using a small flat screwdriver by closing the shoulders of the pin.
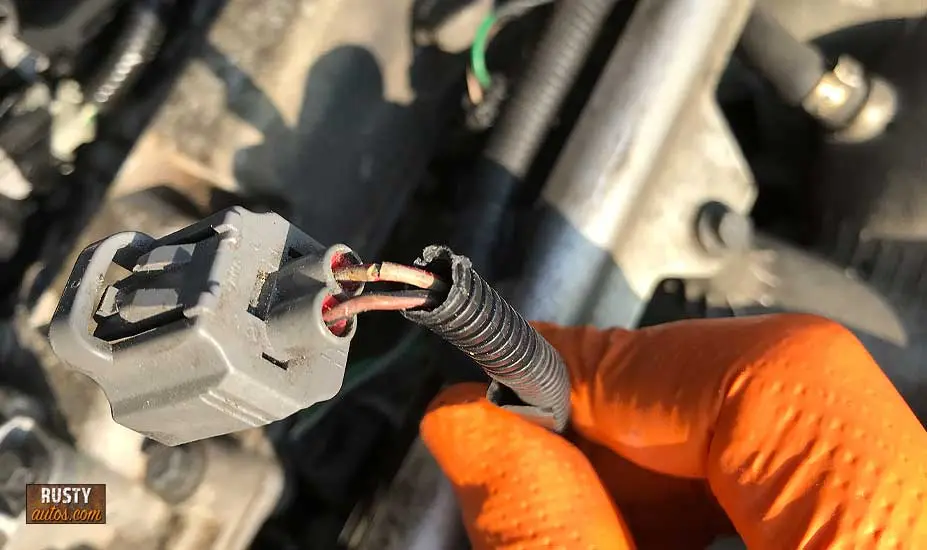
2 Damaged Connection
To diagnose, remove the connector; this often reveals burnt or melted plastic connectors and damaged pins. This occurs because of high resistance at the block connector. High resistance turns to heat, and the root cause is usually a neglected loose connector. The bad contact of a loose or corroded connector promotes arcing.
Fix:
The damaged connector will need to be replaced. A proper bulb block connector will need to be fitted together with soldered connections. Fitting individual spade connectors to the lamp will cause endless trouble with incorrect fitting and future loose wiring.
A repair kit is available at an auto parts store, and you’ll need a solder gun, solder, and heat shrink shielding. This is the only repair that will be permanent; simple wire connectors will only be a short-term solution.
Check out the tools I use here on the Auto electrical repair tools page.
3 Faulty Bulb
A bulb works hard, and they are durable; a regular halogen bulb could be expected to last about 1000 hours, and a xenon bulb about three times that. Nevertheless, an intermittent faulty bulb is possible.
Diagnose:
The fastest test for a bulb is to simply swap it to the other side of the vehicle and see if the problem follows the bulb or stays with the lamp unit. The latter suggests a circuit problem.
Fault-finding xenon bulbs isn’t quite as easy as the bulbs are harder to handle, so instead of swapping the bulbs, swap the igniter if easier. By process of elimination, you’ll find your failure.
Fix:
Replacing a bulb is not very difficult; follow these tips, and you’ll have no trouble nailing it.
- Handle the bulb by the base, never the glass.
- If you do handle glass, use an alcohol wipe to clean the bulb before fitting.
- Fit the lamp cover so the lamp seals; otherwise, bugs and moisture will shorten the life of the bulb.
- Power down HID systems and disconnect the ground (negative) battery cable but use a battery maintainer to keep the control modules’ stored settings alive.
4 Faulty Wiring

A wiring fault is a common cause of intermittent headlights too. A broken wire within the circuit will build resistance and cause the light to come on and off. Finding the break can sometimes be difficult.
Diagnose:
Try the wiggle test, but as you know, only on the basic lighting system, the HID systems need to be powered down and a resistance check run on each wire of the lights circuit.
A volt drop test is the best way to find high resistance in a regular 12-volt system, but the system will need to be live. A large difference indicates high resistance, check across connectors, etc.
Fix:
Remove the resistance by replacing a connector or section of wire. Using the same gauge wire as using a smaller wire can cause further resistance.
5 Faulty Relay

What’s a relay? A relay is a small electro-mechanical device that is employed to control a heavy amped circuit (Load) using a low amp circuit (control). It’s used in lots of circuits – lights, horns, wipers, starter motors, power seats, etc.
Sending power through the control side of the relay magnetizes it and causes copper armature contact points to close completing the load side circuit and powering up the light. The relay emits an audible click as the contact points close and open; this is a normal operation.
A faulty relay or dirty contact points may cause the relay to engage and disengage causing the light to work intermittently.


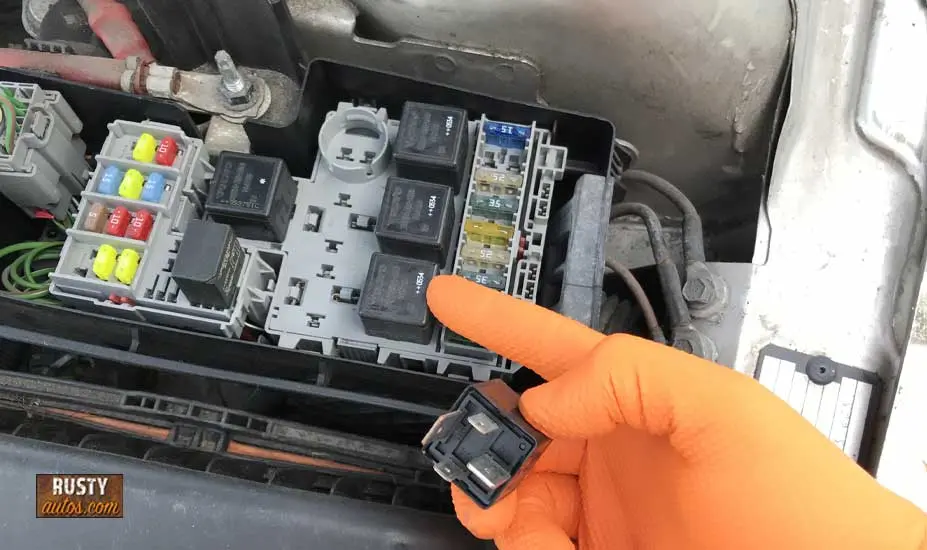
How To Diagnose A Faulty Relay
- Use your ears to locate the offending relay, place your hand on the relay and feel it click.
- Remove the relay and swap it with one of its neighbors; you’ll often find many identical relays in the same fuse box.
- Swapping the relays is a fast and simple way to diagnose.
- Shaking a faulty relay will often produce a rattling sound.
- Hotwire the relay and check resistance using a volt meter.
You’ll find a useful plug and test relay tester here on the Auto electrical repair tools page.


How To Replace A Relay
Replacing is easy; pull out the old and make sure the pins are correctly aligned before pushing home the new relay. Nice!
Related Question
Why does the bulb keep blowing? Moisture trapped inside a headlamp is the most common cause of premature bulb failure.
- About the Author
- Latest Posts


John Cunningham is an Automotive Technician and writer on Rustyautos.com. He’s been a mechanic for over twenty-five years and has worked for GM, Volvo, Volkswagen, Land Rover, and Jaguar dealerships.
John uses his know-how and experience to write articles that help fellow gearheads with all aspects of vehicle ownership, including maintenance, repair, and troubleshooting.