


Are your tires starting to wear unevenly? Tire rotation is an essential part of car maintenance that can help prolong the life of your tires and improve your car’s performance.
I’m John Cunningham, a qualified and experienced auto technician, and in this step-by-step guide, I’ll walk you through the process of rotating your tires on your own. Whether you’re a complete beginner or just need a refresher, our guide has got you covered.
Worth noting although we refer to this process as rotating the tires, we actually move (rotate) the whole wheel, not just the tire.
Worth also noting on vehicles with Tire Pressure Sensors (TPS), we’ll need to let the onboard computer know that we have relocated the wheel to its new location. For most vehicles, this can be done vis the Drivers Information Module (DIM); however, some vehicles may require a small electronic TPS tool which I’ll link here. Anyhow I’ll cover recalibrating it below.
In this blog post, I’ll cover:
- Why tire rotation is important and how often you should do it
- The tools and equipment you will need, including an axle stand and torque wrench for safety
- How to choose a safe location to jack up your car and how to jack it up properly
- How to remove and inspect your tires for wear and damage
- Different tire rotation patterns, including front-to-back and X-pattern, and how to determine which one to use
- How to properly rotate your tires and reinstall them on your car
- Final checks, including resetting the tire pressure sensors (TPS), checking tire pressure, and inspecting lug nuts for proper torque
Safety
As a beginner, it’s essential to prioritize safety when rotating your tires. Always work on a level, hard surface, use an axle stand to support your car, and make sure to use a torque wrench to tighten lug nuts to the correct torque specification. We’ll provide detailed instructions on how to do all of this in our guide.
It’s also important to note that the manufacturer may dictate the tire rotation pattern, but rotating tires front-to-back on the same side of the vehicle is standard.
Swapping tires from side to side can be problematic with directional tires, so make sure to check your tires for the directional arrow if moving side-to-side.
Why Tire Rotation Is Important
Tires in different positions on your car wear differently, depending on various factors such as driven wheels, driving habits, weight distribution, terrain, and tire design.
For example, front tires often wear faster than the rear ones in front-wheel drive cars (FWD) due to the front wheels being the driven wheels, and steering and braking forces also cause wear. While in rear-wheel drive (RWD) vehicles, tires undergo more strain due to the engine’s power.
By rotating your tires regularly, you can help equalize the wear across all four tires, which helps to maximize their lifespan. Additionally, tire rotation can help maintain proper alignment and balance, leading to better handling and improved fuel efficiency.
How Often Should You Rotate Your Tires?
Tire rotation frequency varies depending on the car, tire type, and driving conditions. However, a general guideline is to rotate your tires every 6,000 to 8,000 miles or every six months, whichever comes first. Consult your car’s owner manual or a trusted mechanic for your specific car and tire recommendations.
Tools and Equipment Needed
Before starting, gather the necessary tools and equipment:
- Jack and jack stands: Make sure they’re rated for your car’s weight and have a secure grip on the body.
- Lug wrench: It’s usually included with your car’s tools, but make sure it fits your car’s lug nuts size.
- Torque wrench: A tool that measures the torque applied to the lug nuts, ensuring that they’re tightened evenly and securely. A torque wrench is necessary for safety and to avoid damaging the wheel or brake components.
- Chocks: Wedge-shaped objects that prevent the car from rolling during tire rotation.
- Gloves and safety glasses: Protect your hands and eyes from dirt, debris, and sharp edges.
Tire Rotation Stepped Process

Step 1 Jacking Up Your Car
- Choose a safe location: Find a flat, level surface, away from traffic and slopes, with enough space to work and move around.
- Engage the parking brake: Put the car in park (for automatic transmissions) or first gear (for manual transmissions), and engage the parking brake for extra safety.
- Chock the wheels: Place wheel chocks behind and in front of the wheels that aren’t being raised.
- Loosen the lug nuts: Use the lug wrench to loosen them, but don’t remove them yet. This is easier while the wheel is still on the ground, and the resistance from the car’s weight helps prevent the wheel from spinning.
- Raise the car: Place the jack at the recommended lifting point, usually near the wheel, and pump the jack handle to raise the car. Don’t go beyond the recommended lifting height to avoid instability and damage to the car. Always refer to the owner manual for specific instructions.
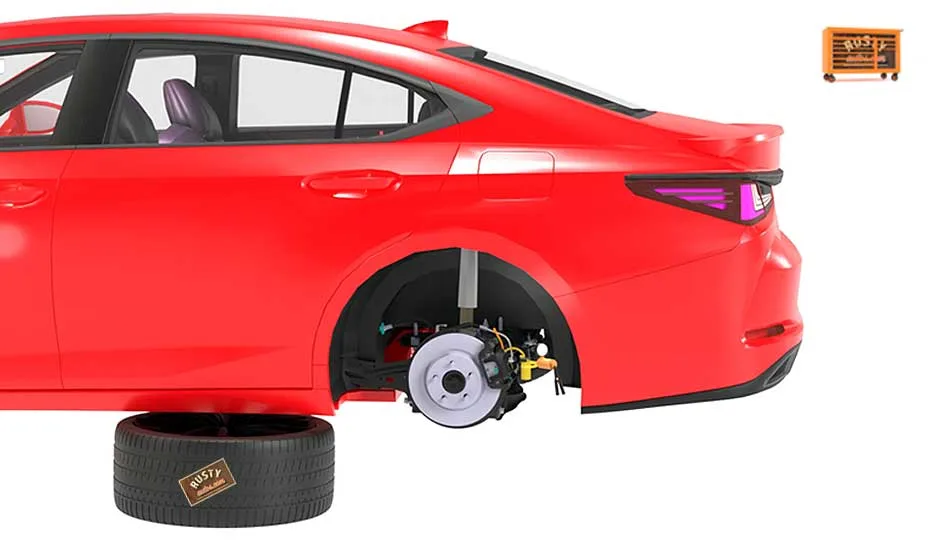
- Secure the car with jack stands: Slide the jack stands under the car’s recommended supporting points and lower the car onto them. If you don’t have jack stands, improvise with the car’s spare wheel, but never trust a jack by itself. Double-check that the car is stable and the stands are securely in place before working on the wheels.
Step 2 Removing the Wheels
- Remove the lug nuts: Use the lug wrench to remove the lug nuts altogether. Put them in a safe place to avoid losing them.
- Remove the wheel: Grab it with both hands and pull it towards you while keeping it straight, then lift it off the hub. If it’s stuck, wiggle it slightly; if it refuses to move, we’ll need to be more persuasive; check out this post “for how to handle “Wheel won’t come off.”
Step 3 Tire Inspection


While the tires are off, take the time to inspect them for any signs of wear or damage, such as cracks, bulges, or uneven tread wear. It may be time to replace your tires if you notice any issues.
Step 4 Rotating Pattern
Now that you have removed the tires and inspected them for any damage, it is time to rotate them. There are several tire rotation patterns, and the pattern you use will depend on the type of tires on your car and the manufacturer’s recommendations.

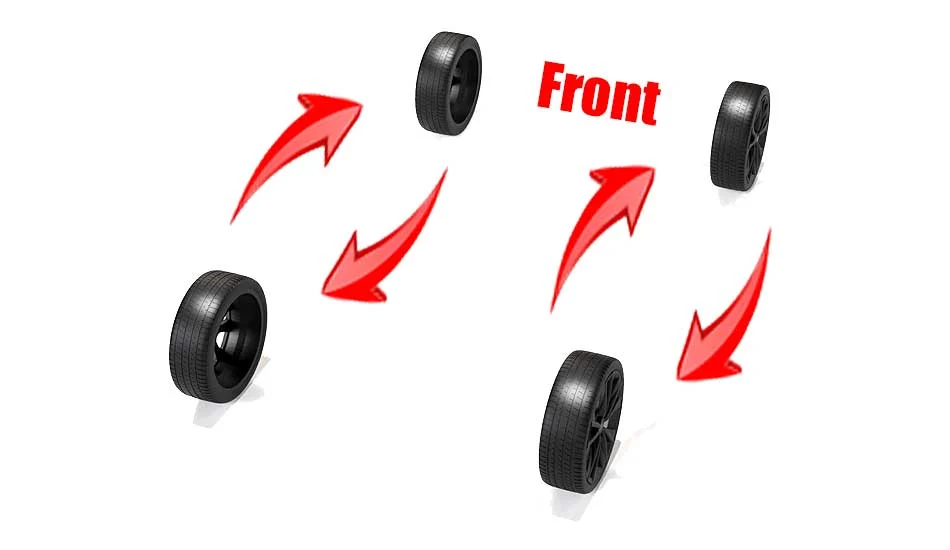
For most cars, rotating the tires from front to back on the same side of the vehicle is standard. This means that the front left tire will go to the back left, and the front right tire will go to the back right.
This rotation pattern is typically used for cars with directional tires.
If your car has directional tires, swapping them from side to side can be problematic, so make sure to check them for the directional arrow if you are thinking of moving them from side to side.
If you are unsure which tire rotation pattern to use, consult your car’s owner manual or a professional mechanic for guidance.

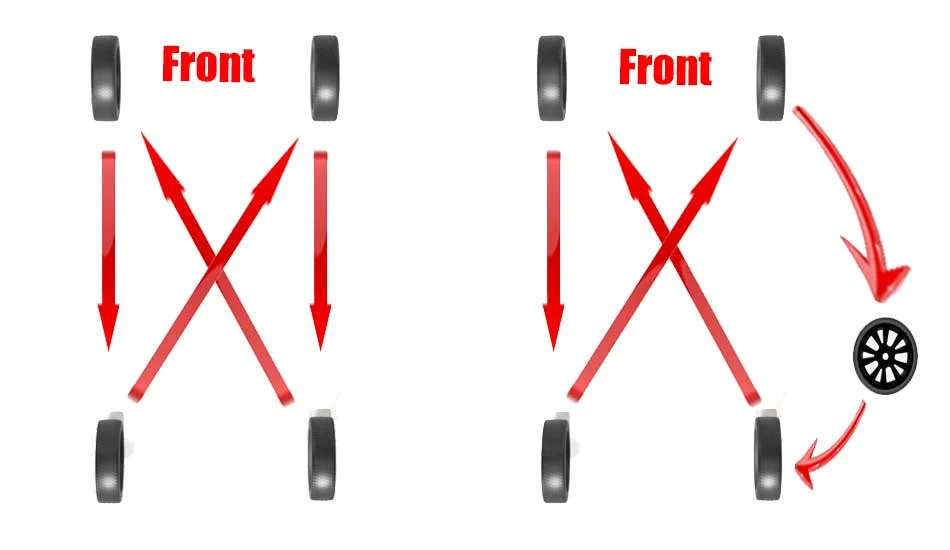
Here are some other common types of rotation patterns, including one for spare wheel rotation.
Once the lug nuts are removed, gently lift the wheel off the ground and carefully place it in the appropriate position according to the tire rotation pattern you have selected.
Step 5 Reinstalling the Wheels
After rotating the tires, it is time to reinstall them. I like to add a little copper grease to the hubs to prevent wheel-to-hub corrosion; you’ll find the copper grease I use here on the brake repairs parts and tools page.
Begin by placing the tire back onto the car’s hub and aligning the holes in the wheel with the studs on the hub. Then, thread the lug nuts back onto the studs by hand to ensure they are correctly threaded.
Step 6 Lowering the Car Back Down
Remove the jack stands and carefully lower the car back down to the ground.
Step 7 Torque Wheel Lugnuts
Next, use your torque wrench to tighten the lug nuts to the manufacturer’s recommended torque specification. Car lug nuts are usually between 81 ft-lbs. to 100 ft-lbs. range (110 to 130 Nm), and trucks are set higher, typically in the 100 ft-lbs. to 150 ft-lbs. range (135 – 200 Nm)).
It is crucial to torque the lug nuts to the correct specification to ensure that the wheel is safely secured to the car. I made a video about torquing wheels and how to set your torque wrench. You can check it out here – Torque wrench use


Step 8 Final Checks
Before hitting the road, perform final checks to ensure everything is in order. First, check the tire pressure in all four tires using a tire pressure gauge. Inflate or deflate the tires as necessary to ensure that they are all at the correct pressure. (See adjusting tire pressure guide video here)
If your vehicle has an onboard TPS monitoring system, you may need to calibrate it; check that out here – TPS Calibration.
Next, recheck the lug nuts to ensure that they are correctly tightened. Use your torque wrench to confirm that the lug nuts are tightened to the correct specification.
Finally, take a test drive to ensure that everything is working correctly. Pay attention to how the car handles and if there are any unusual vibrations or noises.
A dislodged wheel rim weight commonly causes vibrations; having the wheel balanced at a tire shop is the most common fix for wheel vibrations.
TPS Calibration


Depending on your vehicle, there are two common methods for calibrating your TPS. Most vehicles will allow for calibrating manually through the DIM, but some, as said, may require a handheld tool. A good tire shop will happily do it for you.
The two methods are as follows:
Method 1: Using the Driver Information Module
- Locate your dashboard’s “TPMS” or “Tire Pressure Monitoring System” button. This button is typically found near the steering wheel or on the center console.
- With your car turned on and in “park,” press and hold the TPMS button until the indicator light on your dashboard blinks twice.
- Release the TPMS button and drive your car at speeds above 15 mph for at least 20 minutes. This will allow the sensors to recalibrate and adjust to the new tire positions.
- After driving for 20 minutes, check the tire pressure readings on your driver information module. They should now match the correct tire pressures for your new tire positions.
Method 2: Using a Handheld Calibration Tool
- Purchase a handheld TPMS calibration tool. You can find these tools online or at your local auto parts store.
- Turn on your car and plug the calibration tool into the OBDII port, which is typically located under the dashboard on the driver’s side.
- Follow the on-screen instructions on the calibration tool to enter the make and model of your car, as well as the new tire positions.
- Press the “calibrate” button on the calibration tool and wait for the process to complete. This may take a few minutes.
- Once the calibration is complete, check the tire pressure readings on your driver information module. They should now match the correct tire pressures for your new tire positions.
Conclusion
Tire rotation is essential to maintaining your car’s tires and ensuring they last as long as possible. By rotating your tires regularly, you can help ensure that they wear evenly and maintain their performance over time.
Always be cautious and follow the proper safety procedures when working on your car. Always work on a level surface and use an axle stand to prevent the car from falling while you’re working on it. Additionally, use a torque wrench to properly tighten the lug nuts to the manufacturer’s recommended specification.
By following the steps outlined in this guide, you can perform a tire rotation on your own and save yourself money on a trip to the mechanic. Happy DIYing!
About the Author
This article was created with the assistance of AI technology to aid the author, John Cunningham, who is a seasoned Red Seal-certified auto technician with more than 25 years of experience in vehicle repairs. However, please note that John Cunningham has edited the content to ensure accuracy and quality.
You may find the following links helpful:
- About the Author
- Latest Posts


John Cunningham is an Automotive Technician and writer on Rustyautos.com. He’s been a mechanic for over twenty-five years and has worked for GM, Volvo, Volkswagen, Land Rover, and Jaguar dealerships.
John uses his know-how and experience to write articles that help fellow gearheads with all aspects of vehicle ownership, including maintenance, repair, and troubleshooting.