
Welcome to the exciting world of MAP sensors. Before we delve into the details, it’s important to note that not every car is equipped with a MAP (Manifold Absolute Pressure) sensor.
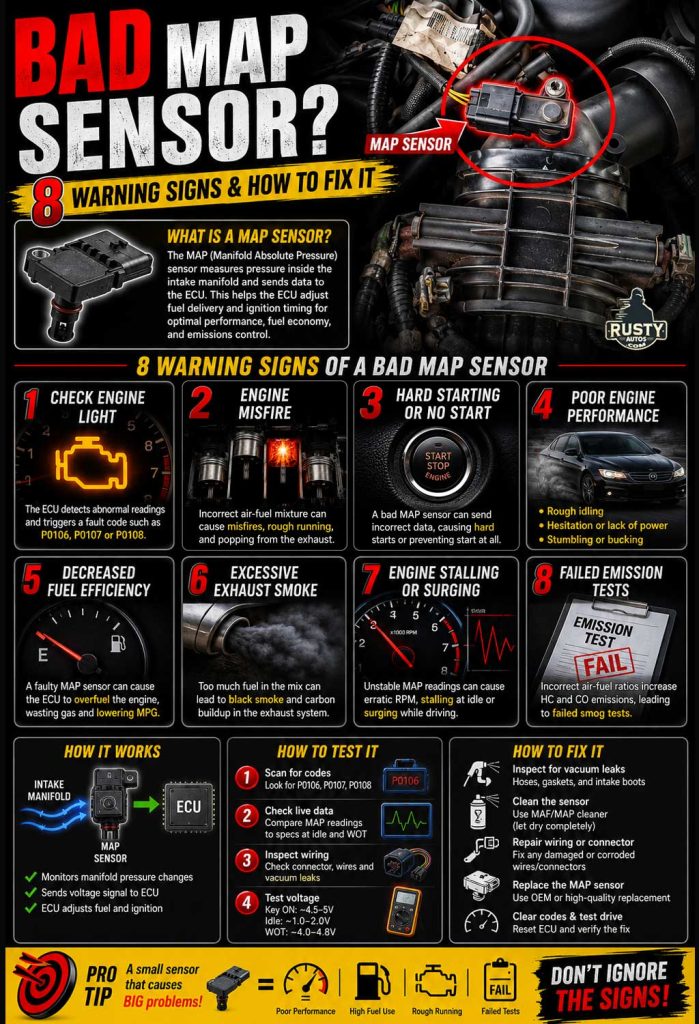
This mighty little sensor plays a crucial role by measuring the intake manifold pressure and providing the data to the Engine Control Unit (ECU). With this information, the ECU adjusts the air-fuel mixture for optimal combustion, ensuring efficient engine performance, fuel economy, and emissions control.
How the MAP Sensor Works
As an engine runs, the pressure inside the intake manifold constantly changes depending on throttle position and engine load. When the throttle is closed, such as when idling or coasting, the engine creates a high vacuum (low absolute pressure). Conversely, when the throttle is wide open, allowing maximum air intake, the vacuum drops, and the manifold pressure increases.
The MAP sensor continuously monitors these pressure fluctuations and sends a corresponding voltage signal to the ECU. By analyzing these readings, the ECU determines how much fuel to inject and whether ignition timing needs adjustment. A faulty MAP sensor can lead to incorrect air-fuel mixture calculations, resulting in poor performance, rough idling, increased fuel consumption, or even engine stalling.
In vehicles with MAP sensors, they typically reside in the intake manifold or near it, where they can accurately gauge the pressure changes as the engine operates. This sensor helps the ECU make real-time adjustments to ensure the engine runs smoothly across various driving conditions.
For vehicles without a MAP sensor, alternative sensors like Mass Airflow Sensors (MAF) or a combination of other sensors may fulfil similar functions in monitoring and adjusting engine parameters.
In this guide, we’ll cover everything you need to know about the MAP sensor, from signs of a bad one, diagnostic procedures, to replacement. Let’s jump on in!
Where Is the MAP Sensor Located?
Most MAP sensors are mounted:
- Directly on the intake manifold
- On the throttle body
- On the intake plenum
- Occasionally on the firewall connected by a vacuum hose
The exact location varies by vehicle manufacturer and engine design.
Signs of a Failing MAP Sensor
A faulty MAP sensor can wreak havoc on engine performance, fuel efficiency, and drivability. Here are the key warning signs to look out for:
1. Check Engine Light
One of the most common symptoms of a bad MAP sensor is an illuminated check engine light. When the ECU detects abnormal MAP sensor readings—such as pressure levels that don’t match expected engine conditions—it triggers a diagnostic trouble code (DTC). These codes often include P0106 (MAP Sensor Performance Problem), P0107 (Low Input), or P0108 (High Input).
If your check engine light comes on, scanning the vehicle’s ECU with an OBD-II scanner can help pinpoint whether the MAP sensor is at fault.
2. Engine Misfire
A failing MAP sensor can send incorrect pressure readings to the ECU, leading to an improper air-fuel mixture. This can result in engine misfires, where one or more cylinders fail to combust properly. Misfires often cause jerky acceleration, a rough-running engine, or even loud popping noises from the exhaust. If left unaddressed, misfires can damage the engine over time.
3. Hard Starting or No Start
Since the MAP sensor helps regulate the amount of fuel injected into the engine, a completely failed sensor can lead to difficulty starting or even a no-start condition. If the ECU receives a reading that suggests abnormal manifold pressure (or no reading at all), it may not supply the correct amount of fuel for proper ignition.
This issue is especially noticeable in extreme weather conditions, where the air density is already variable.
4. Poor Engine Performance
A malfunctioning MAP sensor can cause:
- Rough idling – The engine may shake or feel unstable at idle.
- Hesitation during acceleration – You press the gas, but there’s a delay or sluggish response.
- Lack of power – The engine feels underpowered, especially when going uphill or towing.
- Stumbling or bucking – The vehicle may jerk as it struggles to maintain smooth power delivery.
Because the MAP sensor helps the ECU fine-tune fuel injection and ignition timing, incorrect readings can throw off performance across all driving conditions.
5. Decreased Fuel Efficiency
If your car suddenly starts guzzling more fuel than usual, a bad MAP sensor could be to blame. A faulty sensor may trick the ECU into thinking the engine is under heavy load, leading it to dump excessive fuel into the combustion chambers. This results in an overly rich mixture, wasting fuel and reducing miles per gallon (MPG).
6. Excessive Exhaust Smoke
If you notice thick black smoke from your exhaust, especially under acceleration, it could be due to a MAP sensor malfunction. When the ECU receives incorrect manifold pressure data, it may inject too much fuel, causing incomplete combustion and excessive carbon buildup in the exhaust system. This not only reduces efficiency but can also damage the catalytic converter over time.
7. Engine Stalling or Surging
Erratic RPM fluctuations are another sign of a MAP sensor issue. You might experience:
- Stalling – The engine dies at idle, especially at stoplights or when coasting.
- Surging – The engine revs up unexpectedly, even without pressing the accelerator.
These symptoms occur because the ECU struggles to regulate fuel delivery when MAP readings are unstable or incorrect.
8. Failed Emission Tests
A malfunctioning MAP sensor can cause high hydrocarbon (HC) and carbon monoxide (CO) emissions, leading to a failed emissions test. Since modern vehicles rely on precise air-fuel ratios to maintain clean combustion, a faulty MAP sensor disrupts this balance, increasing pollutants and making it harder to pass state or local emissions inspections.
Now let’s get to the diagnosis.
What Causes a MAP Sensor to Fail?
Common causes include:
- Age and normal wear
- Oil contamination from the PCV system
- Carbon buildup
- Moisture intrusion
- Corroded electrical connectors
- Damaged wiring
- Engine backfires damaging the sensor diaphragm
Although MAP sensors are generally reliable, contamination and wiring issues are far more common than complete sensor failure.
How to Diagnose a Bad MAP Sensor
Diagnosing a failing MAP (Manifold Absolute Pressure) sensor involves reading trouble codes, conducting a visual inspection, checking live sensor data, testing the wiring, and measuring sensor output. Below, we’ll walk you through each step to help pinpoint whether your MAP sensor is the culprit.
1. Scan for Trouble Codes (DTCs)
The first step in diagnosing a faulty MAP sensor is to connect an OBD-II scanner to your vehicle’s diagnostic port. A failing MAP sensor typically triggers one of the following diagnostic trouble codes (DTCs):
- P0068 – MAP/MAF Throttle Position Correlation: The ECU detects a mismatch between the readings from the MAP sensor, MAF sensor (if equipped), and throttle position sensor.
- P0105 – MAP Sensor Circuit Malfunction: A general error indicating the ECU is receiving an out-of-range or erratic signal from the MAP sensor.
- P0106 – MAP Sensor Performance Issue: The sensor is providing inconsistent or unrealistic manifold pressure readings.
- P0107 – MAP Sensor Circuit Low Input: The MAP sensor is sending a voltage reading that is too low, which may indicate a vacuum leak, clogged sensor port, or internal failure.
- P0108 – MAP Sensor Circuit High Input: The sensor is reporting a voltage reading that is too high, suggesting a short circuit, wiring issue, or an engine running under excessive load.
- P0109 – MAP Sensor Circuit Intermittent Malfunction: This code indicates that the MAP sensor signal is fluctuating unpredictably, which can cause intermittent drivability issues.
- P1106 / P1107 (Manufacturer-Specific Codes): Similar to P0106 and P0107, these codes indicate MAP sensor signal issues and may appear on certain makes and models.
If any of these codes appear, the next step is to inspect the sensor and surrounding components.
2. Perform a Visual Inspection
A thorough visual check can reveal common issues that may mimic a bad MAP sensor, such as vacuum leaks, clogged sensor ports, or damaged connectors.
- Locate the MAP Sensor: It is usually mounted on the intake manifold or throttle body. Some vehicles may have it attached via a vacuum hose instead.
- Check for Vacuum Leaks: Cracked, loose, or disconnected vacuum hoses leading to the sensor can cause false pressure readings.
- Inspect the Sensor for Dirt or Debris: A clogged sensor port can cause incorrect readings. If dirty, clean the sensor with electronic contact cleaner or MAF sensor cleaner (avoid brake cleaner, as it may damage internal components).
- Examine the Connector & Pins: Corrosion, bent pins, or loose connections can disrupt sensor communication with the ECU.
If no visible issues are found, the next step is to check the sensor’s live data.
3. Check Live MAP Sensor Data on a Scan Tool
A live data scan allows you to monitor the MAP sensor’s real-time performance and compare it to expected values. To do this:
- Connect an OBD-II scan tool and navigate to the live data section.
- Locate the MAP sensor reading (often displayed in kPa, PSI, or Volts).
- Start the engine and observe the values:
- At idle (high vacuum, low pressure) → the MAP reading should be around 10-20 kPa (1.5-3 PSI or 1.0-1.5V).
- Under wide-open throttle (WOT) (low vacuum, high pressure) → the reading should rise to around 80-100 kPa (11-14 PSI or 4.0-4.5V).
What to Look For:
- Stuck readings: If the MAP sensor stays at a fixed value regardless of throttle input, it’s likely faulty.
- Erratic fluctuations: The reading should change smoothly with throttle movement. Sudden jumps or drops may indicate a failing sensor or wiring issue.
- Unrealistic readings: If the MAP sensor is reporting extremely high or low pressures compared to expected values, there may be a problem.
If the live data is abnormal, it’s time to check the wiring and sensor voltage manually.
4. Check the Wiring and Sensor Voltage
Electrical problems are a common cause of MAP sensor failures. A multimeter can be used to test voltage, but ideally you’ll need a voltmeter with a graphing function.
Test the MAP Sensor Voltage Output:
- Turn the ignition to ON (engine off).
- Back-probe the signal wire (usually the middle wire in a 3-wire connector).
- Check for reference voltage (usually 5V from the ECU).
- Start the engine and observe voltage changes:
- At idle (high vacuum, low pressure) → the MAP sensor should read around 1.0-1.5V.
- Under full throttle (low vacuum, high pressure) → voltage should increase to 4.0-4.5V.
- No voltage change? The sensor may be faulty.
- No voltage at all? Check the wiring harness and ECU power supply.
Test the Wiring for Continuity & Shorts:
To run these tests you’ll need a wiring diagram and you’ll need to disconnect the battery and the ECU plug connector.
- Use a multimeter’s continuity mode to check the MAP sensor wiring for breaks, loose connections, or corrosion.
- If the sensor wiring is intact but the sensor isn’t functioning properly, it may need to be replaced.
5. Compare Readings with a Vacuum Gauge
If you have access to a vacuum gauge, you can compare actual manifold vacuum readings against the MAP sensor output to ensure accuracy.
- Connect the vacuum gauge to an intake manifold port.
- At idle, vacuum should be around 18-22 inHg (inches of mercury).
- At wide-open throttle (WOT), the vacuum should drop close to 0 inHg.
- If the MAP sensor reading does not correlate with actual vacuum readings, the sensor is faulty.
6. Swap with a Known-Good Sensor (If Possible)
If you’re still uncertain whether the MAP sensor is faulty, it’s worth considering a simple swap. While I don’t advocate blindly replacing parts, sometimes, when a component is inexpensive, it’s more practical to replace it rather than spend excessive time testing—especially if you lack the right tools.
Installing a known-good MAP sensor, whether from a similar vehicle or a new replacement, can quickly confirm the issue. If the engine runs better and the trouble codes disappear, you’ve found your culprit.
Can a MAP Sensor Be Cleaned?
Before replacing the sensor, it’s worth trying a cleaning procedure.
- Remove the MAP sensor.
- Spray the sensing element using MAP sensor cleaner or electronic contact cleaner.
- Allow it to dry completely.
- Reinstall and clear any fault codes.
Avoid touching the sensing element with tools or cloths, as it is easily damaged.
Cleaning may restore operation if the sensor is contaminated with oil vapors or carbon deposits.
How to Replace a MAP Sensor
Replacing a MAP (Manifold Absolute Pressure) sensor is a straightforward task that requires minimal tools and can be done in under 30 minutes. Since the MAP sensor plays a crucial role in engine performance and fuel management, installing a new one can restore lost power, fuel efficiency, and drivability.
Tools and Materials Needed:
- New MAP sensor (ensure it matches your vehicle’s make and model)
- Socket set
- Screwdriver (if the sensor is held in place with screws)
- Pliers (for hose clamps, if applicable)
- Electronic contact cleaner (optional, for cleaning the connector)
- OBD-II scanner (to clear trouble codes after replacement)
Step-by-Step Guide to Replacing the MAP Sensor
1. Locate the MAP Sensor
The MAP sensor is usually mounted on the intake manifold, throttle body, or firewall. In some vehicles, it is attached via a vacuum hose, while in others, it is a direct plug-in sensor. If you’re unsure of its exact location, consult your owner’s manual or an online repair guide for your specific vehicle.
2. Unplug the Electrical Connector
- Locate the MAP sensor’s electrical connector.
- Press the locking tab and gently pull the connector off the sensor.
- Inspect the connector for corrosion, bent pins, or dirt. If necessary, spray it with electronic contact cleaner and let it dry before reconnecting later.
4. Remove the MAP Sensor
- If the MAP sensor is held in place with bolts or screws, remove them using a socket or screwdriver.
- If it is secured with a vacuum hose, carefully loosen the clamp or pull the hose off the sensor.
5. Compare the Old and New Sensor
Before installing the new sensor, compare it to the old one. Check that:
- The connector matches the old one.
- The mounting points align properly.
- The vacuum port (if applicable) is the same size.
6. Install the New MAP Sensor
- Position the new sensor in place.
- Reattach bolts or screws and tighten them snugly, but do not overtighten.
- If the sensor connects via a vacuum hose, secure the hose firmly onto the new sensor.
7. Reconnect the Electrical Connector
- Plug the electrical connector back into the sensor.
- Ensure it clicks into place securely.
8. Clear Trouble Codes and Test the Repair
- Use an OBD-II scanner to erase any stored MAP sensor-related trouble codes.
- Start the engine and let it idle for a few minutes.
- Take the vehicle for a test drive to ensure it runs smoothly and that previous symptoms (rough idle, hesitation, stalling, poor acceleration) have disappeared
Great job, you nailed it!
FAQs About MAP Sensors
Can a bad MAP sensor cause transmission shifting problems?
Yes. Many automatic transmissions rely on engine load information supplied by the ECU. If the MAP sensor sends incorrect load data, the transmission may shift too early, too late, or feel harsh during gear changes.
Can I drive with a bad MAP sensor?
Driving with a faulty MAP sensor is not recommended. A failing sensor can cause poor fuel economy, reduced engine power, rough idling, and even stalling. In some cases, the engine may go into limp mode, limiting performance until the issue is fixed.
5. How much does it cost to replace a MAP sensor?
The cost of a MAP sensor replacement varies depending on the vehicle make and model. Typically:
- DIY replacement: $30 to $100 for the sensor itself.
- Mechanic replacement: $100 to $300, including labor costs.
Can a MAP sensor cause a rough idle?
Yes. A faulty MAP sensor can send incorrect pressure readings to the ECU, leading to an imbalanced air-fuel mixture. This can cause rough idling, hesitation, or even engine stalling.
Does a MAP sensor need to be calibrated?
Most modern MAP sensors are pre-calibrated and do not require manual calibration. However, after replacing the sensor, it’s a good idea to reset the ECU by disconnecting the battery for a few minutes or clearing stored trouble codes with an OBD-II scanner.
What happens if I unplug my MAP sensor?
Unplugging the MAP sensor will force the ECU into a default mode, often leading to poor engine performance, high fuel consumption, and possibly putting the engine into limp mode. This should only be done for diagnostic purposes and not as a solution.
How long does a MAP sensor last?
MAP sensors are designed to last 100,000 miles or more, but they can fail earlier due to contamination, heat exposure, or electrical issues. Regular maintenance, such as checking for vacuum leaks and cleaning connectors, can help extend its lifespan.
Will replacing a MAP sensor improve fuel economy?
If the old sensor was faulty, replacing it can restore proper fuel-air mixture calculations, leading to better fuel efficiency. However, if fuel economy issues persist, other factors like oxygen sensors, fuel injectors, or vacuum leaks may be the cause.
You may find the following pages helpful:
Would You Know What To Do?
If your engine warning light came on tonight, would you know to keep driving, pull over, or call for recovery?
Most drivers wouldn’t.
That’s exactly why I wrote this guide.

- About the Author
- Latest Posts


John Cunningham is an Automotive Technician and writer on Rustyautos.com. He’s been a mechanic for over twenty-five years and has worked for GM, Volvo, Volkswagen, Land Rover, and Jaguar dealerships.
John uses his know-how and experience to write articles that help fellow gearheads with all aspects of vehicle ownership, including maintenance, repair, and troubleshooting.