
Your car’s alternator serves as more than just a power generator—it’s a crucial component that ensures your vehicle’s electrical system operates smoothly. Let’s keep things simple, there are two types of alternators: ECU-controlled and voltage regulator-controlled.
In ECU-controlled systems, the alternator’s output is regulated based on voltage at the battery and voltage demands sensed by the Engine Control Unit. This precise control involves adjusting the duty cycle of the voltage supplied to the alternator, ensuring optimal electrical output.
A voltage regulator-controlled alternator, on the other hand, while performing the same function, it does so without the use of a computer. Typically mounted on the back of the alternator, the voltage regulator receives current from the battery. It adjusts the voltage supplied to the alternator’s brush assembly based on battery voltage readings, which in turn generates voltage.
Both alternator types produce AC voltage, and since cars use DC voltage, this must be converted. To convert AC voltage into the DC voltage needed, the alternator includes a rectifier composed of several diodes known as a rectifier bridge.
Features like freewheel clutch pulleys further enhance the alternator’s efficiency. These reduce belt stress and enhance durability by allowing the alternator to spin freely when not actively charging. In higher-end models, alternators may incorporate water cooling systems for improved efficiency, though this can complicate DIY replacements due to accessibility issues.
So, whether you’re troubleshooting issues or planning a replacement, understanding your alternator’s role and characteristics will help you to nail your vehicle’s electrical gremlins. Let’s dive in!
Signs of a Faulty Alternator
Bear in mind a faulty alternator may overcharge as well as undercharge or not output any voltage at all. Here are some common symptoms to watch out for:
- Dimming Lights: One of the earliest signs is often dimming headlights or interior lights, indicating insufficient power supply.
- Warning Lights: Keep an eye on dashboard warning lights, especially the battery light (P0562). If it illuminates while driving, it could signal a problem with the alternator or the charging system.
- Strange Noises: Alternators sometimes emit grinding or whining noises when they’re failing, often due to worn-out bearings or internal components.
- Rattling noise when shutting off engine: Indicates a worn out clutch pulley/decoupling pulley.
- Battery Issues: A weak or dead battery (P0560), even after a full charge, may indicate that the alternator isn’t effectively recharging it while the engine runs.
- Electrical Malfunctions: Erratic behavior from electrical components such as power windows, radio, or dashboard gauges can stem from inconsistent power supply.
- Burning Smell: A burning rubber smell, especially near the alternator, could indicate overheating due to excessive friction or electrical issues.
- Engine Stalling or Rough Idling: As the alternator provides power to the ignition system, a failing alternator can lead to engine stalling or rough idling.
- Battery Drain: If your battery consistently drains, even when the vehicle is not in use, it could be a sign of a faulty diode in the alternator allowing current leakage.
- Excessive Battery Heat or Smell : Overcharging can lead to excessive heat buildup in the battery, potentially causing it to fail prematurely or leak electrolyte which will throw off an acid smell.
- Flickering Lights: Headlights, interior lights, or dashboard lights may flicker or become unusually bright caused by an overcharging condition.
Next we’ll look at how to diagnose your alternator.
How to Diagnose Alternator Issues
Here’s a guide to diagnosing common alternator faults:
Check Dashboard Lights:
Start with the engine running and observe the dashboard lights. A battery light illuminated on the dashboard indicates a charging system issue.
Battery and Terminals Check:
Inspect the battery condition and terminals for corrosion or loose connections. A weak or faulty battery will cause charging issues. Batteries typically last about 5 years.
Voltage Output Test:

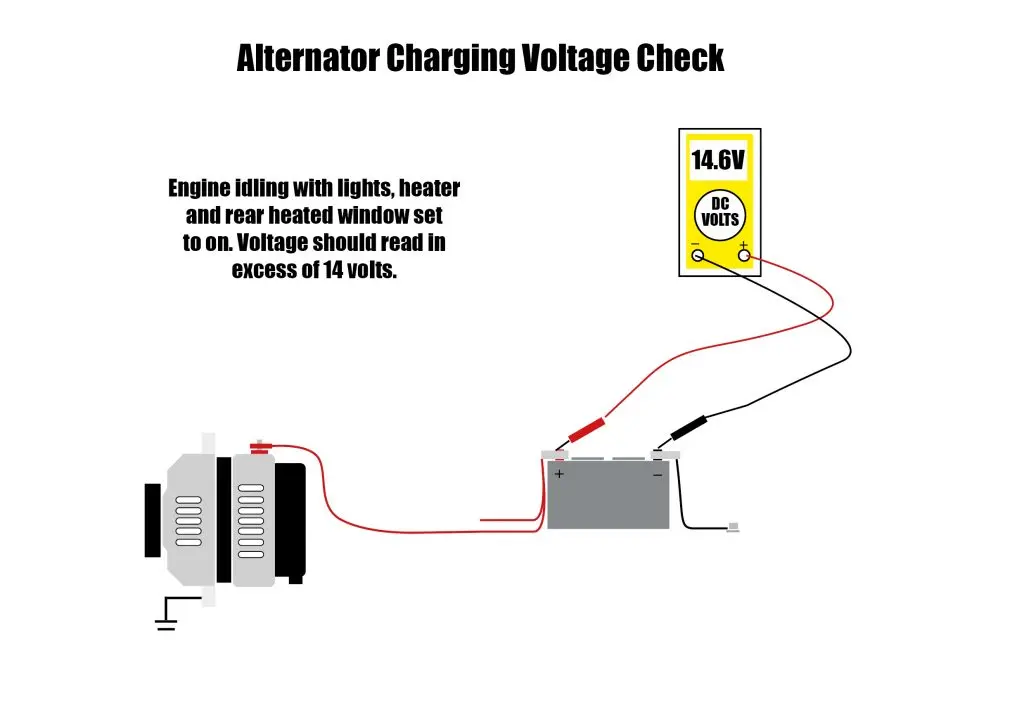
Measure the voltage at the battery terminals with the engine running and all electrical consumers off. A healthy alternator should maintain a voltage of around 13.8 to 14.5 volts. Anything below 12.65 volts suggests insufficient charging. (ECU controlled may have much higher output charge)
Load Test:
Use an ammeter to measure the alternator’s output amperage. A proper charging alternator should output sufficient current to meet the vehicle’s electrical demands. Increase electrical load by turning on headlights, heater, rear heated screen, and other accessories (Raise engine RPM to 2000). The alternator should respond by increasing output to compensate for the added demand.
If you have a scan tool that supports live data, monitor alternator performance in real-time while applying electrical loads. This helps verify the alternator’s response under varying conditions.
Check Fuses and Relays:


Before diving deep into diagnosis, make sure your alternator fuse and relay test are okay.
Check for power at the alternator electrical connector.
Ground Wire Inspection:
Ensure the engine’s ground wire is secure and in good shape. The alternator is grounded through the engine, and so it relies on the engine-to-chassis ground wire.
Alternator Volt Drop Check:
Inspect the B+ alternator cable and the plug connector, making sure they are secure and undamaged. We run a volt drop test as follows: Engine running, check voltage at the battery, now move to the alternator, place the red positive test lead on the B+ post and the black negative lead on the alternator body—a difference of more than .5 volts indicates an excessive volt drop.

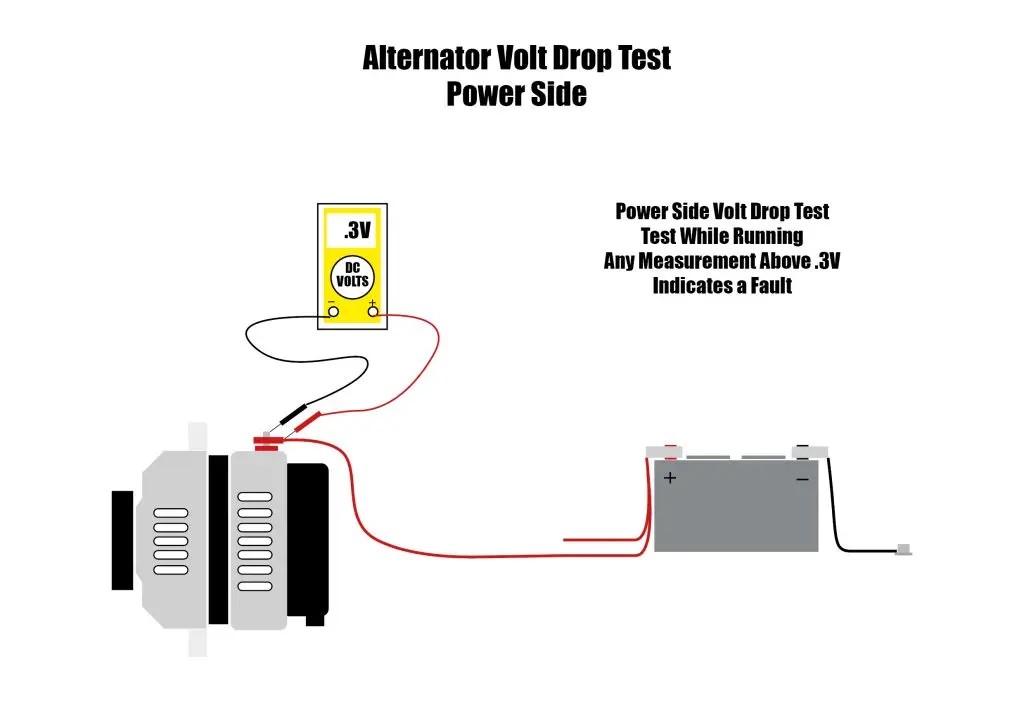
Power (Positive) side voltage drop test: Place the red probe on the alternator’s B+ terminal and the black probe on the battery’s positive terminal. A reading above 0.3V is excessive. Test the connection between the alternator’s B+ terminal and its lead, as well as between the battery post and its terminal to identify the bad connection.
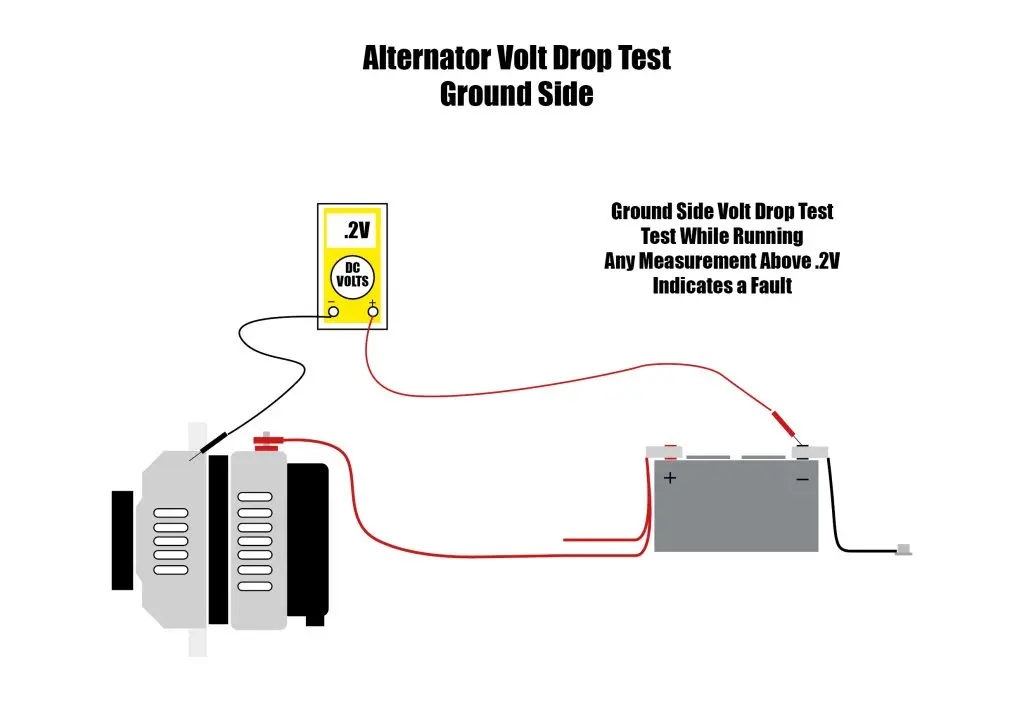
Negative (Ground) side voltage drop test: Place black probe on the alternator body and red probe on the negative battery post, a reading above .2v is excessive, test the engine to chassis and battery negative post to terminal to pinpoint the bad connection.

Belt Condition:
Visually inspect the alternator drive belt and tensioner. A slipping belt can lead to poor charging and should be replaced if worn or loose.
Fault Code Scan:
Use a diagnostic scan tool to check for fault codes related to the charging system. However, codes indicating low charge output may not conclusively diagnose the alternator; additional checks are necessary.
Testing Alternator Clutch Pulley:
For alternators with integrated clutch pulleys, lock the alternator rotor with a fine screwdriver and attempt to rotate the pulley. It should only rotate in one direction. If it rotates in both directions, the clutch pulley is faulty and needs replacement.
Checking for Faulty Rectifier Diode:
Test 1 Check AC Battery AC Current: With the engine running, set meter to AC Volts, its normal for some AC voltage to sneak through, but too much indicates a faulty diode. More than 100mv suggests an issue, so move on to test 2 below.

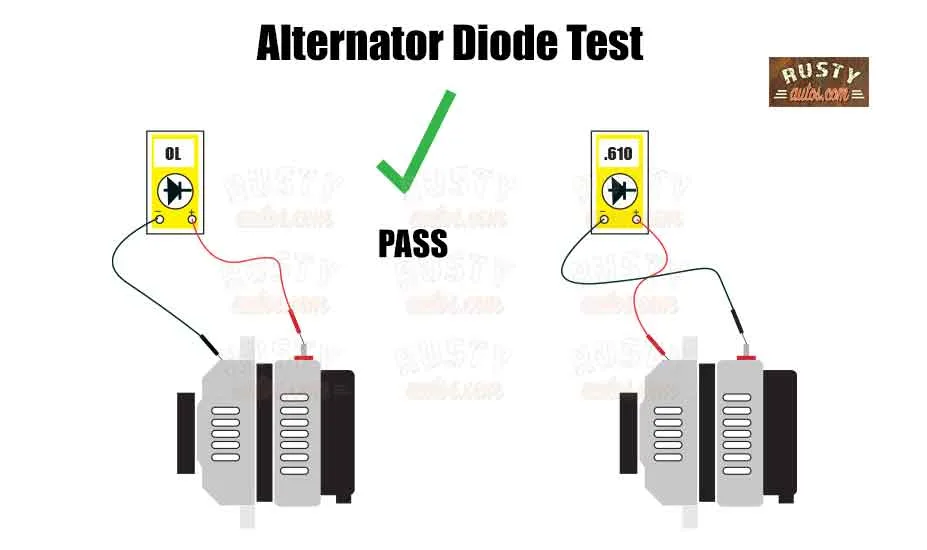
Test 2 Diode test: If your battery appears to lose charge unexpectedly, a faulty diode in the alternator could be the culprit. Here’s how to test for diode problems:
- Set your digital volt-ohm meter (DVOM) to the diode test setting.
- Disconnect the battery positive cable.
- Disconnect the alternator’s B+ terminal and the electrical connector.
- Place the black probe on the alternator’s B+ post and the red probe on the alternator’s body.
- A reading between 450 to 650 indicates normal diode operation.
- As the diode acts as a one-way valve, swapping the probes should not offer any reading; this is a sign that all is good.
Testing Alternator Regulator:
The alternator regulator controls the output voltage of the alternator. Use a multimeter to measure voltage at the alternator’s B+ terminal. If the output rises steadily with RPM, this indicates an issue with the voltage regulator. A regulator can be fitted without removing the alternator. (Remember an ECU controlled alternator doesn’t have a regulator)
How to Replace the Alternator
Replacing the alternator in your vehicle is usually a straightforward task that can be accomplished with basic tools. However, in some vehicles, additional components may need to be removed to access the alternator. Before starting, it’s crucial to verify that the alternator truly needs replacement. In many cases, only the rectifier or regulator (if equipped) needs to be replaced. These components are often accessible without having to remove the entire alternator assembly.
Anyhow, assuming you have access here’s a step-by-step guide to help you through the process:
Tools and Materials Needed:
- Socket set and wrenches
- Screwdrivers (flathead and Phillips)
- New alternator (ensure it matches your vehicle’s specifications)
- New drive belt (optional but recommended)
- Safety goggles and gloves
Steps:
- Prepare Your Vehicle:
- Park your car on a flat surface and engage the parking brake.
- Disconnect the negative terminal of the battery to prevent electrical shorts.
- Locate and Remove the Old Alternator:
- Identify the alternator under the hood. It’s typically connected to the engine with a series of bolts and a drive belt.
- Release the tension on the drive belt by adjusting the tensioner.
- Remove the drive belt from the alternator pulley.
- Disconnect the electrical connections to the alternator, including the positive B+ terminal and any electrical harness connectors.
- Remove the mounting bolts securing the alternator to the engine block or bracket.
- Install the New Alternator:
- Position the new alternator in place and secure it with the mounting bolts.
- Reconnect the electrical connections, ensuring they are securely attached.
- Reinstall the drive belt over the alternator pulley. If you’re replacing the drive belt, now is an ideal time to do so.
- Test the Installation:
- Double-check all connections and ensure the alternator is securely mounted.
- Reconnect the negative terminal of the battery.
- Start the engine and check for proper operation. Monitor the dashboard for warning lights and ensure there are no unusual noises or vibrations.
- Final Checks:
- Take your vehicle for a short test drive to verify that everything is functioning correctly.
Nice work!
FAQ: Replacing an Alternator
How long does it take to replace an alternator?
- The time required can vary depending on your vehicle’s make and model. Generally, it can take anywhere from 1 to 3 hours.
Do I need special tools to replace an alternator?
- Basic hand tools like wrenches, sockets, and screwdrivers are usually sufficient. However, specific vehicles or alternator designs might require specialty tools for belt tensioning or other tasks.
Can I replace the alternator myself, or should I seek professional help?
- DIY replacement is feasible for many, especially with basic automotive repair experience and the right tools. However, if your vehicle’s alternator is in a hard-to-reach location or requires complex procedures, professional assistance might be advisable.
What should I do if my alternator fails shortly after replacement?
- Double-check all connections and ensure the replacement alternator matches your vehicle’s specifications. Sometimes, a faulty electrical connection or incorrect installation can lead to issues. If problems persist, consult with a professional mechanic.
Can a bad alternator cause other electrical problems in my car?
- Yes, a failing alternator can lead to various electrical issues such as dimming lights, electrical malfunctions, and battery drain. Prompt replacement can prevent further damage to your vehicle’s electrical system.
How often should I replace my alternator?
- Alternators typically last around 7 to 10 years or longer, depending on usage and maintenance. Regular inspection and addressing any signs of malfunction promptly can extend the alternator’s lifespan.
10. Can I drive with a bad alternator?
- It’s not recommended. A malfunctioning alternator can lead to a discharged battery, which will leave you stranded. It’s best to address alternator issues promptly to avoid potential breakdowns.
You may find the following pages helpful:
Would You Know What To Do?
If your engine warning light came on tonight, would you know to keep driving, pull over, or call for recovery?
Most drivers wouldn’t.
That’s exactly why I wrote this guide.

- About the Author
- Latest Posts


John Cunningham is an Automotive Technician and writer on Rustyautos.com. He’s been a mechanic for over twenty-five years and has worked for GM, Volvo, Volkswagen, Land Rover, and Jaguar dealerships.
John uses his know-how and experience to write articles that help fellow gearheads with all aspects of vehicle ownership, including maintenance, repair, and troubleshooting.