
Never a good day for a breakdown; a flat battery happens to us all at some point, all part of the joys of motoring. Not to worry, as car problems go, you’ve won the lottery. And we’ll get this figured out right now!
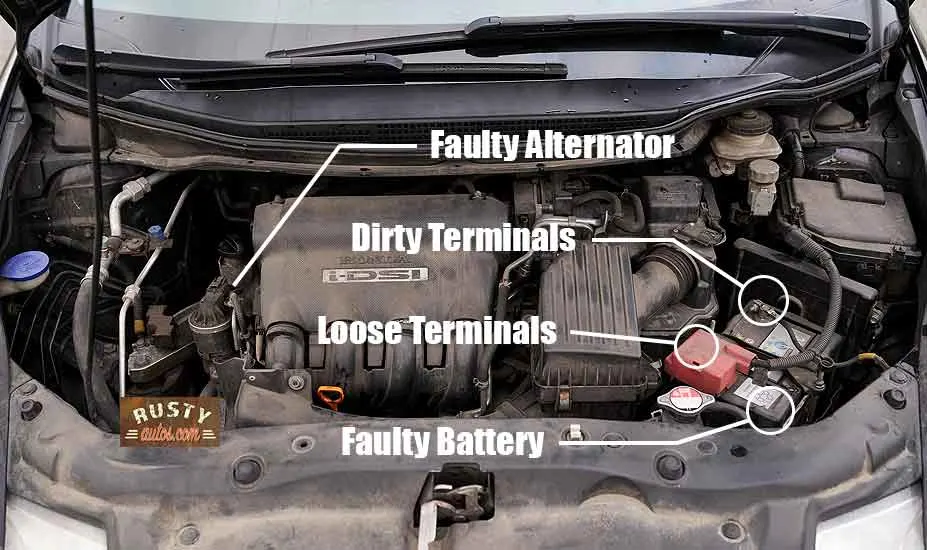
Common causes of dead Honda Civic battery include:
- Loose battery terminal
- Corroded battery terminal
- Consumer accidentally left on
- Failed battery
- Wiring Short
- Failed alternator
In this post, you’ll learn how to get to the root cause of your Civics’ dead battery quickly.
Index
- Flat battery quick fix checks
- Flat battery diagnosis
- Civic jumpstarting
- Testing a Civic battery
- Testing Civic Alternator
- Charging a Civic battery
- Swapping out Civic battery
- What does Civic battery cost?
Ok, let’s get stuck in, I’ve been a mechanic for over 25 years, and flat batteries are hands down the most common issue. That said, it’s not always the battery that’s at fault.
Symptoms of a flat battery include some obvious ones like a really slow crank speed and here are a few additional ones, some you’ll no doubt be familiar with.
- Central locking inoperative
- Dim interior courtesy lights
- Repeated clicking sound or no sound at all
- Dash lights flickering
- Low battery warning message in drivers info module
All these symptoms scream flat/faulty battery, but the fault may actually lie with something as simple as leaving an interior light on or just a loose battery connection. Meaning experience has shown me that, in most cases, these symptoms point to an easy quick-fix problem.
And so makes sense to look at all the low-hanging fruit first before digging a little deeper, if you know what I mean. And that’s exactly what we’ll do next.

Flat Battery Quick-Fix Checks
Many flat battery issues can be fixed in a flash, and this section is dedicated to checking all those easy, quick fixes. We’ll show you the likely cause and what action you can take to get rolling without delay.
And, if the easy, quick fixes don’t help, don’t worry; I got you! We’ll dive deeper into battery diagnosis a little later in this post, too (all easy stuff).
Ok, let’s go with three easy, quick checks!
First, pop the hood, we’ll need access to the engine bay, and a helper would be great but not strictly necessary.
Action Step 1
First, check if the battery terminals are tight. Give them a wiggle and try starting your engine again (or have a helper wiggle them while you turn the key). Check both terminals.

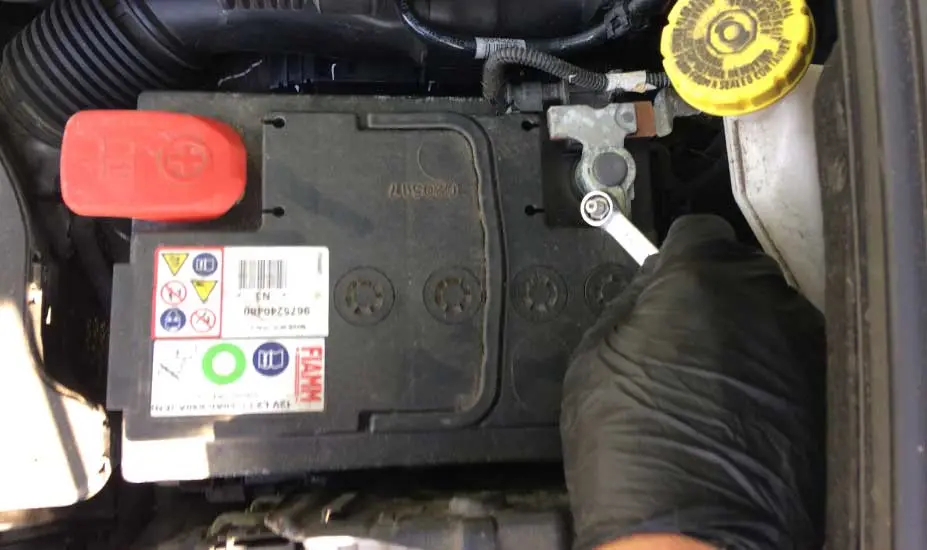
If that works, use a 10mm wrench or adjustable wrench to tighten both terminals.
Check that the battery hold-down clamp (10mm) is also tight. A loose hold-down clamp often results in loose battery terminals.
Action Step 2
Check if the terminals are clean? A white crusty buildup on the terminals is a sign of battery terminal corrosion and an early sign of battery failure.


The white crusty corrosion is a sign of a sulfated battery. It means the battery has leaked acid and is gasing hydrogen, which is explosive if it meets a spark. I’d go ahead a treat your Civic to a new battery; that said, it is possible to clean the corrosion and squeeze a little more life from the battery.
But we’ll need to take care. Acid burns the skin. Use gloves and eye protection.
Cleaning the terminals. Use eye protection and gloves and be careful with ignition sources; even a spark from reconnecting the battery terminal could ignite escaping hydrogen.
To clean the acid, use a teaspoon of bicarbonate soda in a small amount of water to mix it into a paste. Use a glove to work it into the crusty terminal and give it ten minutes to neutralize the terminal acid before rinsing it off with some plain water. Alternatively, pour boiling water over the terminal to remove the acid.
Next, you’ll need a 10mm wrench to loosen and remove the affected terminal; you may as well clean both while you are at it. Some rough-grit paper and a wire brush works great. Clean both the terminals and the battery poles.
Refit the terminals, and tighten. Apply a thin coat of petroleum jelly which will help guard against corrosion.
Action Step 3
As we have eliminated 1 and 2 already, we are getting closer to diagnosing a battery issue as the root cause. But just before we get into the deeper diagnosis, we should check for an accidental power drain caused by an interior light left on or a 12-volt accessory plugged in overnight.

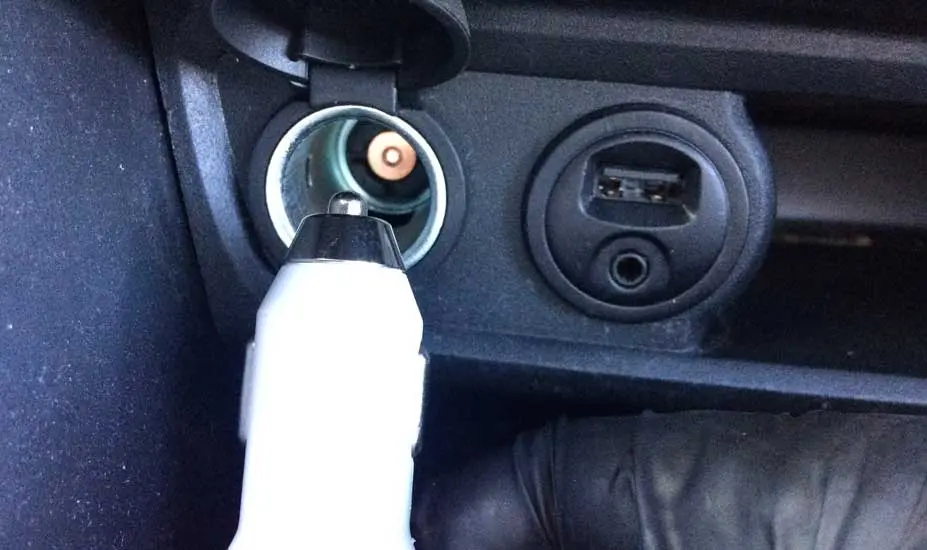
While most interior 12-volt power points are cut with the ignition key, the same is not true for some trunk-located power points. Worth checking that electrical consumers are not plugged in.
Note also modern cars all employ computers to manage the various sophisticated systems. They demand power; they never truly switch off. Instead, they go into sleep mode, usually about 15 minutes to an hour after the engine shuts down.
Some systems are programmed to switch on periodically during shutdown to run maintenance checks. Suppose a vehicle with a perfectly healthy battery isn’t driven regularly. In that case, the computers may drain the battery, this is normal behavior, and a jumpstart and a thirty-minute highway drive will have you fixed up.
If none of that has helped, roll your sleeves, we’re going deep.
Deeper Dive into Civic Battery Diagnosis
Ok, the quick fixes didn’t work, not to worry. Next, we’ll need to take a moment to observe carefully what sound your Civic makes when you turn the key.
Correctly identifying the sound your Civic makes will quickly speed up the process of nailing your flat battery issue. Make sense so far? Great!
Three types of sound are likely, and here they are:
1 Civic makes a repeated clicking sound
If this sounds like your issue, you have a flat or faulty battery, dirty or loose battery terminals, or a bad cable. As vehicles age, corrosion can build up inside the cables, or they break internally from constant flexing. A simple volt drop test will eliminate this as a possible cause.

Solution – Jumpstart or charge your battery before testing your battery, as previously covered.
2 Civic makes a single clicking sound
If this sounds like your issue, you likely have a starter motor issue.

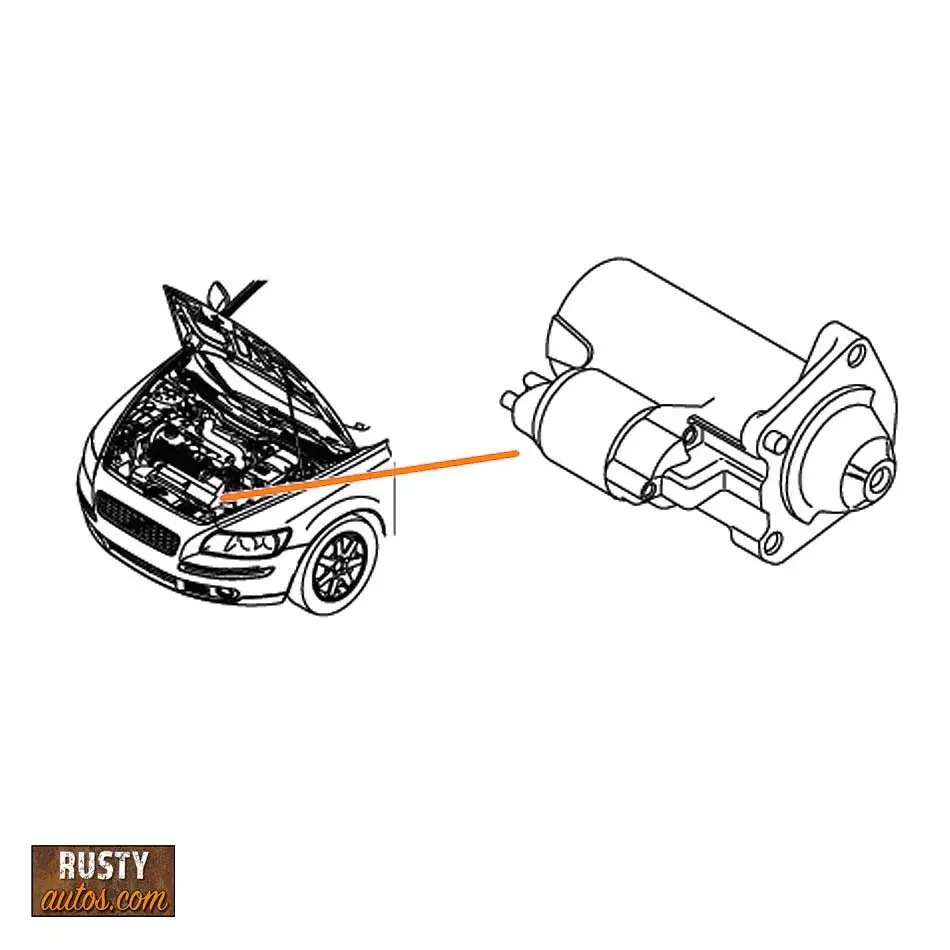
Solution – Try tapping on the starter motor while a helper turns the key. A faulty starter motor solenoid is a pretty common fault.
3 Civic makes no sound at all
This is a harder one to pin down. Often it may be caused by an immobilizer issue or an ignition switch issue; indeed, it could still be caused by a faulty battery.
Solution – Attempt a jumpstart to help rule out a flat battery. Many modern Civics won’t even attempt to engage the starter motor if a minimum voltage isn’t present.
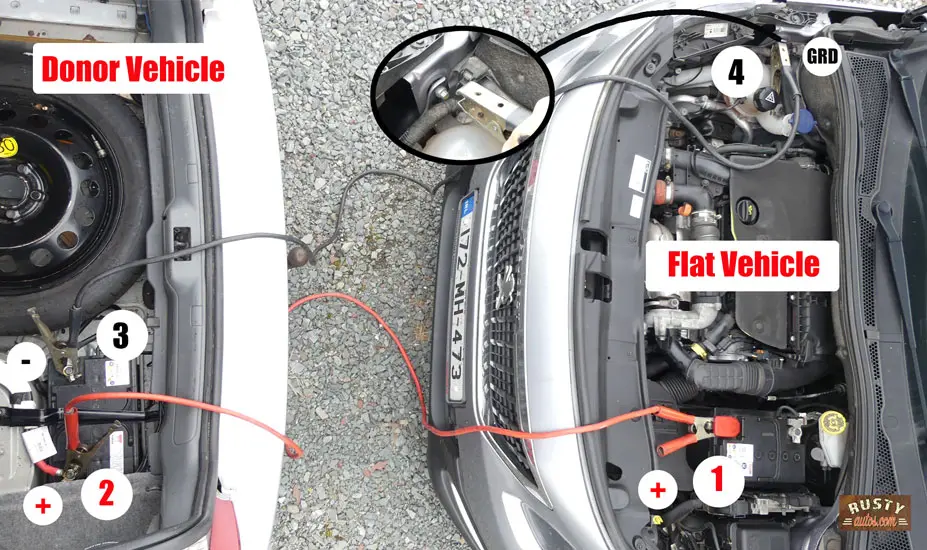
Civic Jumpstarting
Jumpstarting a Civic is easy; you must borrow a donor vehicle and locate its battery before positioning it next to your Civic.
Alternatively, use a jump pack; you’ll find the Mighty NOCO jump pack I recommend here on the “Electrical tools page”
If you need help identifying negative from positive battery terminals, check out this short video, “Unmarked battery terminals video”
- Add jumpers in sequence 1, 2, 3, and 4.
- Start your car.
- While running, remove jumpers in reverse order 4, 3, 2, and 1.
Check out the jumpstarting video here.
Testing a Civic Battery
We’ll need a battery tester or a volt meter to test a Civic battery. If you don’t have either, you can remove the battery from the car and take it to your local parts store. They are usually happy to test it for free.
To test the battery, it must have a sufficient voltage, min 12.5 volts. And so battery testing is a two-part test; part one is checking the voltage, and part two is a load test.
First, let’s check the battery voltage. We’ll need a battery tester or a volt meter. You’ll find both here on the Electrical Tools page. I wrote a post about using a handheld battery tester; it’s a useful bit of kit that thoroughly tests the battery; it also has a crank and alternator test feature. You can check out that post here “Best battery tester”
I choose to use a humble voltmeter since most households are likely to have one.
Anyhow the test procedure is as follows:
- Set your voltmeter to 20 volts DC
- Place the red test probe on the battery positive
- Place the black test probe on the battery negative
- Read the meter as follows:
12.7 – 13.2 volts is 100% charged
12.4 volts is 75% charged
12.2 volts is 50% charged
12.0 volts is 25% charged
0 – 11.9 volts are discharged (Flat)
A battery that reads below 12.5 volts will need to be charged before moving on to part two – the crank test. A battery that reads full is great, but it could still be faulty. We can’t call it good until we run the crank test.
The crank test is as follows:

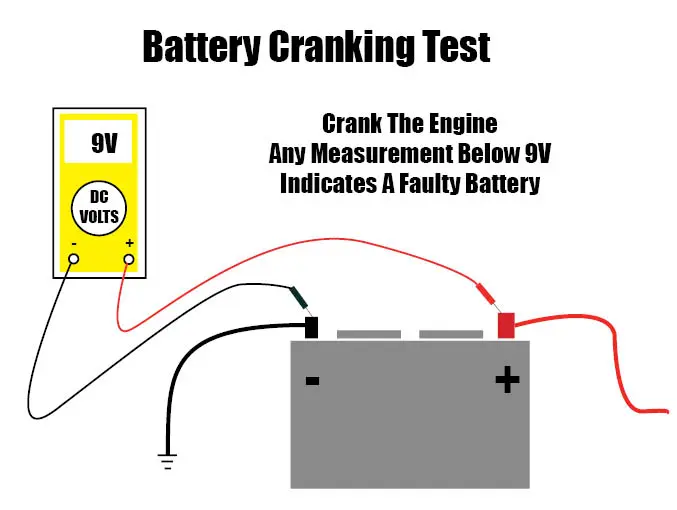
Connect the leads as before, but this time we’ll need a helper to turn the key to the start position (III). The battery should not drop below 9 volts; if it does, go ahead and replace it.
Testing Civic Alternator
A Civic alternator has an important job; it’s tasked with producing all the power your Civic needs to run its electrical system. Its second important job is to replace the voltage the battery spent cranking over the motor so that theirs enough to repeat the process the next time you hit the key.
A Civic alternator test is much like testing the battery, the main difference being we’ll need the engine running, and we’ll use a voltmeter as before.
The test is as follows:

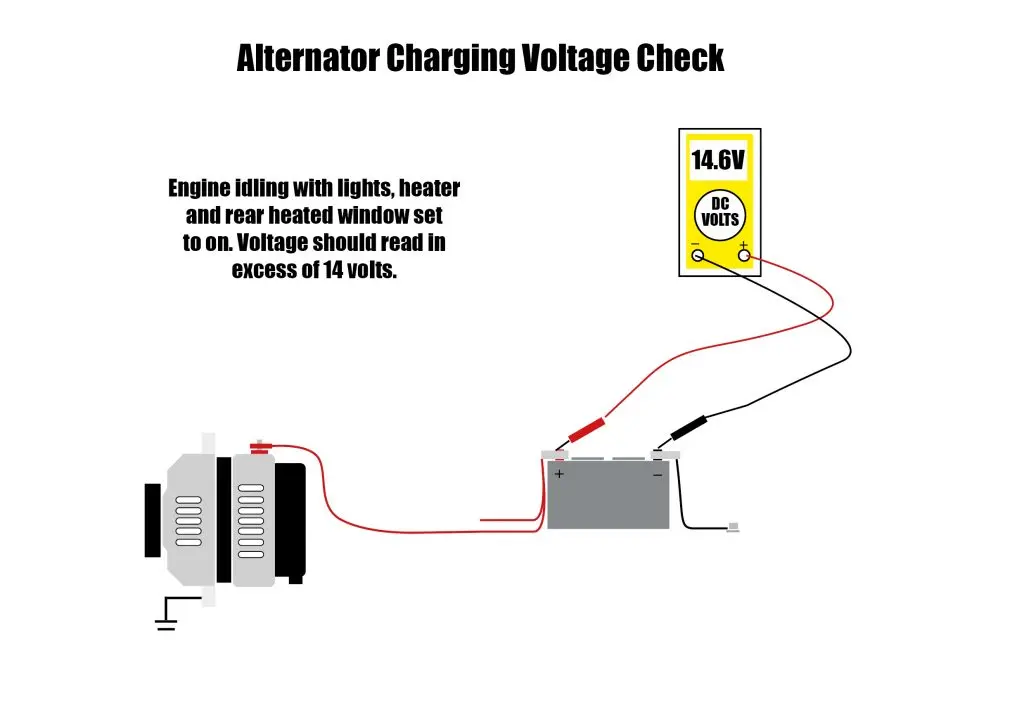
- Engine idling
- Turn on lights, rear heated screen, and heater fan
- Set voltmeter to 20 volts DC
- Red probe to battery positive
- Black probe to battery negative
- A reading between 13.5 and 14.5 volts means all is good in the Civic alternator world.
If that’s not the case, check your drive belt is in place and your alternator fuse hasn’t blown.
If your battery tested good and your alternator tested good, then that leaves two very possible reasons your Civic battery is flat – they are:
- Accidental battery drain by 12-volt consumer – which we’ve covered previously.
- Short circuit – a short circuit may be a wiring issue or a failed electric motor, etc.

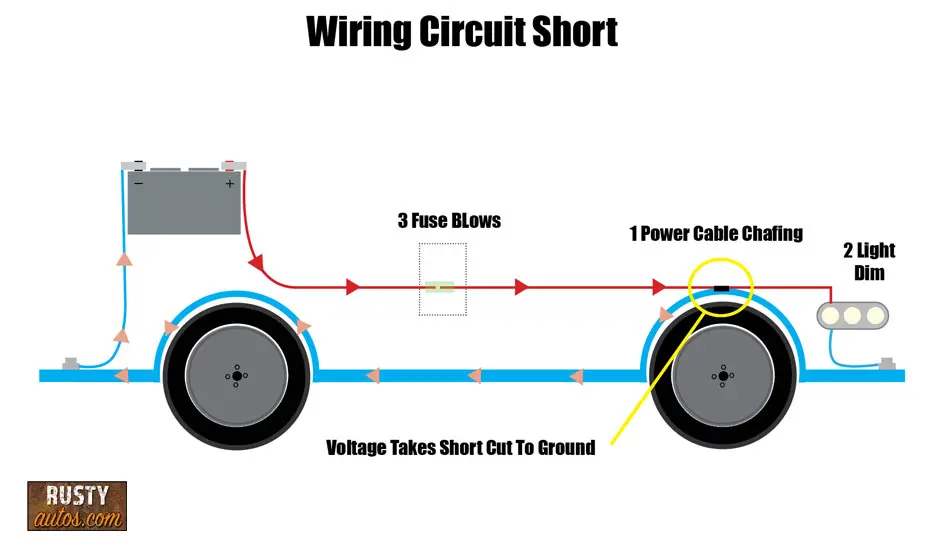
A short will continue to drain the battery until it is found and repaired. To find a short, check out this post – “Car battery dead won’t unlock.”
Charging a Civic Battery
By far, the fastest way to charge a Civic battery is to jumpstart it and drive it. Of course, for that, you’ll need jumper cables and a donor car. The alternative is to buy a battery charger, and you’ll find the one I recommend, the NOCO charger, here on the electrical tools page.
Or remove your battery and take it to a parts store. For a few dollars, they’ll charge it and test it afterward.
Using a modern battery charger like the NOCO is easy; it’s impossible to fit it incorrectly, and it has a fast charge or trickle charge feature, meaning it’s safe to leave on your car, boat, RV, or mower battery.
Modern battery chargers monitor the state of charge and turn off and on as needed, so gone are the days of overcooking.
Swapping out Civic Battery
If you need additional help swapping out a Civic battery, check this video “Change car battery video” or check this post “How difficult to change car battery?”
- Remove the keys from the car
- Remove the ground terminal – 10mm
- Remove the positive terminal -10mm
- Remove the battery hold down – 10mm
- Remove the battery (Note location of poles, take a picture)
- Clean battery tray (use gloves). Neutralize wet acid with bicarbonate soda and water
- Clean terminals with a wire brush and sandpaper
- Refit battery (Be sure posts are in the correct location, reference your picture)
- Fit battery hold down
- Fit positive terminal
- Fit negative terminal
- Apply a thin coat of petroleum jelly to terminals
Now go ahead and start the vehicle. Some systems like traction control, and EPS will need to be calibrated; starting and driving your Civic does the job.
Other systems may need a little help:
Windows – power the windows up and down and hold the switch at each cycle for approx two seconds. Repeat for all windows.
Infotainment screen – Push and hold the power button for two seconds to start the self-calibrating procedure. Your Honda will reestablish a GPS connection when you drive the vehicle.
Battery monitoring – Your Civic is likely fitted with a battery control module.

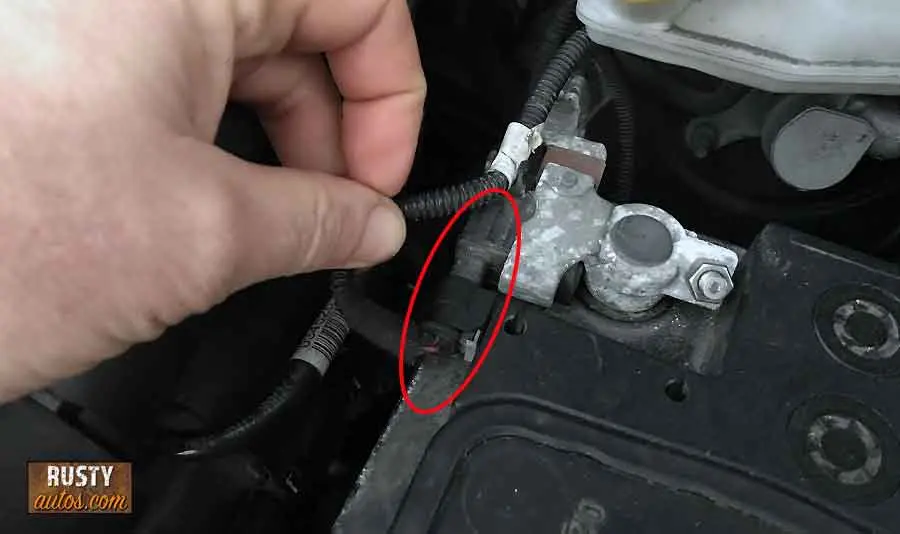
You can identify such a system easily as the negative battery terminal has a small sensor and wire attached.
Ideally, the control module needs to be calibrated, and by calibrated, I mean the control module needs to know a new battery has been fitted. This is important as old batteries are charged at a higher rate to help keep them at their best; if your Civic’s battery control module doesn’t know it has a new battery fitted, it will continue to charge your new battery at a higher rate.
This may shorten the life of your new battery. Recalibrating your battery control model is a job for a shop with the correct Scan tool.
How Long to Swap Out a Civic Battery?
You can swap a Civic battery yourself, battery replacement is a really easy job, and we’ve covered it above. Even a novice won’t take more than 45 minutes to take the core of it.
If you take your Civic to a shop, they may take a little longer; strange, I know. The reason is a shop (bigger shops) usually has procedures in place, meaning you’ll need to do some paperwork, and when your car progresses to the workshop floor, it will get included in the price safety inspection.
The inspection usually includes brake, tire, and steering checks. They may also check items like light wipers and check the ECU for any pending or current faults.
These checks also serve as an upsell opportunity for the workshop, so both parties are winners.
So how long does a shop take? It is likely about one and a half hours.
How Much Does a Civic Battery Cost?
Batteries aren’t hugely expensive unless we’re talking EV batteries, of course. A new 12-volt Civic battery will set you back between $179.00 and $220.00 (as per AutoZone)
Labor to fit – expect to pay between $60 and $150
All professional parts stores use a computerized database to correctly select a battery for your Civic. That said, they will require your Civics chassis number or the year and engine size.
You may find the following posts helpful also:
- How long to charge a battery driving?
- Car won’t idle after flat battery
- Car battery dead central won’t unlock
- Engine won’t crank video
About the Author
John Cunningham is a Red Seal Qualified automotive technician with over twenty-five years of experience in the field. When he’s not writing about car repair, you’ll find him in his happy place – restoring classic cars.
- About the Author
- Latest Posts


John Cunningham is an Automotive Technician and writer on Rustyautos.com. He’s been a mechanic for over twenty-five years and has worked for GM, Volvo, Volkswagen, Land Rover, and Jaguar dealerships.
John uses his know-how and experience to write articles that help fellow gearheads with all aspects of vehicle ownership, including maintenance, repair, and troubleshooting.