

There’s never a good time to break down. It’s always inconvenient and sometimes stressful. So let’s see if we can figure this out with the minimum amount of fuss.
So, why won’t your car start even though the lights come on? The most likely fault is a flat battery, but here are 10 other possible causes:
- Faulty battery
- Loose dirty or damaged battery connections
- Key code fault
- Clutch / Park lock out switch
- Blown main fuse
- Faulty starter relay
- Loose / damaged starter wiring circuit
- Faulty starter
- Faulty ignition switch
- Mechanical fault


In most cases, it’s a battery-related fault, and so we’ll run a few quick tests that will help us narrow down the field of possible causes.
If your car is younger than 1996, it’ll be fitted with a data link connector. Using a code reader will help speed up diagnoses.
Using Our Ears
A few simple observations can be made without any tools, just our ears.
- Does your car make a repeating clicking noise, or a single click noise, when the key is turned to crank (start). If so your battery is most likely flat, but it could also suggest a faulty starter motor.
- If your car makes no noise at all when the key is turned to crank (start) – this may also be caused by a flat battery an activated Inertia switch is common too. The list of possibles causes is much larger and we’ll cover the common one’s below.
Checking For Flat Or Faulty Battery

Often modern cars will have working lights and yet the engine won’t crank over, and that’s because modern cars have battery management software built into the engine control module. In plain English, this means the ignition won’t attempt to engage the starter motor if the battery is low.
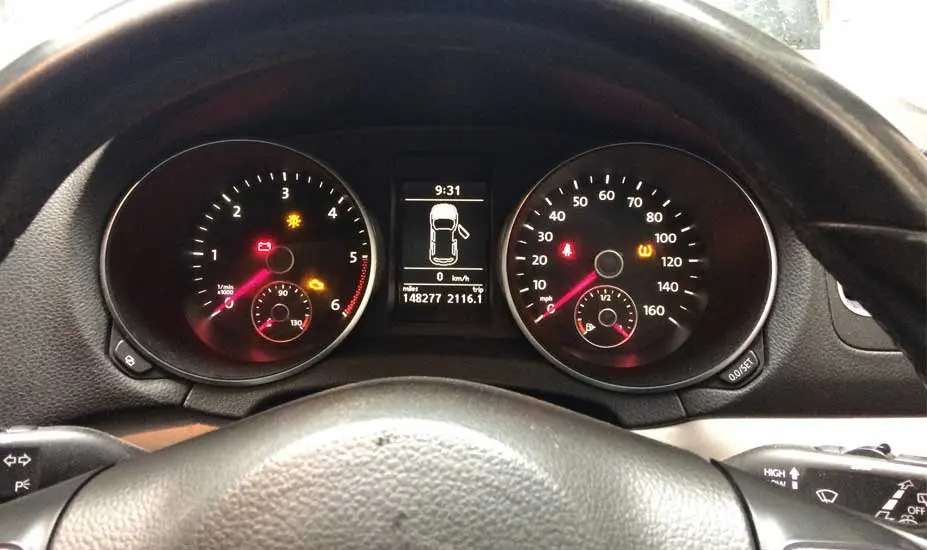
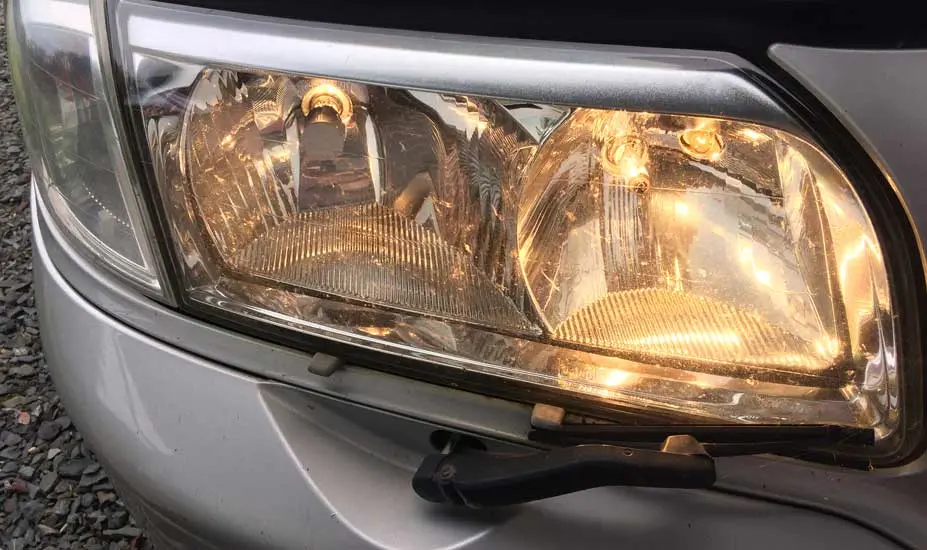
A quick way to test your battery is to turn on your car headlights and your windshield wipers at full speed. If the lights seem dim and the wipers are slow, then you can be pretty sure your battery is flat.
Boost Start
A flat battery is easy to fix. You can boost start (jump-start) your car from another car or any 12-volt battery that’s strong enough. This is the fastest solution to a flat battery.
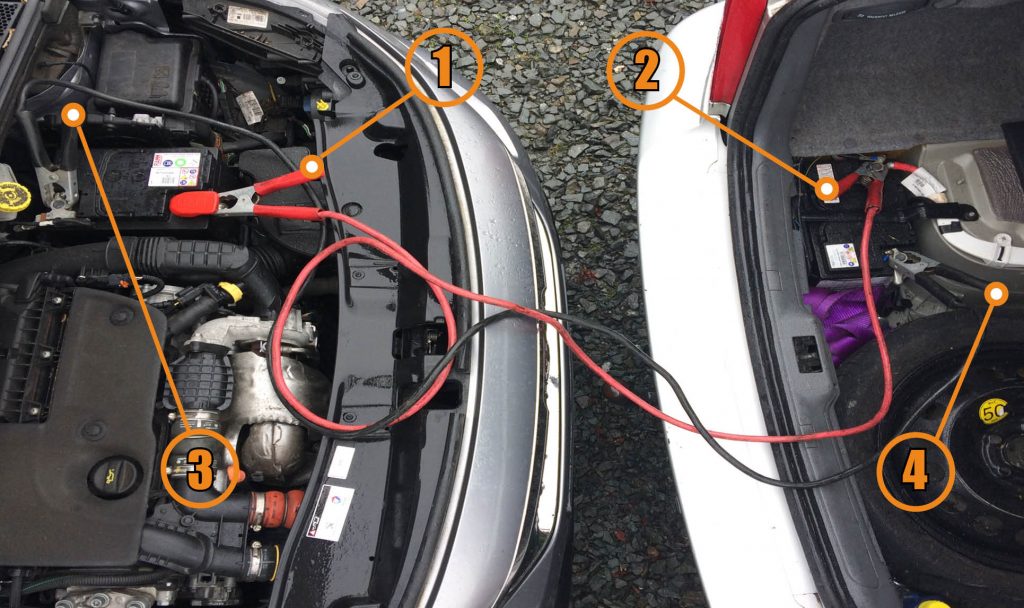

Jump starting is simple, connect the red positive (+) to red positive and negative black (-) to negative.
Using the picture below as a guide, put the jumper cables on in sequence 1, 2, 3, 4. (It’s not important which car has the flat battery)
Start your car and leave the cables attached and your car idling for a few minutes before removing.
Now with the engine running, remove the cables in reverse order 4, 3, 2, and 1.
Another option is to charge the battery. However, this may take several hours, depending on the size of the battery and the amp rating of the charger used.
The battery may be more than just flat. It may be faulty. Ordinarily, a jump-started car will stay running, even with a faulty battery, but if you run too many consumers like heaters, wipers, and lights, the engine will stall.
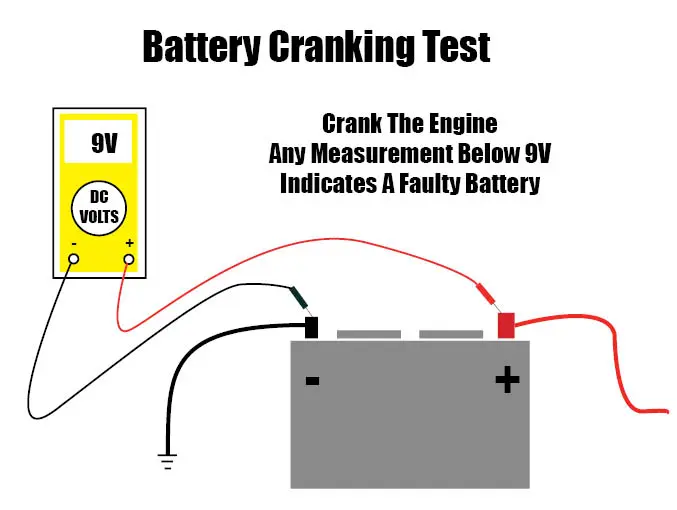
Testing battery


Testing the battery is easy. You can purchase an inexpensive battery testing tool. Testing the battery is a two-part process. We’ll first test the voltage and then check the battery when loaded.
Battery Voltage test
The following readings represent the state of charge of a battery at rest:
- 12.7 – 13.2 volts is 100% charged
- 12.4 volts is 75% charged
- 12.2 volts is 50% charged
- 12.0 volts is 25% charged
- 0 – 11.9 volts is Discharged (Flat)
A battery could read a healthy 12.65 volts and still be faulty, so we need to load test it to be sure it’s got the power to turn the engine.
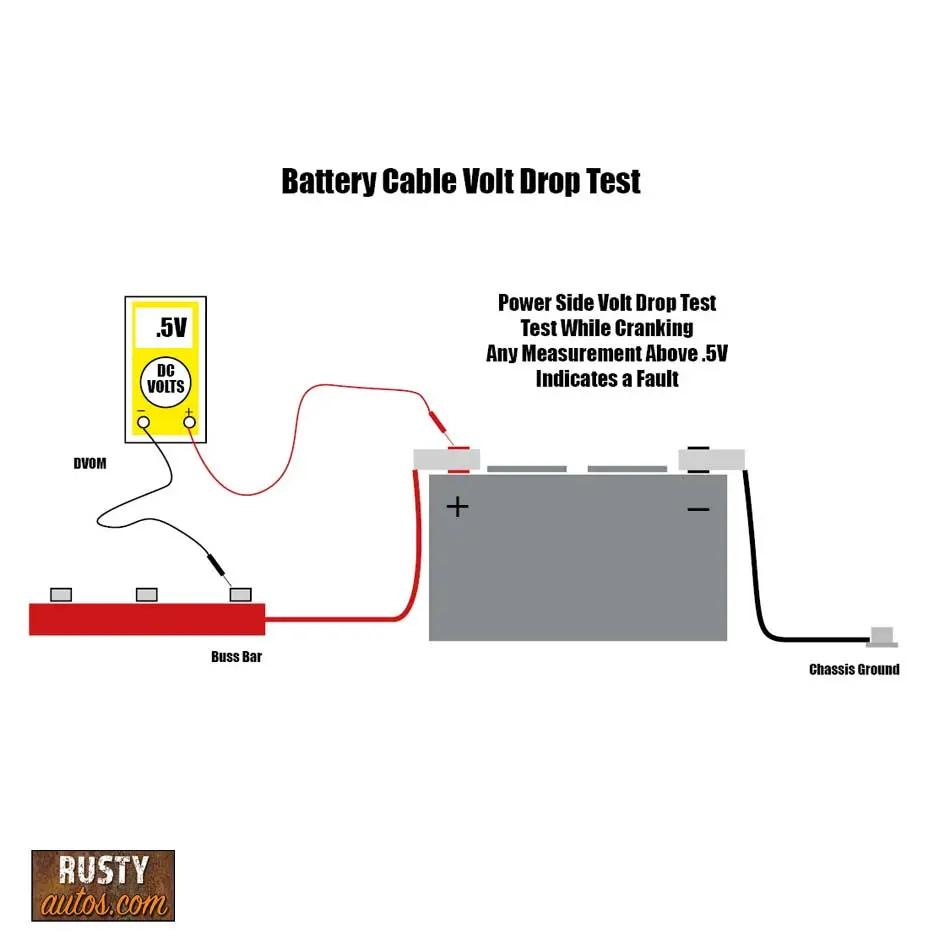
Battery load test
To execute this test, we’ll need a helper and our DVOM. Connect the meter as per the diagram below and have the helper crank over the engine. A battery that drops below 9 volts on a crank is faulty.
If battery voltage doesn’t move when the ignition is turned to the crank (start) position, your battery isn’t at fault.

If you need a new battery, check out the Amazon car battery link below.
Amazon Car BatteryChecking For Loose / Dirty Or Faulty Battery Connections

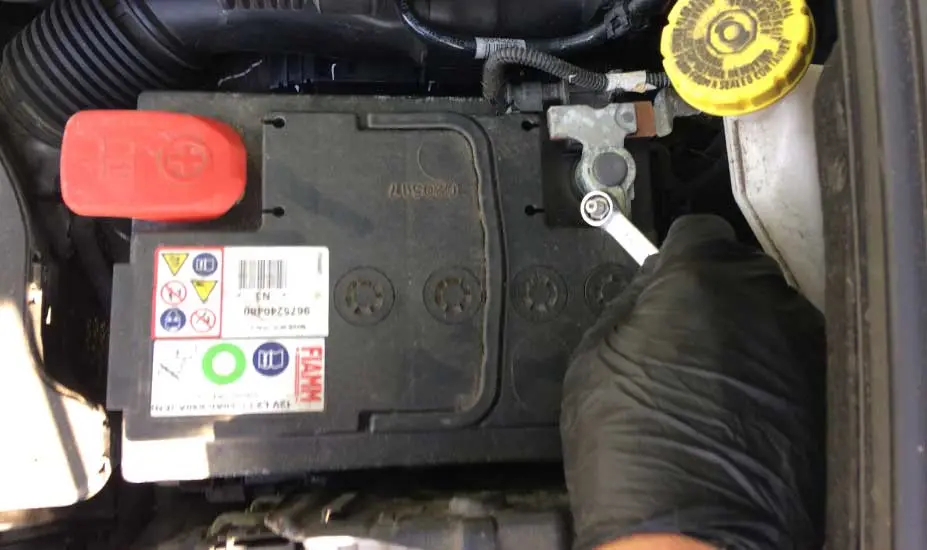
As you probably know, voltage moves around in a circuit. Any break or defect in the circle of flow will cause problems. Often intermittent electrical problems are caused by dirty or weak battery connections.
Acid corrosion on the battery terminals is common. It looks like a white/green chalky deposit. This creates a blockage in the flow of the battery current.
Using baking soda and some water is the best way to naturalize it. The battery connections and terminals will need to be cleaned with sandpaper or a battery post cleaner.
A battery cable is actually made up of several individual wires twisted and covered in an insulator. Engine vibration can cause some of the individual wires to break, which in turn, just like corrosion, can cause a slowdown of current through the wire, not unlike a traffic jam.
Check both positive and negative battery terminals are tight, leads, cables, and connections are free from damage and corrosion.
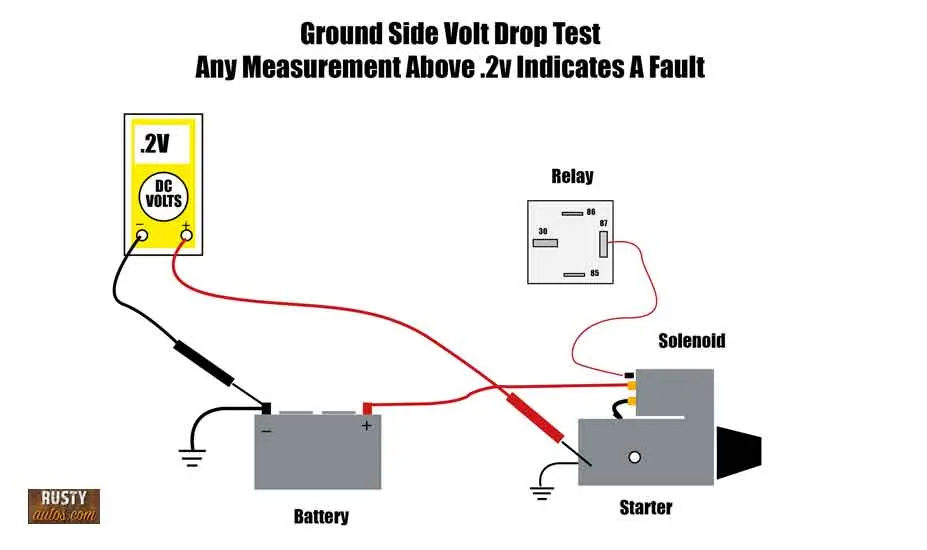
The best test for battery cables is the volt drop test. Don’t worry, this is simple. The test basically measures the difference in voltage between the two separate test points, a large voltage difference tells you there’s a blockage in the system.
A blockage could be broken wires, bad connections, chafing wires, etc.
For this test, you’ll need a voltmeter, and it will only be accurate if the circuit is loaded (key in the crank position).

Checking Your Car Security System


Check your dashboard for a security warning light. Most cars made in the last twenty years use a security chip in the ignition key. The chip is coded to the engine control module and is read by the ignition switch code reader.
If the wrong key is used or the chip isn’t being read, the ignition lights will come on but the engine won’t turn over.
Key chips sometimes go bad as do the ignition key code readers. Most cars will flash a warning light on the dash if there’s a problem with the security system.

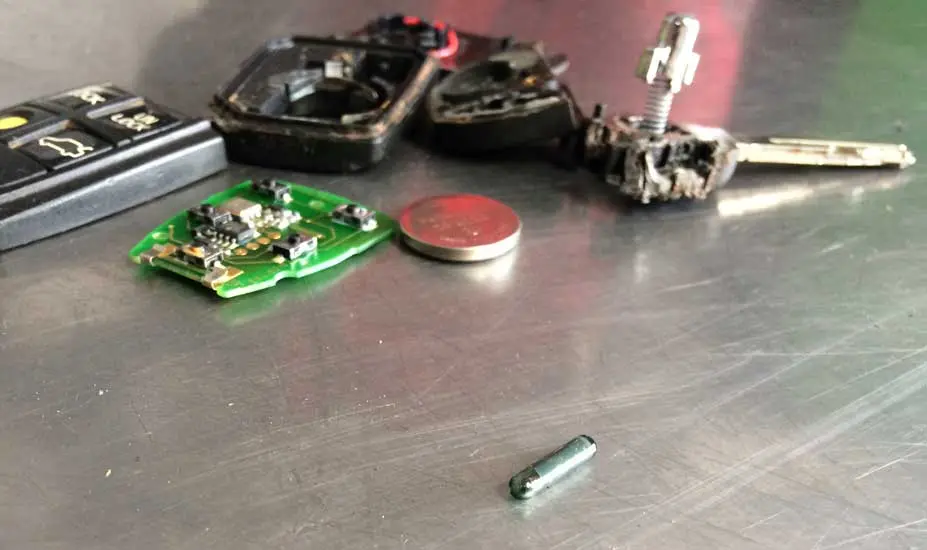
If you have a security code or a key warning light on your dashboard, you’ll need to visit the main dealer as your key or control module may need to be programmed.
If your car is push-button start, try pushing the start button with the key fob, this helps the ignition code reader read the key fob chip.
Checking Your Interior Light

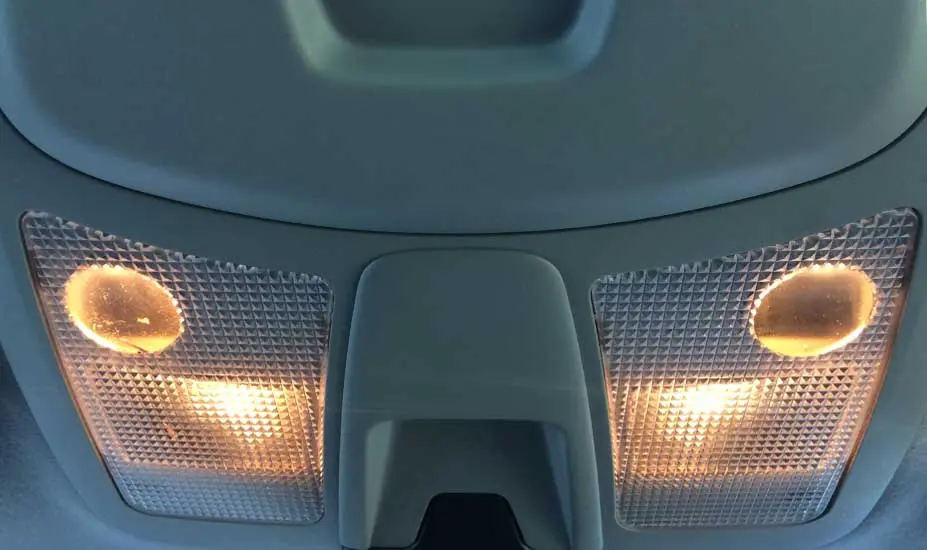
Having checked that your battery is in good shape by running wipers and lights, go ahead and turn on the interior dome light or headlights. Watch the light as you turn the key to the start position.
If the dome light goes dim, it suggests power is going to the starter motor and that the starter is probably faulty. (See starter testing below)
If your dome light doesn’t go dim, then your starter isn’t getting a start signal, and we’ll need to keep fault finding.
Inertia Switch
An inertia switch is a safety switch designed to trigger automatically in the event of an accident. It is discretely located inside your vehicle and, when activated, cuts fuel to the engine, but on some models, it also kills the power to the starter.
The switch is sensitive to a knock or jolt so off-road driving or a deep pothole might set it off. These switches can become super sensitive and troublesome.
The sensor is commonly found behind the front kick panel (plastic panel beside your feet) may be on the driver’s side or passenger’s front side. When activated the switch button will be in the up position. To reset it press it down.
Check The Clutch / Park Lockout Switch

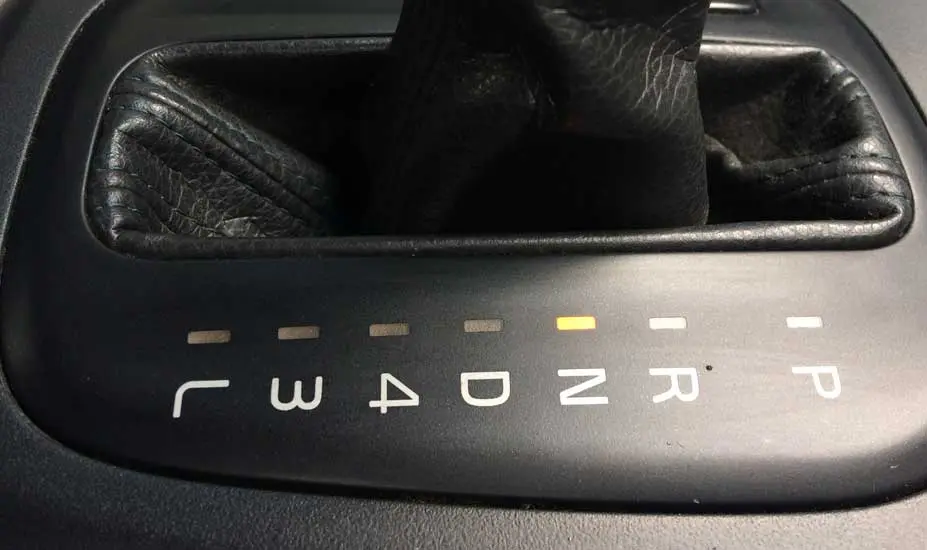
The lockout switch isn’t fitted to all cars. It depends on how old it is. If your car has an auto transmission, you’ll know that you can’t start it unless it’s in park (P). If the PRNDL switch (Park, Reverse, Neutral, Drive, Low) is faulty, it won’t recognize that the car is in park and so won’t allow it to crank.
A quick way to override it is to put the transmission in neutral (N). If your car now starts, you have diagnosed a failed PRNDL switch. It’s an electronic component that is fitted to the outside of the transmission, and it tells the power-train control unit what gear has been selected. If you have access to basic tools, it’s pretty simple to replace.
Clutch lockout switch

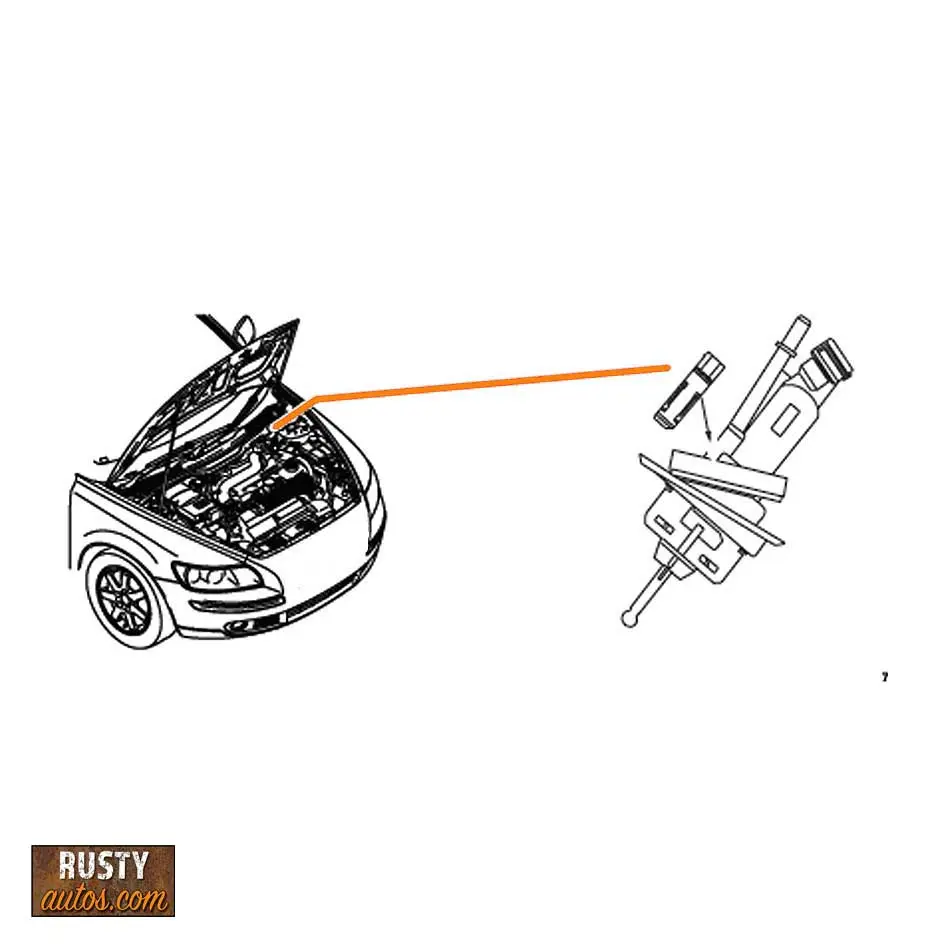
If your car is manual, it may have a clutch lockout switch. Do you have to depress the clutch pedal to start the engine? If so, check in the foot-well area above the clutch pedal for the switch. You may need to remove a cover.
Pressing the pedal with your hand will help you identify the correct mechanism and the sensor. Check the wiring is in place.
If all is in order, remove the wiring and jump them using a fuse or jumper wire, this bypasses the clutch switch and tells the ECU (engine control unit) that the pedal is pressed. If your car now starts, you have diagnosed a failed clutch pedal lockout switch.
This is a simple swap-out fix. No special tools are needed.
Check For Blown Fuse

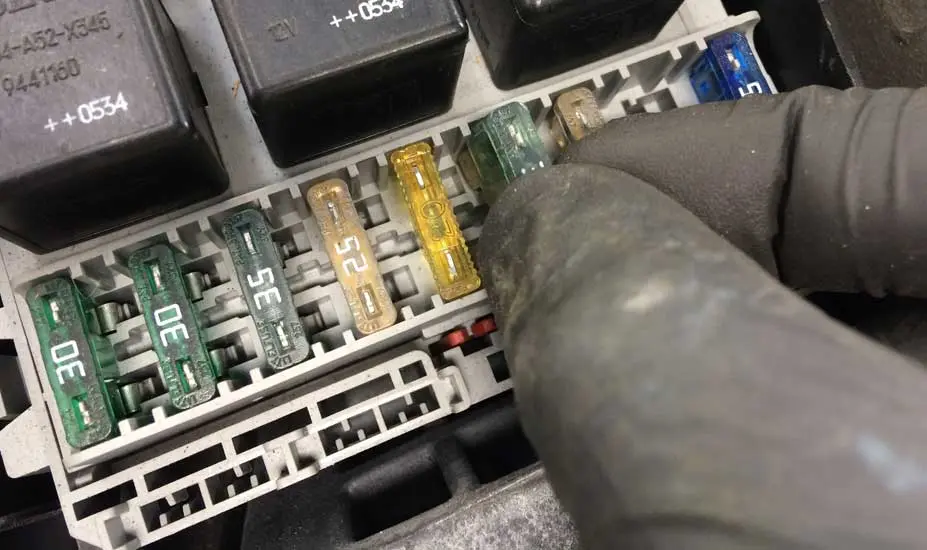
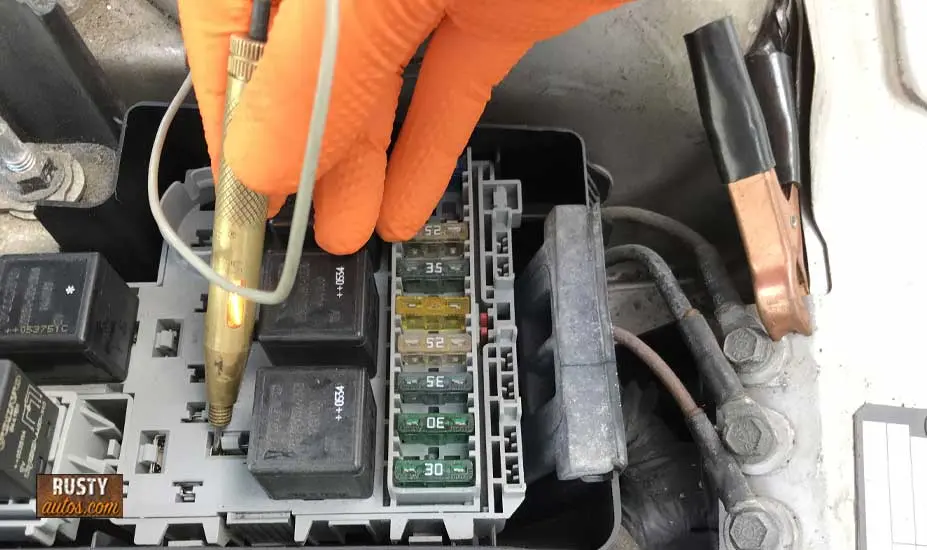
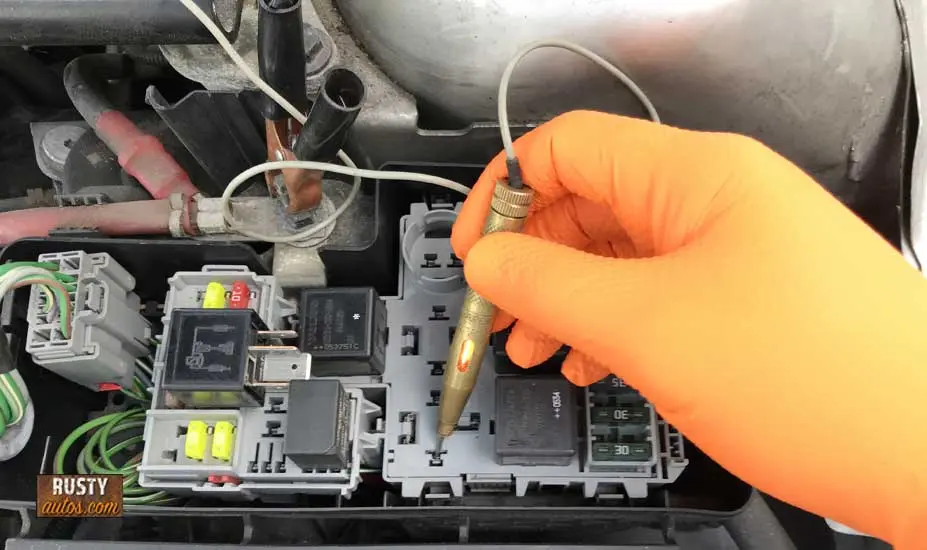
Check your car’s fuse box. There’s usually more than one. The fuse box that carries the starter fuses usually lives under the hood. Most helpful makes will list all consumers on the back of the fuse box either printed into the plastic cover or on a printed label.
Check the fuses section for a listing called “starter solenoid” or “starter” fuse. It will be a large amp fuse of around 35 amp.


You’ll need a simple test light to check for power on both sides of the fuse. If you found a blown fuse, then you found your problem. However, often, replacing the fuse is just a temporary fix. It may blow again.
The purpose of a fuse is to protect a circuit (wiring and components). Each circuit in a car is designed to carry a set amperage. Some circuits, like a simple dome light, will carry about 1 amp, but the average starter circuit will carry way more, in excess of 200 amps.
If you tried to push 200 amps through a dome light circuit, the wiring would simply catch fire. Placing a fuse in the circuit that has a filament that’s designed to burn (blow a fuse) above, say, two amps, saves the circuit from damage.

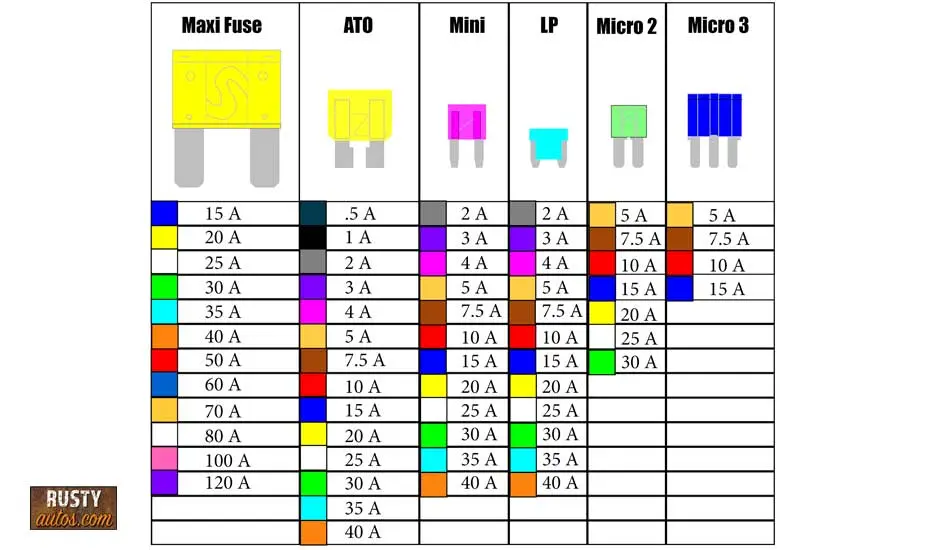
Fuses come in a few varieties and amp ratings; some are built into the cable itself, and when they blow, they require a new cable. It’s very important to use the correct fuse size and check your manual or fuse box cover.
Using a fuse that’s too big could lead to circuit damage or a fire. Using a fuse that’s too small will cause it to blow.
Reasons a starter fuse continuously blows include:
- Fuse too small
- Shorted circuit
- Failed starter motor
- Starter binding
- Engine mechanical failure
Faulty Relay


A relay contains two separate circuits: a Control side (controlled by the operator or ECU) and the Load side, a component that receives the power, in our case – the starter motor.
The relay is a type of switch that controls a high amperage (Load) circuit like our starter by turning on and off power to a separate low amperage circuit (Control).
In older cars, a typical solenoid relay has a control circuit that is powered by turning the ignition switch to the crank (start) position. This causes a winding within the relay to become magnetic, and by simple mechanics, it completes the starter motor circuit (Load side).

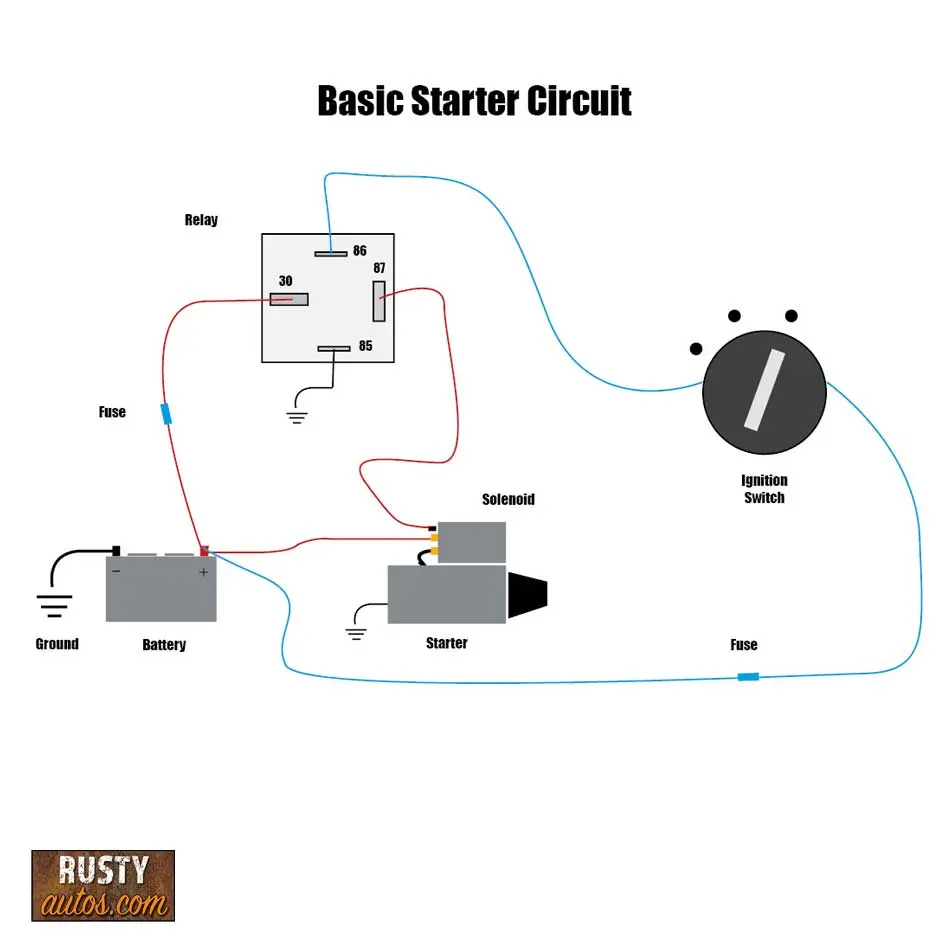
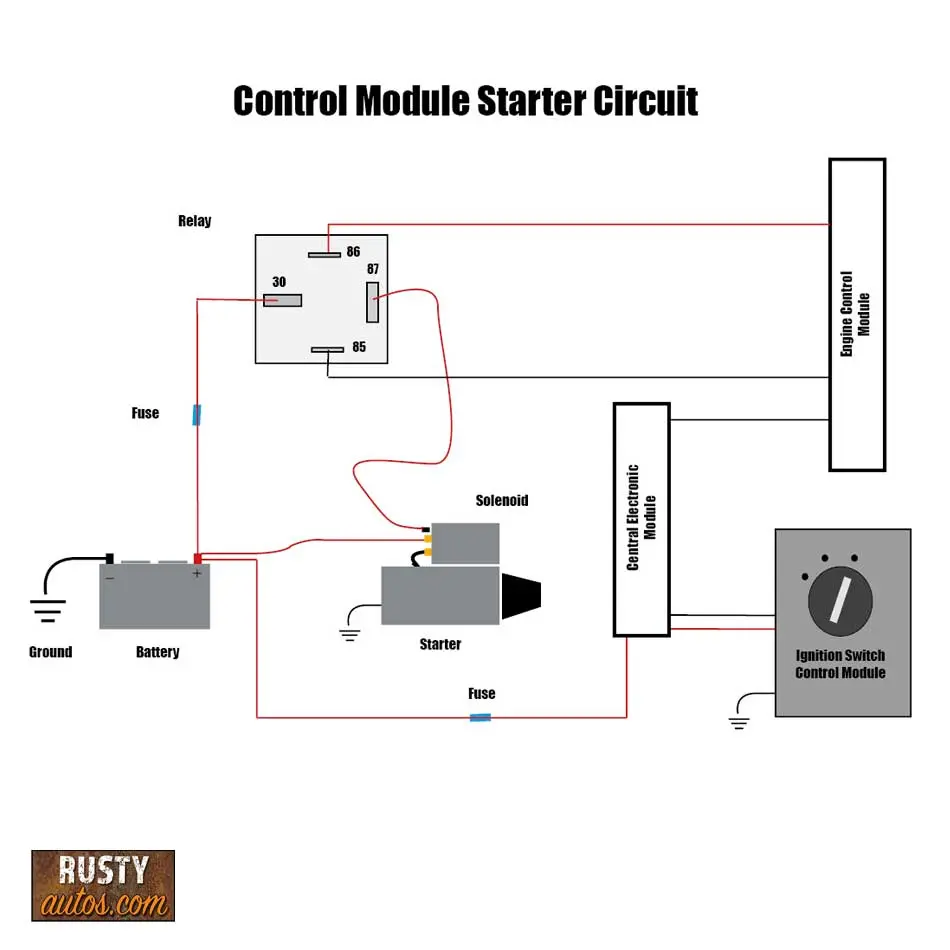
On late model cars, the ignition isn’t connected to the starter relay directly. Instead, the start command is sent to the engine control module, and it controls the relay.

Testing the relay

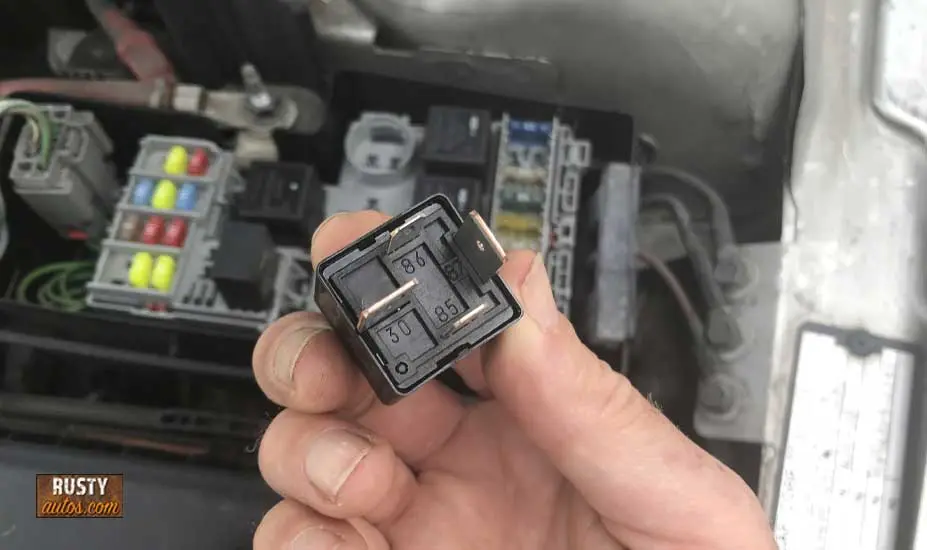
There are a few different ways to test a relay: pull the relay and shake it. If you hear a rattling sound, the armature has fallen off. Replacing the relay is the fix.
If you don’t hear the rattling sound, it doesn’t mean it’s a good relay, so the next test – pull another relay from a wiper or light circuit. If they have the same pinout, plug it in and try starting the engine.
With a Dvom, you can check continuity on the relay, but you’ll need a power probe to fire the relay or mock up some wiring.


Check For Faulty Starter Circuit
Before attempting any tests, apply the parking brake and place the manual transmission cars in neutral.
Loose wiring, rodents, vibration, corrosion, and heat can cause damage to a wiring circuit. I’ve seen lots of wiring faults. Some can only be described as one in a million.
Late-model cars run several control modules, all of which rely on precise voltage readings to communicate. Any variation outside this voltage window sets a check engine light.
Damaged wiring

Loose wiring has to be the most common cause of electrical problems. Vibration and rough terrain can cause connectors to come loose. Constant vibration can also cause the pins in the connectors to agitate and corrode; this creates two problems: corrosion between the pins and poor connection tension.
Mechanics know only too well that mice love auto-wiring insulation, and they can do quite a lot of damage when left to it. Suspect wiring damage if you see evidence in the form of droppings and nibbled soundproofing.
Chaffing (rubbing wiring harness) damage is another common failure. However, a chaffing wire usually gives intermittent problems before it finally lays down. Chaffing is common in the engine bay, where there’s lots of vibration.
Broken wires are usually found where a wiring harness changes direction sharply around an engine bay or along a chassis rail. Some wiring harnesses are famous for breaking. It is always worth checking known faults for your particular make and model.
Corrosion in the wiring and the connectors is worse in salt states, but a wet climate will obviously cause more wiring corrosion problems than a dry one. Wiring around or under the battery will often become corroded as the battery acid leaks, so check this area for damaged cables and connectors.
Checking the starter circuit
The car must be in Park with the parking brake on. To check your starter circuit, you’ll need a test light and some patience.
The starter circuit is really two separate circuits: the ignition side (Control) and the starter solenoid side (Load). The ignition circuit side controls the starter solenoid using the starter relay. We’ll now test each circuit separately.
Go ahead and remove the starter relay and identify the control circuit. A typical relay will have four pins (marked), two smaller pins for the ignition (85 & 86 Control) circuit, and two larger pins carry the higher amps to the starter motor solenoid (pins 30 & 87 Load side)
Starter side test
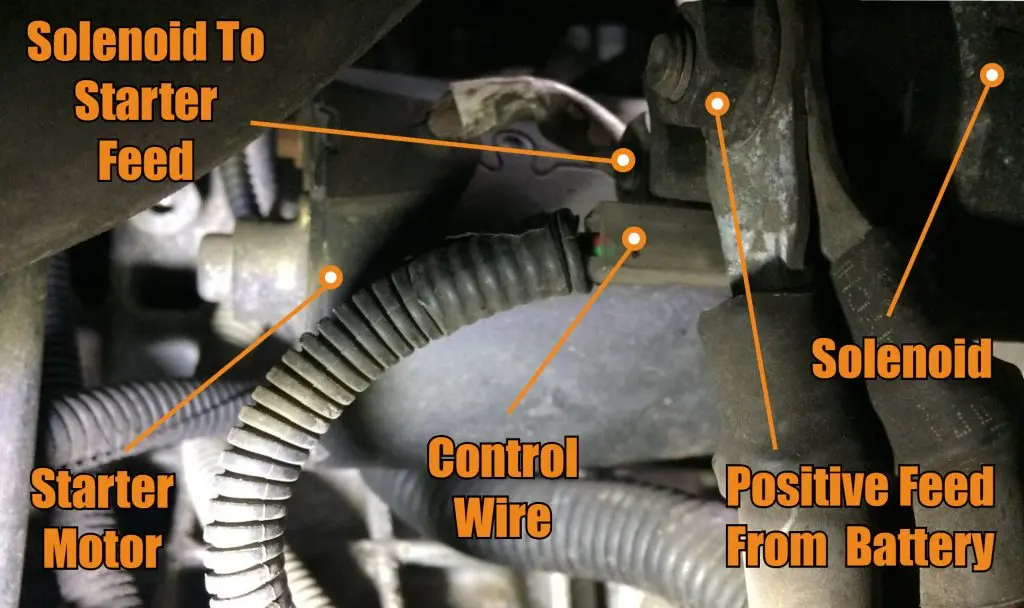
The car must be in Park with the parking brake on. In the second part of this test, we’ll hot wire the starter motor, bypassing the ignition switch circuit. If the engine cranks over, we know the relay board to solenoid wiring, solenoid, and starter motor are all good.

- Using your test light, verify power at Pin 30 of the relay board. This is the starter solenoid power source. No light indicates an open in the power supply, work back ways to the power source.


- Go ahead and move your crocodile clip to a power source; this will allow us to find ground. Probe relay board Pin number 87. No light indicates a bad ground; trace the wiring back to the ground source.
If both of these tests lit the test light, go ahead and hotwire the solenoid.
Hotwire starter motor solenoid
WARNING – Connecting the incorrect terminals will cause PCM damage. If you are in doubt about pin identification, do not proceed.
Using a suitable jumper wire, momentarily connect the pin connector 30 to the female Pin connector opposite, connector number 87. This is the starter load side and will send power directly to the starter solenoid.
WARNING – The engine may crank over – The car must be in Park with E-brake on.


At this point, the engine:
- Does not crank – Check the wiring from the fuse-box to the starter, if all OK, suspect a faulty starter.
- Does crank over – You’ve verified that the wiring to the starter and the starter motor are good. The problem may lay with the control circuit or the relay.
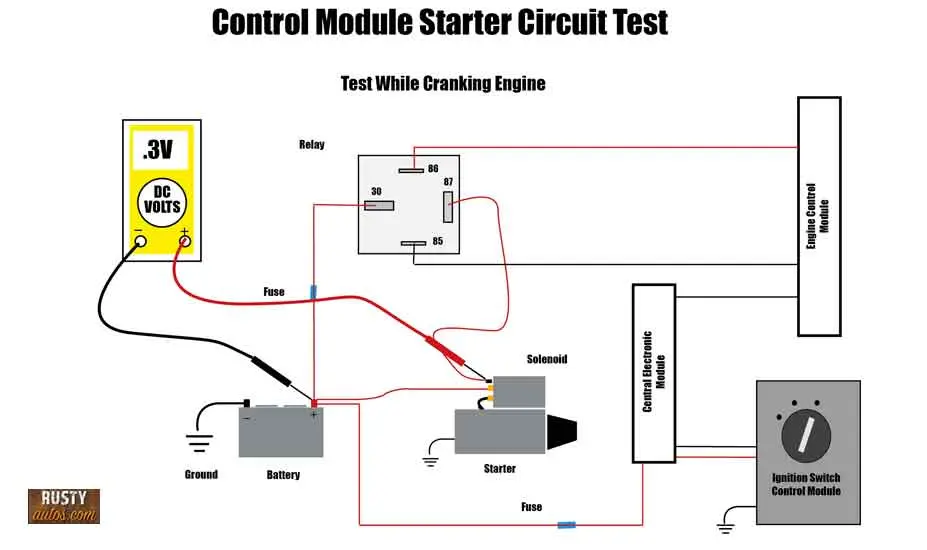
Ignition side test
This test will check the ignition side of the starter control, and that includes the ignition switch, start control module(s), all the wiring to the relay board and the relay board.
Late-model module-controlled cars run both a ground at pin 85 and power at pin 86, but only when cranked. Typically, this is open at all other times.
Let’s go ahead and check using just our test light ground and the power of the control side of the relay.


- With your test light crocodile clip grounded and the relay removed, probe the relay control female board pin 86 while a helper cranks the engine.
If you don’t have power, you’ll need to work backwards to the fuse-box supply, checking for broken or corroded wiring all the way back to the ECU.
As you know a circuit won’t work until it has a ground, so now we’ll check the ground side.

- Go ahead and move your crocodile clip to a power source, this will allow us check ground. Probe Pin connector number 85 while a helper cranks the engine.
If the test light doesn’t light expect to trace the ground back to the ECU, checking for breaks or corrosion.
Testing A Starter Motor
Starter motors have it tough, if you’ve ever tried turning over an engine by hand you’ll know what I mean. Problems with starters include sticking plunger, faulty solenoid, broken winding, worn bearings, worn brushes, worn starter drive gear.
Apply the parking brake and place manual transmission cars in neutral before attempting these tests.

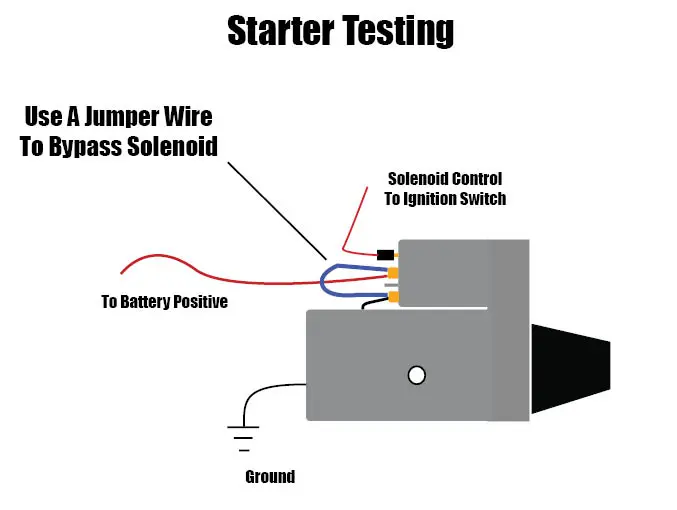
You can test the starter and solenoid by applying a 12-volt supply to the solenoid control wire. If the starter cranks over, go back and take another look at the starter wiring circuit.
If the starter doesn’t crank, go ahead and bypass the solenoid by jumping it using a jumper wire (blue wire). See diagram above.
This won’t test the solenoid, only the starter motor. But before attempting this test, it’s important as before to apply the parking brake and place manual transmission cars in neutral.
If the starter cranks, go ahead and replace the starter solenoid. Some manufacturers will sell you just the solenoid, and others will only supply a complete starter motor that includes the solenoid.
If the engine still won’t crank, get a suitable wrench or ratchet and socket, and try turning the engine over by hand just to be sure there isn’t a mechanical fault. If the engine turns over, go ahead and replace the starter motor.
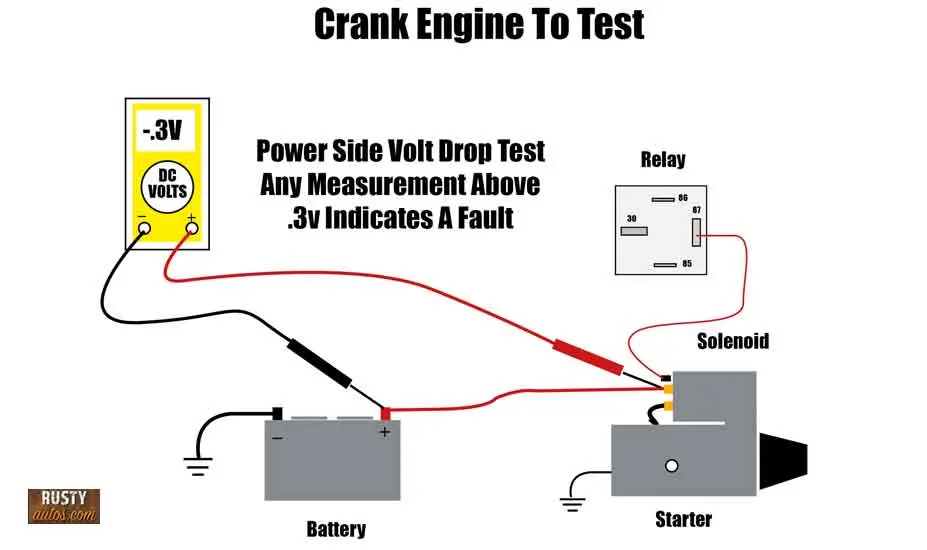
Volt Drop Testing
If you have a voltmeter to hand, try volt drop testing the starter motor power side, ground side, and also the solenoid control circuit. Volt drop testing measures a difference in voltage in a circuit. A large difference indicates a fault (high resistance) in that circuit.
Volt drop testing a circuit systematically is often the fastest way to find a fault; however, I understand access to the various components often prevents progress.
Volt drop testing will only be accurate when the circuit is live, so have a helper turn the key while you record your values. Note that modern car electronics put a huge drain on a car battery when the ignition is left on for extended periods.
Older cars 10-plus years old may show a higher reading on the power side of the starter circuit. More modern cars should read less. Around .3v is good.
Using a battery maintainer while testing is advised.


Related Questions
No dash lights when I turn the key? The most common cause of no dash lights is a completely discharged battery, other possible causes include:
- Battery wire disconnected
- Main fuse blown
- Main relay faulty
- Ignition switch faulty
New battery car won’t start just clicks? The new battery may need to be charged but other possible causes of the clicking sound include:
- Loose battery terminal
- Dirty battery terminal
- Broken battery cable
- Bad engine ground strap
- Faulty starter relay
- Faulty starter solenoid
- About the Author
- Latest Posts


John Cunningham is an Automotive Technician and writer on Rustyautos.com. He’s been a mechanic for over twenty-five years and has worked for GM, Volvo, Volkswagen, Land Rover, and Jaguar dealerships.
John uses his know-how and experience to write articles that help fellow gearheads with all aspects of vehicle ownership, including maintenance, repair, and troubleshooting.