
Ever smelled raw gasoline near your car, noticed a drop in fuel economy, or had your Check Engine Light come on unexpectedly? These could all be signs of a failing EVAP canister, a crucial component in your vehicle’s emissions system. While it may not seem as critical as your engine or transmission, a faulty EVAP canister can lead to increased emissions, poor performance, and even a failed emissions test.
The EVAP (Evaporative Emission Control) canister plays a key role in preventing fuel vapors from escaping into the atmosphere. It traps and stores excess vapors from the fuel tank, then sends them to the engine to be burned off. But when the canister fails—due to clogs, cracks, or valve malfunctions—it can cause a range of problems, from fuel odours and rough idling to difficulty refuelling and decreased efficiency.
Ignoring a bad EVAP canister can cost you, not just at the pump, but also in expensive repairs and failed emissions tests. In this guide, we’ll walk you through the 7 most common symptoms of a bad EVAP canister and show you how to diagnose and fix the problem before it leads to bigger issues. Let’s get started!
What Is an EVAP Canister and What Does It Do?
7 Symptoms of a Bad EVAP Canister
How to Diagnose a Bad EVAP Canister
How to Replace a Bad EVAP Canister
What Is an EVAP Canister and What Does It Do?
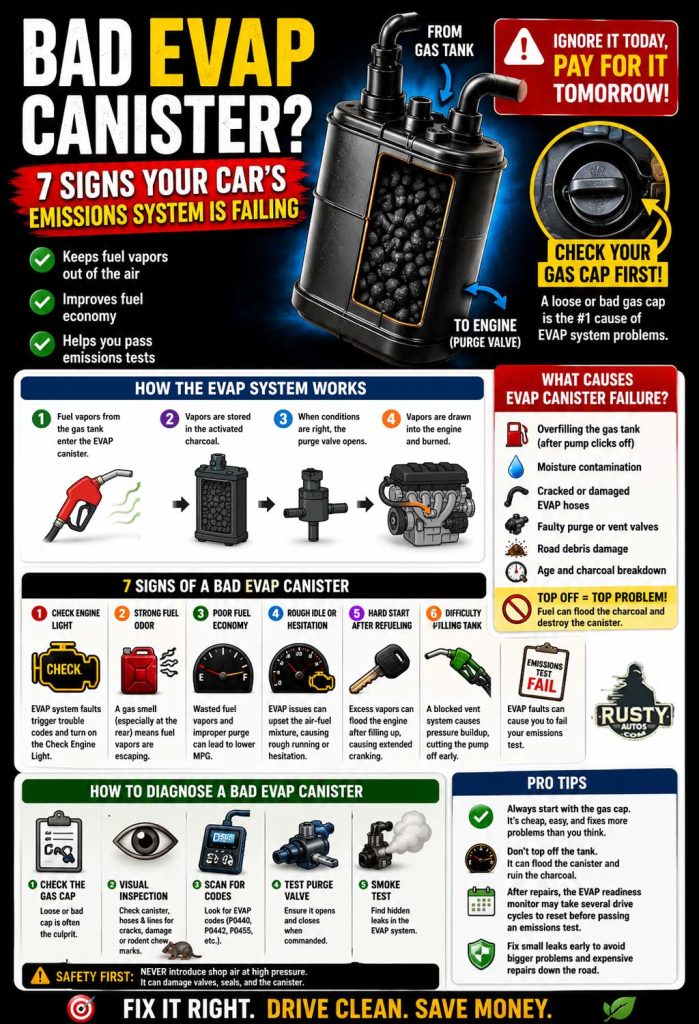
The EVAP (Evaporative Emission Control) canister is a key part of your car’s emissions system, designed to trap and store fuel vapors before they can escape into the atmosphere. Instead of allowing these vapors to vent freely from the fuel tank, the EVAP system redirects them into the engine, where they are burned as part of the combustion process. This helps reduce air pollution while improving fuel efficiency.
How Does the EVAP Canister Work?

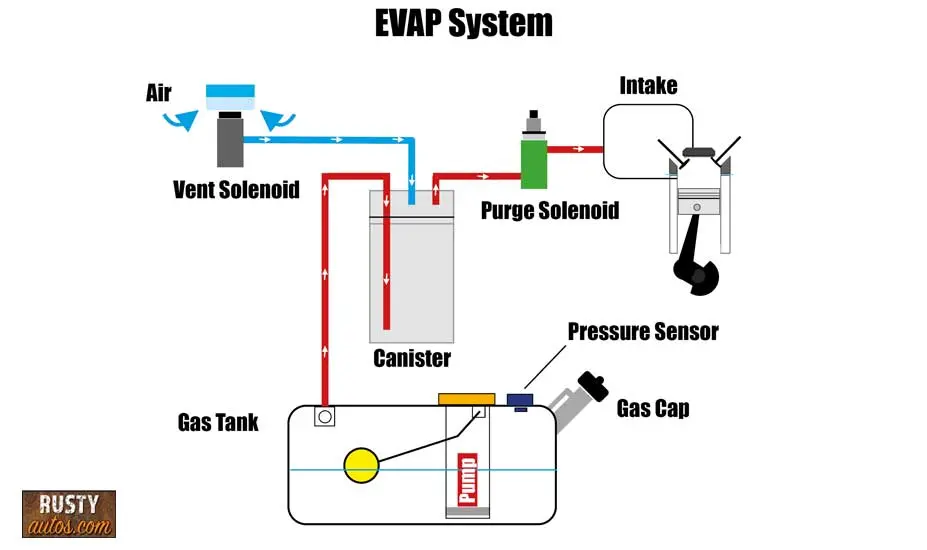
The EVAP canister is typically filled with activated charcoal, which absorbs and holds fuel vapors from the gas tank. These vapors remain stored until the engine is running and conditions are right for them to be purged into the intake manifold and burned. The process works as follows:
- Fuel vapors from the gas tank enter the EVAP canister and are stored in the charcoal bed.
- A purge valve opens, allowing the vapors to be drawn into the engine.
- The vapors are burned as part of the combustion process, reducing emissions and waste.
Where Is the EVAP Canister Located?
The location of the EVAP canister depends on your vehicle, but it is generally found:
- Near the fuel tank, often underneath the vehicle.
- In the engine bay, in some models.
- Integrated with other EVAP system components, such as the purge valve or vent solenoid.
Why Is the EVAP Canister Important?
A properly functioning EVAP canister helps:
- Reduce harmful emissions by preventing fuel vapors from escaping.
- Improve fuel economy by recycling vapors back into the engine.
- Prevent fuel odors that would otherwise escape from the gas tank.
- Ensure compliance with emissions laws to prevent fines or failed inspections.
When the EVAP canister fails, it can cause fuel system pressure issues, performance problems, and a check engine light.
What Causes an EVAP Canister to Fail?
The EVAP canister is designed to last many years, but several common issues can cause it to fail prematurely.
The most common causes include:
- Overfilling the gas tank after the pump clicks off
- Moisture contamination
- Cracked EVAP hoses
- Road debris damage
- Faulty purge or vent valves
- Age-related charcoal breakdown
One of the biggest EVAP canister killers is repeatedly topping off the fuel tank after the gas pump automatically shuts off.
When this happens, raw fuel can enter the charcoal canister and saturate the charcoal inside.
Once fuel contaminates the charcoal bed, the canister can no longer store vapors properly and usually needs replacement.
Simple rule — when the gas pump clicks off, stop filling.
7 Symptoms of a Bad EVAP Canister
A failing EVAP canister can cause a variety of issues, ranging from fuel odors and poor fuel economy to check engine lights and trouble filling up at the gas station. Since the EVAP system is designed to keep harmful fuel vapors from escaping, any malfunction can lead to emissions problems, performance issues, and even failed inspections.
Here are the most common signs that your EVAP canister is failing.
1. Check Engine Light (CEL) Comes On
One of the most common symptoms of a bad EVAP canister is an illuminated check engine light. Since the EVAP system is monitored by the engine control module (ECM), any malfunction—such as a clogged canister, faulty purge valve, or vapor leak—can trigger a trouble code.
Common EVAP-related trouble codes include:
- P0440 – EVAP System Malfunction
- P0441 – Incorrect Purge Flow
- P0442 – Small EVAP Leak Detected
- P0455 – Large EVAP Leak Detected
- P0456 – Very Small EVAP Leak Detected
- P0449 – Vent Valve/Solenoid Malfunction
Before replacing any EVAP components, always check the gas cap first.
A loose, damaged, or poorly sealing gas cap is one of the most common causes of EVAP system trouble codes and fuel vapor leaks.
Inspect the rubber seal for cracks, flattening, or damage, and make sure the cap clicks securely when tightened.
A bad gas cap can trigger the exact same warning lights and fault codes as a failing EVAP component.
If your Check Engine Light is on, scanning for trouble codes with an OBD2 scanner can help confirm whether the EVAP canister or another component is the issue.
2. Strong Fuel Odor Around the Vehicle
A functioning EVAP system prevents fuel vapors from escaping, so a strong gas smell around your car—especially near the rear of the vehicle—could indicate a problem. This may be caused by:
- A cracked or leaking EVAP canister.
- A clogged purge valve, preventing vapors from being sent to the engine.
- Excess fuel saturation, causing vapors to leak from the system.
If you smell raw fuel near the gas cap or under the car, it’s important to inspect the EVAP system to prevent excessive emissions and potential safety hazards.
3. Poor Fuel Economy
A failing EVAP canister or purge valve can sometimes affect fuel economy by disrupting fuel vapor management and upsetting the air-fuel mixture.
The MPG loss is usually small at first, but may worsen if other EVAP components begin to fail as well. Instead of being routed back into the engine for combustion, vapors may escape or fail to be purged properly, leading to wasted fuel and decreased miles per gallon (MPG).
If you’ve noticed a drop in fuel economy without any other apparent issues, a faulty EVAP canister, purge valve, or vent solenoid could be to blame.
4. Rough Idle or Engine Hesitation
When the EVAP system isn’t functioning properly, it can create an imbalance in the air-fuel mixture, leading to:
- Rough idling, where the engine struggles to stay running.
- Hesitation or stumbling during acceleration.
- Inconsistent RPMs, especially when idling or coming to a stop.
This happens when a clogged or malfunctioning EVAP canister prevents the proper flow of vapors into the engine, disrupting combustion.
5. Hard Starting After Refueling
A faulty EVAP purge valve or saturated charcoal canister can allow excessive fuel vapors into the engine after refueling.
This can temporarily flood the engine and cause:
- Extended cranking
- Rough starting
- Stumbling immediately after filling the tank
- Brief rough idle after refueling
If your car struggles to start mainly after filling the gas tank, the EVAP system deserves close inspection.
NOTE:
You’ll need to renumber the remaining symptom headings after adding this section.
6. Difficulty Filling the Gas Tank
A faulty EVAP canister can cause pressure issues in the fuel system, making it difficult to fill the gas tank. If you experience:
- Gas pump shutting off repeatedly while refueling.
- Slow refueling, even with a nearly empty tank.
- Excessive pressure build-up when removing the gas cap.
This could mean that the venting system within the EVAP canister is clogged, preventing proper airflow and causing refueling difficulties.
7. Failed Emissions Test
Since the EVAP system is designed to reduce emissions, a failing EVAP canister can cause your car to fail an emissions test due to:
- Excess fuel vapor leaks detected during inspection.
- Stored EVAP system trouble codes triggering an automatic fail.
- Incomplete purge cycles, leading to unburned vapors being released.
If your vehicle recently failed an emissions test, inspecting the EVAP system—including the canister, purge valve, and vent solenoid—should be a priority. Even after repairing the EVAP system, the EVAP readiness monitor may require several drive cycles to reset before the vehicle will pass an emissions inspection.
8. Hissing Sounds or Pressure Build-Up
In some cases, a bad EVAP canister can lead to abnormal pressure build-up in the fuel system. Symptoms may include:
- A hissing sound when opening the gas cap.
- Excess vacuum or pressure inside the fuel tank.
- Difficulty removing the gas cap due to excessive suction.
These issues often point to a ventilation problem, where the EVAP canister fails to regulate fuel vapor pressure properly.
How to Diagnose a Bad EVAP Canister
Diagnosing a failing EVAP canister requires checking for trouble codes, inspecting for leaks or cracks, and testing related components like the purge valve and vent solenoid. Since the EVAP system is sealed, issues with the canister can trigger a Check Engine Light, cause fuel vapor leaks, or lead to pressure buildup in the fuel system. Follow these steps to confirm if your EVAP canister is the problem.
Step 1: Scan for Trouble Codes (OBD2 Scanner Method)
Since the EVAP system is monitored by the engine control module (ECM), any malfunction in the canister or related components will usually trigger a Check Engine Light (CEL).
How to Scan for EVAP System Codes
- Plug an OBD2 scanner into the vehicle’s diagnostic port (under the dashboard).
- Turn the ignition to the ON position (without starting the engine).
- Scan for stored trouble codes.
Common EVAP-Related Trouble Codes
- P0440 – EVAP System Malfunction
- P0441 – Incorrect Purge Flow
- P0442 – Small EVAP Leak Detected
- P0455 – Large EVAP Leak Detected
- P0456 – Very Small EVAP Leak Detected
- P0449 – Vent Valve/Solenoid Malfunction
If your scan tool detects any of these codes, the EVAP canister or related components may be failing.
Step 2: Perform a Visual Inspection of the EVAP Canister
A damaged or clogged EVAP canister can lead to fuel vapor leaks, affecting the overall emissions system.
How to Inspect the Canister
- Locate the EVAP canister (usually near the fuel tank or in the engine bay).
- Look for visible cracks, physical damage, or leaks—fuel vapor leaks can cause a strong gas smell.
- Check for excessive dirt or debris clogging the canister, as this can prevent proper vapor storage and release.
- Inspect the hoses carefully for rodent damage or chew marks, especially if the vehicle sits unused for long periods. Modern engine bays and underbody wiring are surprisingly attractive to rodents.
If the canister is cracked or heavily contaminated, it needs to be replaced.
Step 3: Test the Purge Valve for Proper Function
The EVAP purge valve allows stored fuel vapors from the canister to enter the engine for combustion. If it’s stuck open or closed, it can lead to fuel smells, rough idling, and pressure buildup.
How to Test the Purge Valve
- Disconnect the purge valve electrical connector and hoses.
- Blow air through the valve.
- If air flows freely when the valve is disconnected, it’s stuck open (bad).
- If air does not pass through when activated with 12V, it’s stuck closed (bad).
- Use a multimeter to check for electrical resistance (should match manufacturer specs).
If the purge valve is faulty, replacing it may solve the problem without needing to replace the EVAP canister.
Check out “Is your Purge Valve Failing?”
Step 4: Check the Vent Solenoid for Proper Function
The EVAP vent solenoid allows fresh air into the canister to help purge fuel vapors. If it’s stuck closed, it can cause pressure buildup, difficulty filling the gas tank, and vacuum leaks.
How to Test the Vent Solenoid
- Disconnect the solenoid’s electrical connector and hoses.
- Use a 12V power source to activate the solenoid.
- Check if the solenoid opens and closes properly.
If the vent solenoid is stuck, it can cause similar symptoms to a bad EVAP canister and should be replaced.
In some cases, dirt, mud, road debris, or even insects can block EVAP vent lines and create pressure or refueling problems.
I’ve seen vehicles trigger EVAP fault codes simply because the vent line was partially blocked with debris.
Step 5: Perform a Smoke Test for EVAP Leaks
A smoke test is one of the most effective ways to detect leaks in the EVAP system, including cracks in the canister, loose hoses, or a failing purge/vent valve.
How to Perform a Smoke Test
- Use an EVAP smoke machine (or have a shop perform the test).
- Inject smoke into the EVAP system via the purge line or test port.
- Look for smoke escaping from hoses, valves, or the canister.
If smoke leaks from the canister, it is cracked or leaking and must be replaced.
Never introduce shop air directly into the EVAP system at high pressure.
Too much pressure can damage EVAP valves, seals, and even the charcoal canister itself.
Professional smoke machines regulate pressure very carefully for this reason.
Step 6: Test for Excess Pressure in the Fuel Tank
A failing EVAP canister can cause abnormal pressure buildup in the fuel system, making it difficult to remove the gas cap or fill the tank.
How to Check for Fuel System Pressure Issues
- Turn the ignition off and remove the gas cap.
- Listen for a loud hiss when removing the cap. A small hiss is normal, but a strong vacuum release may indicate a venting issue.
- Attempt to fill the gas tank. If the fuel pump nozzle clicks off repeatedly, the venting system (or EVAP canister) may be clogged.
If your car has refuelling difficulties or excessive pressure buildup, the EVAP system is likely failing.
How to Replace a Bad EVAP Canister
Replacing a faulty EVAP (Evaporative Emission Control) canister is a relatively simple job for most DIY mechanics. The process varies slightly by vehicle, but in most cases, the canister is located near the fuel tank or rear of the vehicle, making access straightforward.
A failing EVAP canister can cause fuel odors, check engine lights, poor fuel economy, and failed emissions tests, so replacing it as soon as symptoms appear can prevent further problems.
Tools and Parts Needed
- Replacement EVAP canister (OEM or high-quality aftermarket)
- Socket set and ratchet
- Wrench set
- Flathead screwdriver
- Jack and jack stands (if necessary for under-vehicle access)
- Penetrating oil (WD-40) (for rusted bolts or fittings)
- Work gloves and safety glasses
Step-by-Step Guide to Replacing an EVAP Canister
Step 1: Locate the EVAP Canister
- The EVAP canister is typically found near the fuel tank, under the rear of the vehicle.
- On some vehicles, it may be inside the engine bay or mounted along the frame.
- Check your owner’s manual or a repair guide for the exact location in your vehicle.
Step 2: Lift the Vehicle (If Necessary)
- If the EVAP canister is mounted under the car, use a jack and jack stands to safely raise the vehicle for easier access.
Step 3: Remove the Electrical Connector and Hoses
- Locate the wiring connector and vacuum hoses attached to the EVAP canister.
- Unplug the electrical connector by pressing the release tab and pulling gently.
- Disconnect the vacuum hoses—some may have quick-connect fittings, while others may require a screwdriver or pliers to loosen clamps.
- Label or take a picture of the hose connections to ensure proper reinstallation.
Step 4: Compare the Old and New Canister
- Before removing the replacement canister, compare it to the old one to ensure it matches in size, shape, and connection points.
Step 5: Remove the Mounting Bolts or Brackets
- The EVAP canister is usually secured by bolts or metal brackets.
- Use a socket and ratchet to remove the bolts. If they are rusted or difficult to remove, spray them with penetrating oil (WD-40) and let it sit for a few minutes before trying again.
- Once the bolts are removed, carefully lower the canister from its mounting location.
Step 6: Install the New EVAP Canister
- Position the new canister in place and align it with the mounting holes.
- Secure it with bolts or brackets, tightening them to manufacturer specifications.
Step 7: Reconnect Hoses and Electrical Connector
- Reconnect the vacuum hoses in their original positions, ensuring they are secure and properly clamped.
- Plug in the electrical connector, making sure it clicks into place.
Step 8: Lower the Vehicle and Reconnect the Battery
- If the vehicle was lifted, carefully lower it back to the ground.
- Reconnect the negative battery terminal.
Step 9: Test the Repair
- Turn the ignition to ON (without starting the engine) and listen for any unusual sounds from the EVAP system.
- Start the engine and let it idle for a few minutes to ensure smooth operation.
- Drive the car for 10–15 minutes to allow the ECM to monitor the EVAP system.
Step 10: Clear Any Trouble Codes (If Applicable)
If the light comes back on after replacement, double-check the hose connections and wiring.
If the Check Engine Light was triggered by a bad EVAP canister, use an OBD2 scanner to clear any stored EVAP system trouble codes. As said earlier, even after repairing the EVAP system, the EVAP readiness monitor may require several drive cycles to reset before the vehicle will pass an emissions inspection.
You may find the following pages helpful:
Would You Know What To Do?
If your engine warning light came on tonight, would you know to keep driving, pull over, or call for recovery?
Most drivers wouldn’t.
That’s exactly why I wrote this guide.

- About the Author
- Latest Posts


John Cunningham is an Automotive Technician and writer on Rustyautos.com. He’s been a mechanic for over twenty-five years and has worked for GM, Volvo, Volkswagen, Land Rover, and Jaguar dealerships.
John uses his know-how and experience to write articles that help fellow gearheads with all aspects of vehicle ownership, including maintenance, repair, and troubleshooting.